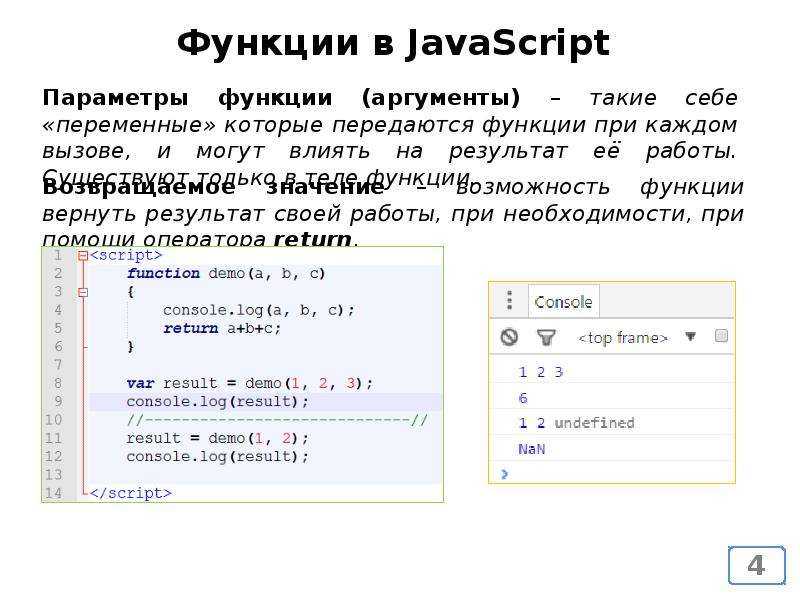
Test your click tracking in Google Analytics 4
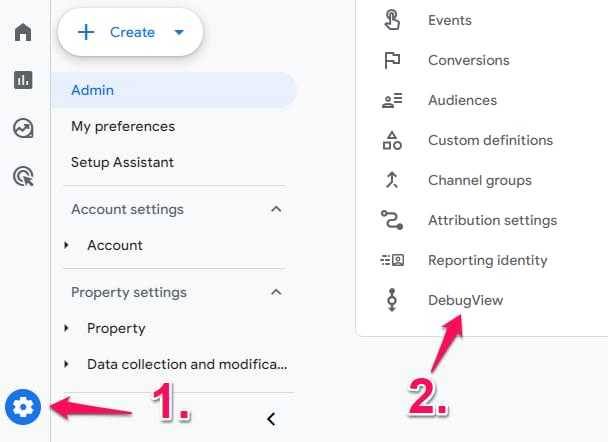
Once you configure your custom events, it’s time to test them. The primary feature built for debugging GA4 data is the DebugView section. You can find it by going to Admin > DebugView.
That’s the place where your debugging should take place. Do not mix this with the GTM Preview and Debug mode. They are two different beasts.
To enable the debug mode in GA4, you have several options (any of them will work):
- Enable the GA debugger Chrome extension
- Send a debug_mode parameter together with an event
- Have enabled Google Tag Manager’s Preview mode on a page that you’re debugging
But since we are working with Google Tag Manager, having the GTM Preview mode enabled automatically enables the debug_mode, thus the data will start appearing in the GA4 DebugView.
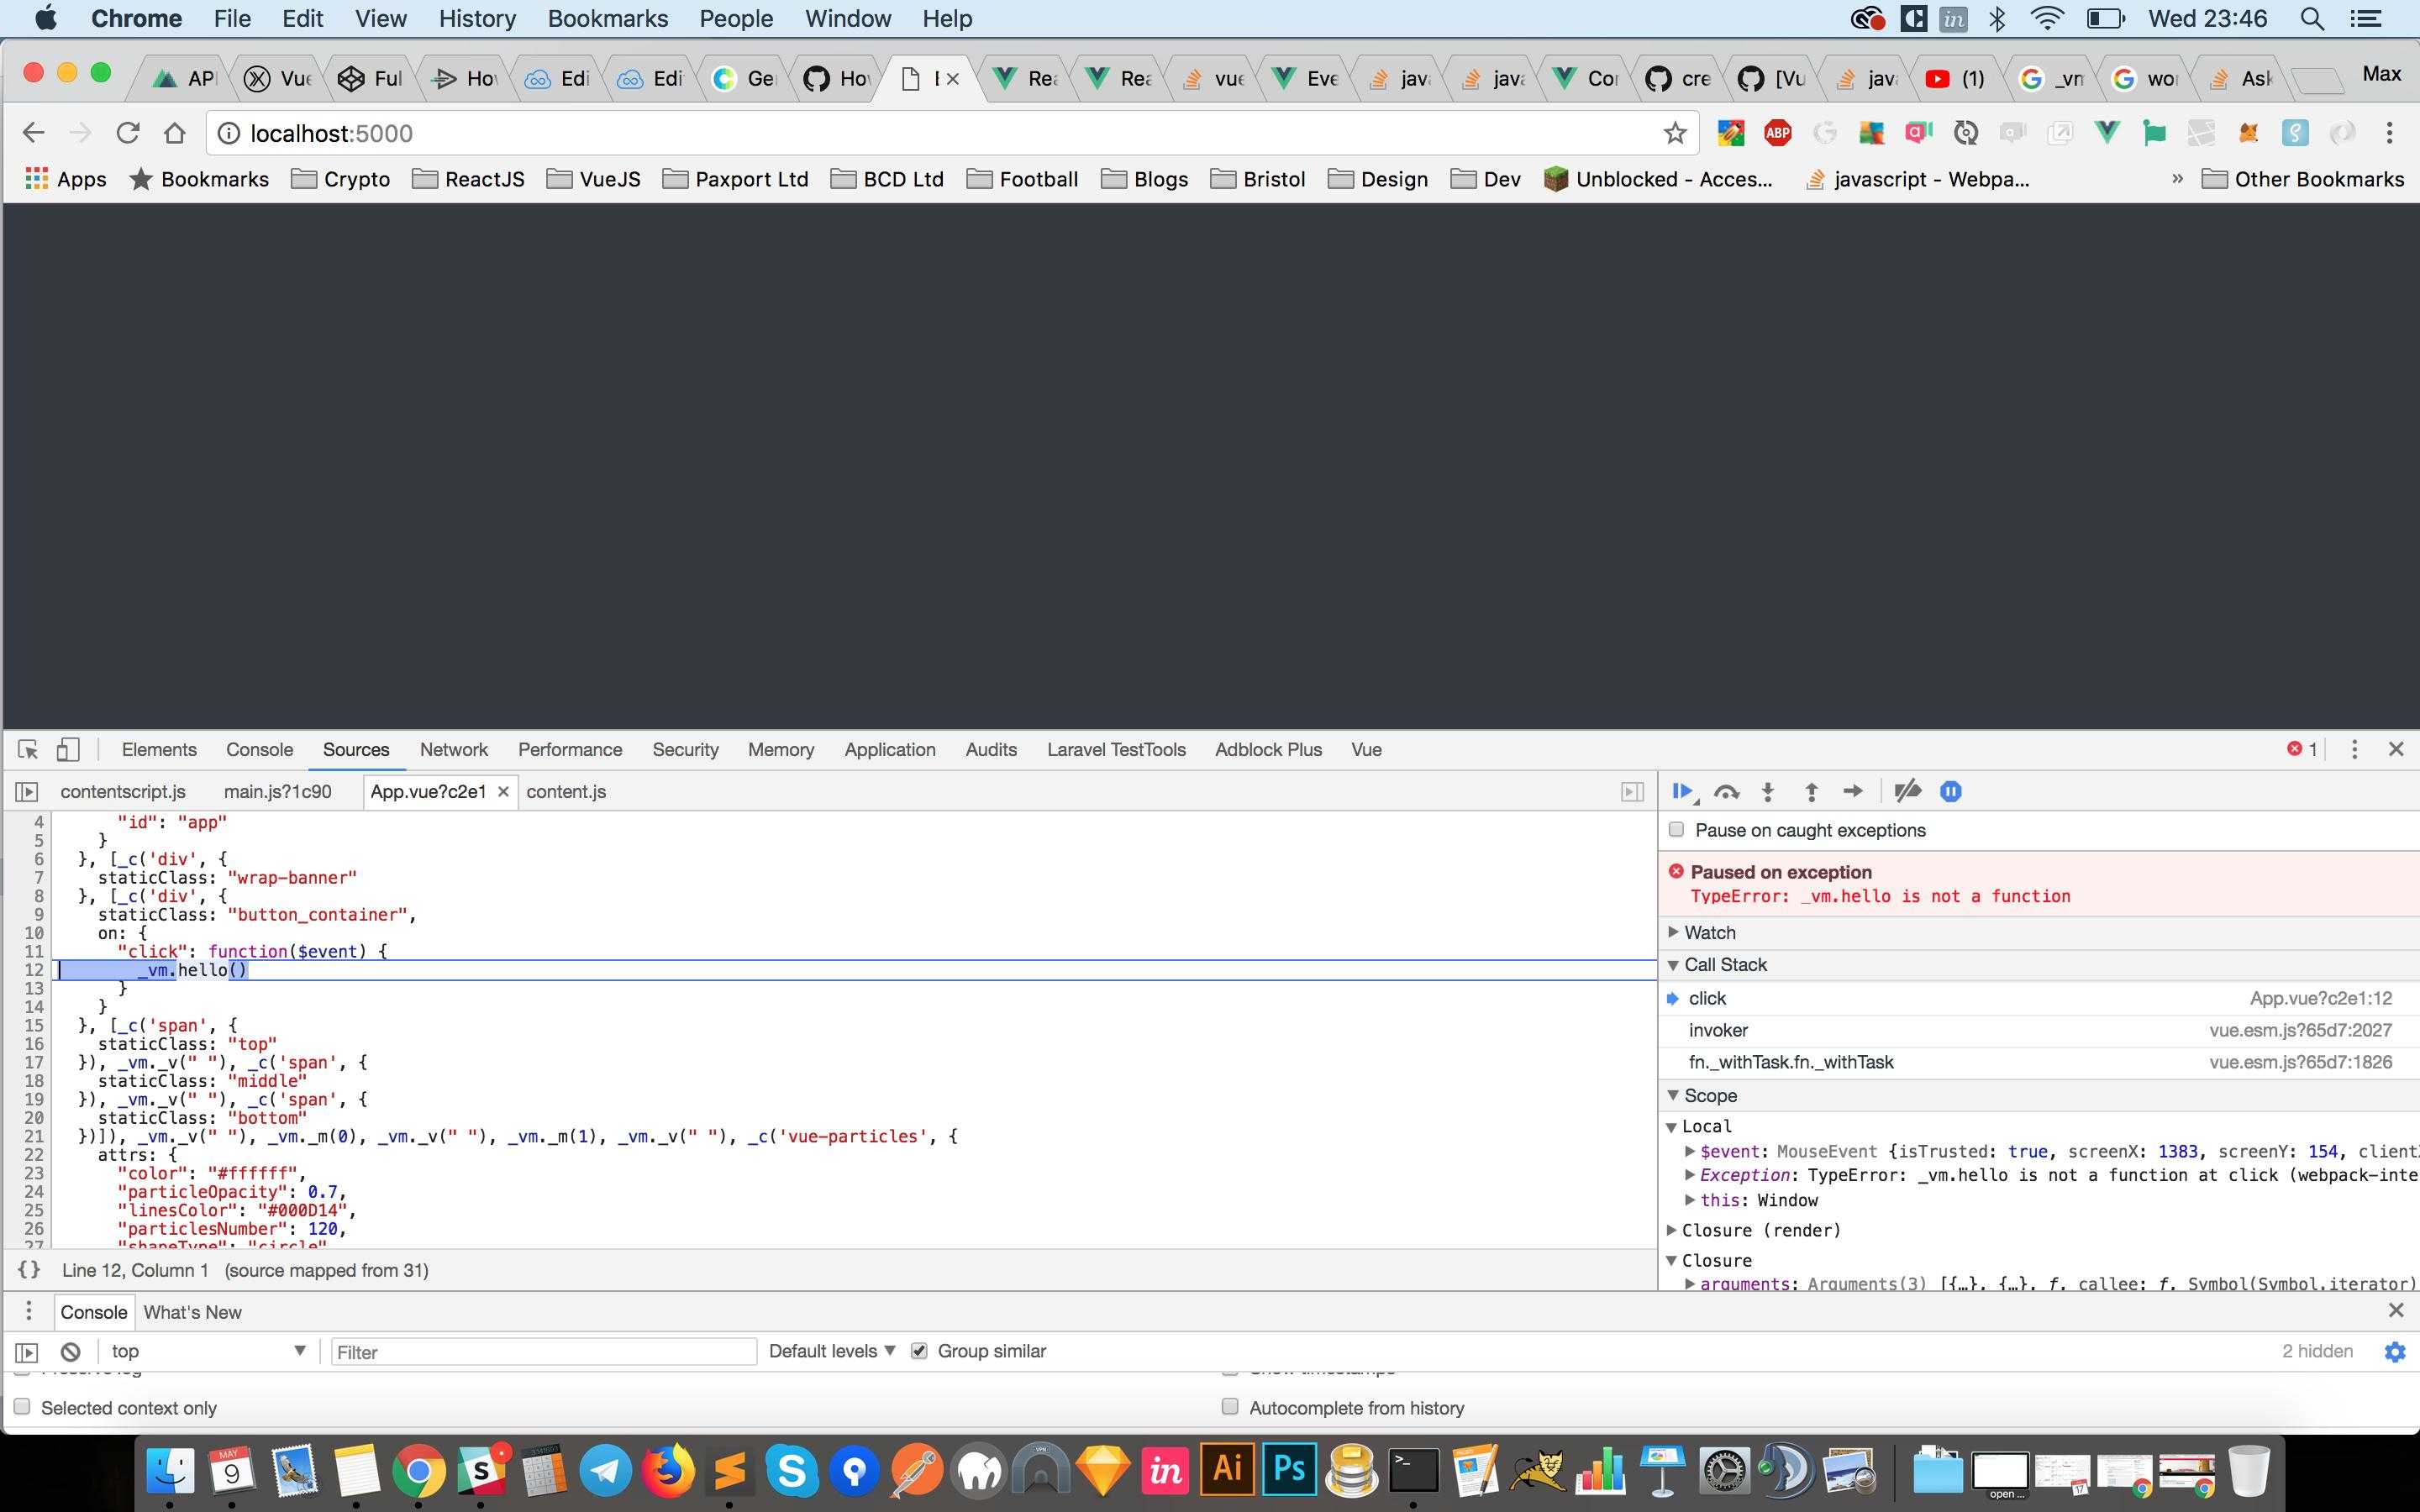
When you start seeing data in the DebugView, you can click on every individual event, and then a list of parameters will be displayed.
Click on that parameter to see the value that was received by GA4. Now that is some granular debugging!

Also, make sure that you have selected the correct Debug device in the top left corner.
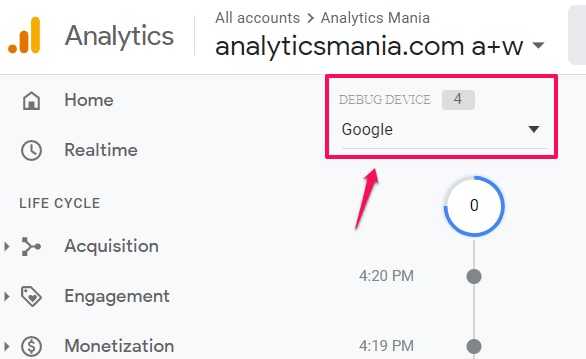
If multiple visitors have enabled the debug view (e.g., they all have enabled the Chrome extension), you will see multiple devices there, and it might require some time to find yourself.
Anyway, once you start seeing data in DebugView, things will look like this.

Events are marked with blue icons, conversions with green. In your case, the menu_click event will be blue (not green).
IMPORTANT: Please ignore the fact that I treat menu_click events as conversions. This is just for demonstration purposes.
If you click the event, you will see the parameters that were sent together with an event. Click on the parameter to see its value.
Once you have made sure that the data is coming in and displayed properly, you should submit your GA4 changes in the GTM container and publish it.
You can do that by clicking the SUBMIT button in the top right corner and then completing all the other steps that the user interface asks you to do.
After that, you should soon start seeing the new data in your real-time reports.
Интерфейс
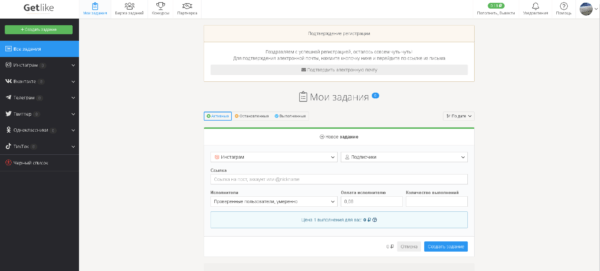
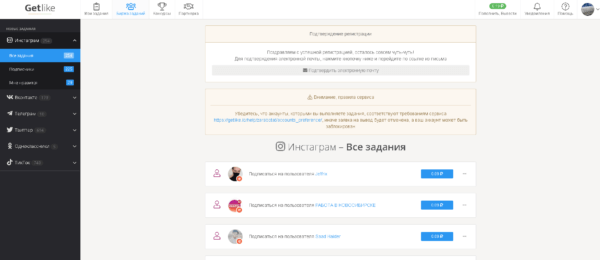
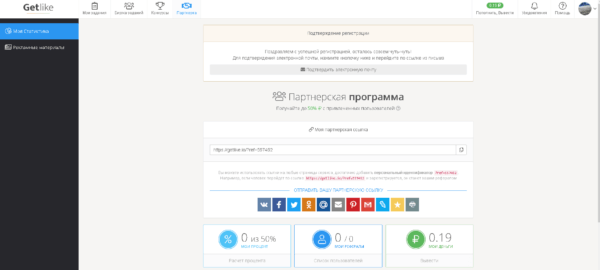
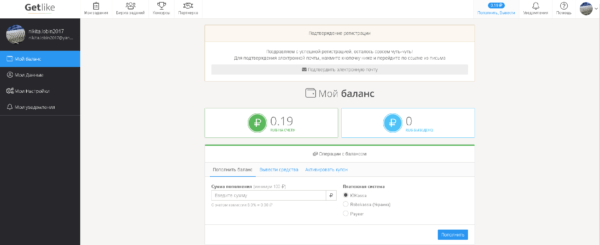
Успешно прошли регистрацию? Тогда переходим к разбору личного кабинета GetLike. Состоит он из нескольких частей. Каждую часть мы будем разбирать отдельно.
Личный кабинет
Интерфейс сервиса ГетЛайк очень простой. С ним разберется даже новичок. В этом разделе я постараюсь вкратце рассказать о всех разделах сайта. Начнем их разбор по очереди:
В разделе «Мои задания» мы займемся накруткой (прокачкой) своих аккаунтов, через добавление заданий.
В разделе «Биржа заданий» мы займемся заработком, через выполнение аналогичных заданий (заданий от других пользователей).
В разделе «Конкурсы» проводятся розыгрыши, в которых можно выиграть различные призы.

Партнерская программа. Через нее мы можем приглашать друзей на сервис ( при помощи ссылки). От этого мы будем получать до 50% от суммы, заработанной вашими рефералами (реферал — это человек, который пришел на сервис, по приглашению друзей, через реферальную ссылку).
В разделе баланса, мы можем посмотреть наличие денег на сервисе, пополнить баланс и вывести деньги.
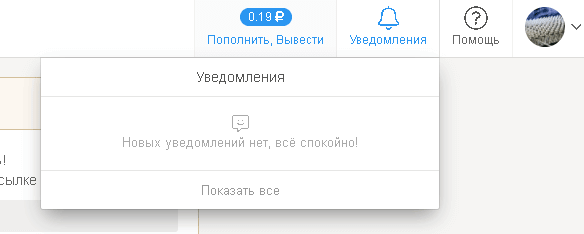
Через уведомления мы будем получать сообщения.
В разделе помощи мы можем найти ответы, на интересующие нас вопросы.
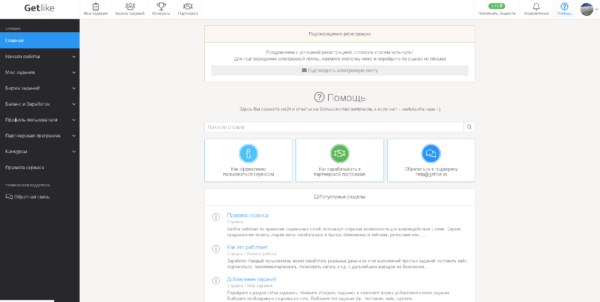
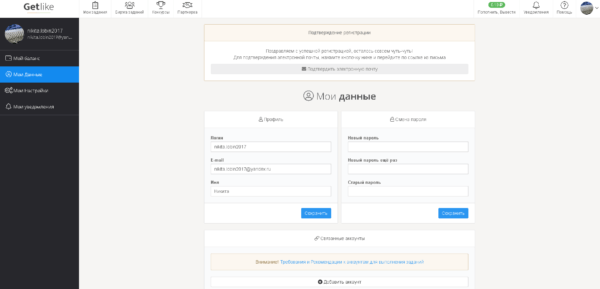
В разделе профиля, мы можем настроить свой аккаунт на сервисе (об этом поговорим далее).
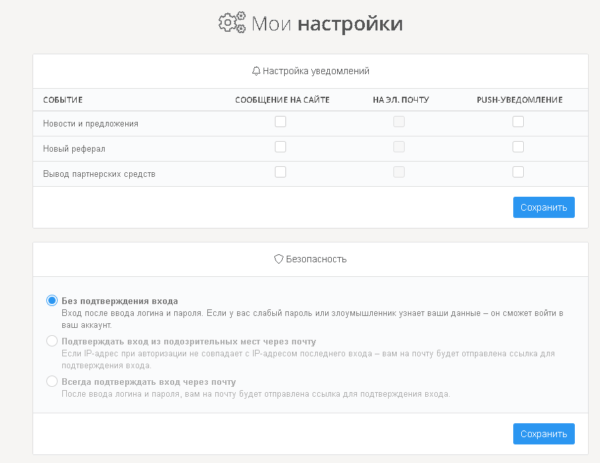
Раздел «Настройки»
Для настроек нам нужно нажать на правый, верхний угол. Там находится раздел с нашим профилем. Далее нажимаем на «Мои настройки».

Настройки делятся на 2 вида:
- Настройки уведомлений. При помощи этих настроек, мы можем выбрать куда и какие типы сообщений будут отправляться. Для этого нам нужно отметить галочкой в нужном квадрате и нажать кнопку сохранения.
- Настройки безопасности. Позволяют защитить наш аккаунт от взломов и кражей. Для этого просто выберите тип безопасности и нажмите кнопку сохранения.
How to get the Class of a clicked element using jQuery
There are two different methods that we can use:
- Using the jQuery property
- Using the function
1. Using the .className jQuery property
The .className property should be used together with either or the property.
Using the .className in combination with the event.target property on any HTML element on the page.
The above jQuery code will be triggered on clicking on any element within the page. On clicking an element (eg heading, paragraph, or button) its class is alerted. You can as well assign it to a variable or do a certain task based on the value of the class.
It is okay to use a different value in the function(event) instead of «event». If you do so, then you should use that value to replace the «event» within event.target.className. Eg, if you use function(xyz), you should as well use xyz.target.className to get the class name.
In the above code, if you click on an element but it happens not to have a class value, it will still show the alert box, but without a value for the class.
Using the .className in combination with this property for a specific type of HTML element on the page.

In order to execute the jQuery code to get the class name only if an element of a specific type is clicked, then you must change the line in the above code to , where «elementName» specifies the name of the element eg h1, h2, button, p, etc. In the case of this example where we substitute «event.target» with «this», you won’t need to have «event» (or anything) inside the function().
In the above code, an alert box is shown with the class name only when a button is clicked. Each button having a unique class, clicking on each will show an alert box with the unique class for that button.
2. Using the attr() function
The function is used to get the value of the specified attribute (eg. class, id, href, etc) in the clicked element. To get the class value, we use «this» property with the attr() function, where we pass «class» to the function.
This refers to the clicked element. Unlike in example the above, we use «this» as because attr() is a function unlike className above.
Smmyt.ru
Как работает Smmyt
YouTube, Instagram, ВКонтакте, — наиболее популярные в России социальные сети, в которых вы можете начать продвижение, накручивая действия пользователей. Услуги предоставляются оптом и в розницу, при больших объемах заказа скидка до 80%. Задание выполняется сразу после оплаты клиентом, срок сдачи отчета до суток, зависит от общего объема действий.
Предоставляемые услуги
- Поставить лайк или дизлайк фотографии, посту, видеоролику, стриму, комментарию;
- Приглашение пользователей в группу;
- Предложение подружится;
- Добавление видеоролика в избранное;
- Репост;
- Комментирование;
- Вывод в ТОП.
Накрутку осуществляют реальные юзеры и боты, зависит от выбранного тарифного плана. В случае обнаружения подписок от ботов можете потребовать замену действий, если выбрали накрутку живыми пользователями.
Тарифы
Минимальный заказ 100 единиц, стоимость указана для одного действия.Поставить лайк обойдется в 15-45 копеек для Instagram и ВКонтакте, 90 копеек в YouTube. Подписчики продаются по 0,45 – 3,5 рубля, дороже всего обходятся для канала на видеохостинге. Вывод в ТОП одного видеоролика стоит 20-35 рублей в зависимости от того, кем осуществляется накрутка: ботами или людьми.
Просмотры видео – 15 копеек, комментарии на канале 8 рублей за штуку, репост 1,1 рубль, дизлайки по рублю.
Стоимость услуг приведена для тарифа «Старт». Если вы хотите получить гарантию от отписок или поручить выполнение задачи исключительно живым людям, выберите «Стандарт», цена действия увеличится на 50%. Для тех, кто не жалеет деньги на продвижение аккаунта, есть тариф «Премиум», в котором заказ будет стоить на 60% дороже.
- Оплата принимается в рублях с электронных кошельков QIWI, Яндекс Деньги, WebMoney;
- Банковских карт;
- Счёта в Сбербанке, мобильного устройства, обслуживающегося у российских операторов сотовой связи.
Вы можете отдать свой аккаунт на раскрутку специалистам сервиса, комплексное продвижение будет осуществлено в кратчайшие сроки. Стоимость услуг зависит от тематики вашего бизнеса, бюджета, установленного ежемесячного минимума по привлечению покупателей.
Как начать продвижение с Smmyt
Создайте новую учетную запись или приступить сразу к выбору услуги
Обратите внимание, перед началом заказа ваш профиль в социальной сети должен быть открыт
Назначьте количество действий кратное 100 единицам, кликните на кнопку заказа. Следуйте инструкциям платежной системы, которую вы сможете выбрать в следующем шаге. После поступления оплаты на счет компании в течение 5-10 минут начнется выполнения заказа. Все прошлые и текущие задания отображаются в вашем личном кабинете. В проекте периодически проходят акции с распродажами услуг, в такие дни при оптовом заказе от 2 000 до 10 000 действий стоят в 2 раза дешевле.
Реферальная программа
Используйте возможность заработать денежные средства на оплату заказа, приглашая новых клиентов. Администрация выплачивает 15% от стоимости заказа вашего реферала. На первом этапе будете получать только 7%, приведите более 50 клиентов за месяц, чтобы заработать максимальные комиссионные. Для привлечения можно использовать социальные сети, видеохостинги, почтовую рассылку. Для активации программы создайте учетную запись, в соответствующем разделе личного кабинета подтвердите свое желание принять в программе. Минимальная сумма для вывода составляет 300 рублей, средства переводятся на кошелек WebMoney или используются для оплаты услуг проекта.
1.
2.
3.
4.
5.
6.
Частые ошибки
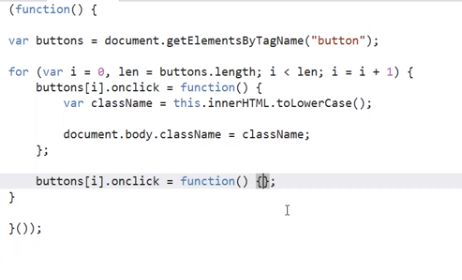
Если вы только начинаете работать с событиями, обратите внимание на следующие моменты. Функция должна быть присвоена как , а не
Функция должна быть присвоена как , а не .
Если добавить скобки, то – это уже вызов функции, результат которого (равный , так как функция ничего не возвращает) будет присвоен . Так что это не будет работать.
…А вот в разметке, в отличие от свойства, скобки нужны:
Это различие просто объяснить. При создании обработчика браузером из атрибута, он автоматически создаёт функцию с телом из значения атрибута: .
Так что разметка генерирует такое свойство:
Используйте именно функции, а не строки.
Назначение обработчика строкой также сработает. Это сделано из соображений совместимости, но делать так не рекомендуется.
Не используйте для обработчиков.
Такой вызов работать не будет:
Регистр DOM-свойства имеет значение.
Используйте , а не , потому что DOM-свойства чувствительны к регистру.
Копаем ещё глубже
Пока набрасывал ответ, пришло дополнение от Руслана:
Рекомендации сервисов остаются прежними, но добавлю:
- если консультации для бизнеса, продвинутой и зрелой аудитории, то лучше подойдёт фейсбук;
- офферы, как разобрали выше – тоже живые люди, но они не покупают, и используют свой (не основной) аккаунт исключительно для накруточно-раскруточной активности.
Поэтому из всех сервисов вам даже ВКтаргет не очень подойдёт, хоть и живые там, и сегментация есть. Потому что все эти сервисы НАКРУЧИВАЮТ, создают видимость, а не дают реальных потенциальных клиентов.
Говоря о ВК, смотреть имеет смысл тех, кто оказывает услуги привлечения подписчиков через рассылку приглашений в группы, отобранные по заранее продуманным параметрам. Привлеченные таким образом подписчики и будут реальными людьми, способными менять свои деньги на наш продукт/услугу. Надо понимать, что при не интересном для них контенте они также могут отписываться.
Я видел такие услуги у SocLike, но цены там другого уровня, и это закономерно и оправдано. На каких сервисах ещё есть такие услуги – требуется отдельная статья-обзор.
Есть фрилансеры, оказывающие подобные услуги – приглашение в группу подписчиков по заданным параметрам из других групп. Но разброс по качеству здесь широкий – есть например ребята, накручивающие реальных живых людей из конкретных городов, но часто это оказываются скажем украинские девчушки до 16 лет, реальные, живые, активные, но… но какой портрет типового клиента там у нас?
Есть и программы, помогающие автоматизировать рассылку приглашений в группы – quick sender, LInviter.
How to check which button just got clicked (with text)
There are a lot of times when you might want to create a series of buttons, or interface elements that are very similar to each other. Creating a calculator, or dashboard, are great examples of this.

In those cases, it’s often easier and more concise to create a series of elements using a procedural loop rather than using custom code. If you’re setting a calculator number button that has text, you might create the button in a loop. That way, you can set the number on the button as you go based on the index of the loop.
FlowPane buttonContainer = new FlowPane(10, 10);
for (int i = 1; i < 10; i++) {
    buttonContainer.getChildren().add(new Button(String.valueOf(i)));
}
calculatorLayout.getChildren().add(buttonContainer);
To activate the button, we will need to add an action event, which we can later use to access the button using .
1. Check the button’s identity using the label text
In the simplest case, we don’t even need to access the Button – we just need the loop counter. Because the button is a labelled node, we can access its text by invoking . Many calculator applications work by pushing operations onto some sort of operation . so we’ll push the number associated with the button onto that.
for (int i = 0; i < 9; i++) {
    Button numberButton = new Button(String.valueOf(i + 1));
    numberButton.setOnAction(event -> {
        calculatorOperations.push(Double.valueOf(numberButton.getText()));
    });
    buttonContainer.getChildren().add(numberButton);
}
To access the button – style-setting for instance – I’d suggest you call the button object directly. However, to access the button later – for example, from an event, you’ll need to access the event target. The target is a property of an event based on what caused the event to happen. I’ve created a complete guide to JavaFX events, if you want to learn more about how they work.
2. How to check which button is pressed when you don’t have access to the button object
Regardless of how it was created, you can identify a button that has just been clicked through the ‘s method.
Then, in the same block of code, you can retrieve the button label text once the target is cast to the type.
EventHandler<ActionEvent> buttonEventHandler(){
    return event -> {
        Button numberButton = (Button) event.getTarget();
        calculatorOperations.push(Double.valueOf(numberButton.getText()));
    };
}
I don’t advocate including a type check for the type here if you’re writing the code and know this event handler will only be applied to these buttons. However, if you’re collaborating on a larger project, you might want to check your event target is a button before you cast to the type.
Often, I’ll create buttons using SVG graphics to make them look a little more appealing. I’ve actually created a whole tutorial about how to use SVGs in JavaFX; they’re a great way to make your programs more visually appealing.
In that case, the button itself won’t have any label text. So, I usually encode the nature of the button a little differently.
JavaScript
JS Array
at()
concat()
constructor
copyWithin()
entries()
every()
fill()
filter()
find()
findIndex()
findLast()
findLastIndex()
flat()
flatMap()
forEach()
from()
includes()
indexOf()
isArray()
join()
keys()
lastIndexOf()
length
map()
of()
pop()
prototype
push()
reduce()
reduceRight()
reverse()
shift()
slice()
some()
sort()
splice()
toString()
unshift()
valueOf()
with()
JS Boolean
constructor
prototype
toString()
valueOf()
JS Classes
constructor()
extends
static
super
JS Date
constructor
getDate()
getDay()
getFullYear()
getHours()
getMilliseconds()
getMinutes()
getMonth()
getSeconds()
getTime()
getTimezoneOffset()
getUTCDate()
getUTCDay()
getUTCFullYear()
getUTCHours()
getUTCMilliseconds()
getUTCMinutes()
getUTCMonth()
getUTCSeconds()
now()
parse()
prototype
setDate()
setFullYear()
setHours()
setMilliseconds()
setMinutes()
setMonth()
setSeconds()
setTime()
setUTCDate()
setUTCFullYear()
setUTCHours()
setUTCMilliseconds()
setUTCMinutes()
setUTCMonth()
setUTCSeconds()
toDateString()
toISOString()
toJSON()
toLocaleDateString()
toLocaleTimeString()
toLocaleString()
toString()
toTimeString()
toUTCString()
UTC()
valueOf()
JS Error
name
message
JS Global
decodeURI()
decodeURIComponent()
encodeURI()
encodeURIComponent()
escape()
eval()
Infinity
isFinite()
isNaN()
NaN
Number()
parseFloat()
parseInt()
String()
undefined
unescape()
JS JSON
parse()
stringify()
JS Math
abs()
acos()
acosh()
asin()
asinh()
atan()
atan2()
atanh()
cbrt()
ceil()
clz32()
cos()
cosh()
E
exp()
expm1()
floor()
fround()
LN2
LN10
log()
log10()
log1p()
log2()
LOG2E
LOG10E
max()
min()
PI
pow()
random()
round()
sign()
sin()
sinh()
sqrt()
SQRT1_2
SQRT2
tan()
tanh()
trunc()
JS Number
constructor
EPSILON
isFinite()
isInteger()
isNaN()
isSafeInteger()
MAX_SAFE_INTEGER
MIN_SAFE_INTEGER
MAX_VALUE
MIN_VALUE
NaN
NEGATIVE_INFINITY
POSITIVE_INFINITY
parseFloat()
parseInt()
prototype
toExponential()
toFixed()
toLocaleString()
toPrecision()
toString()
valueOf()
JS Object
constructor
keys()
prototype
toString()
valueOf()
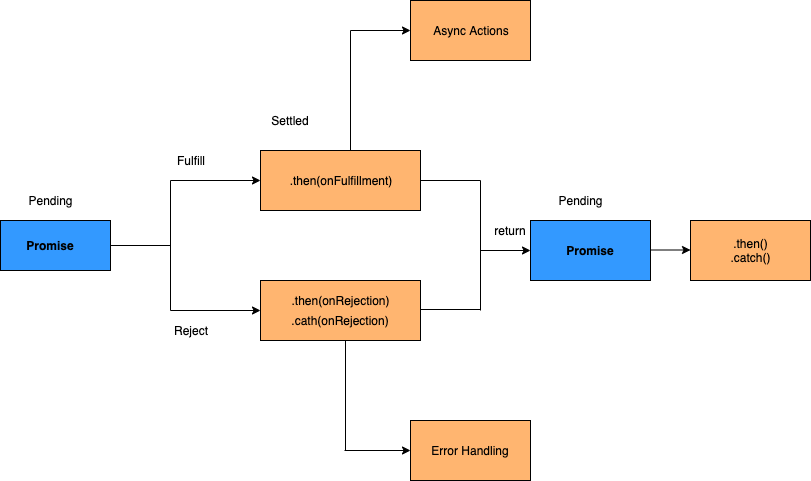
JS OperatorsJS PrecedenceJS Promises
all()
allSettled()
any()
catch()
finally()
race()
reject()
resolve()
then()
JS RegExp
Modifiers:
g
i
d
m
Groups:
(x|y)
Metacharacters:
.
\w
\W
\d
\D
\s
\S
\b
\B
\0
\n
\f
\r
\t
\v
\xxx
\xdd
\uxxxx
Quantifiers:
+
*
?
{X}
{X,Y}
{X,}
$
^
?=
?!
Properties:
constructor
global
ignoreCase
lastIndex
multiline
source
Methods:
compile()
exec()
test()
toString()
JS Statements
break
class
const
continue
debugger
do…while
for
for…in
for…of
function
if…else
let
return
switch
throw
try…catch
var
while
JS String
at()
charAt()
charCodeAt()
codePointAt()
concat()
constructor
endsWith()
fromCharCode()
includes()
indexOf()
lastIndexOf()
length
localeCompare()
match()
padEnd()
padStart()
prototype
repeat()
replace()
replaceAll()
search()
slice()
split()
startsWith()
substr()
substring()
toLocaleLowerCase()
toLocaleUpperCase()
toLowerCase()
toString()
toUpperCase()
trim()
trimEnd()
trimStart()
valueOf()
JS TypedArray


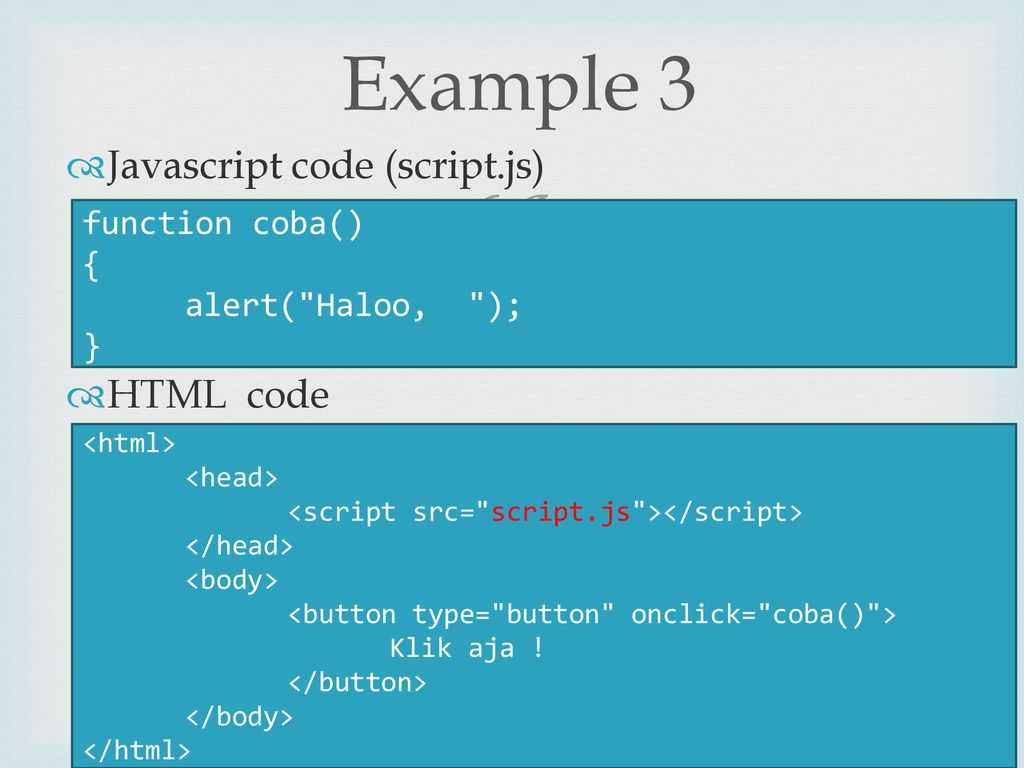
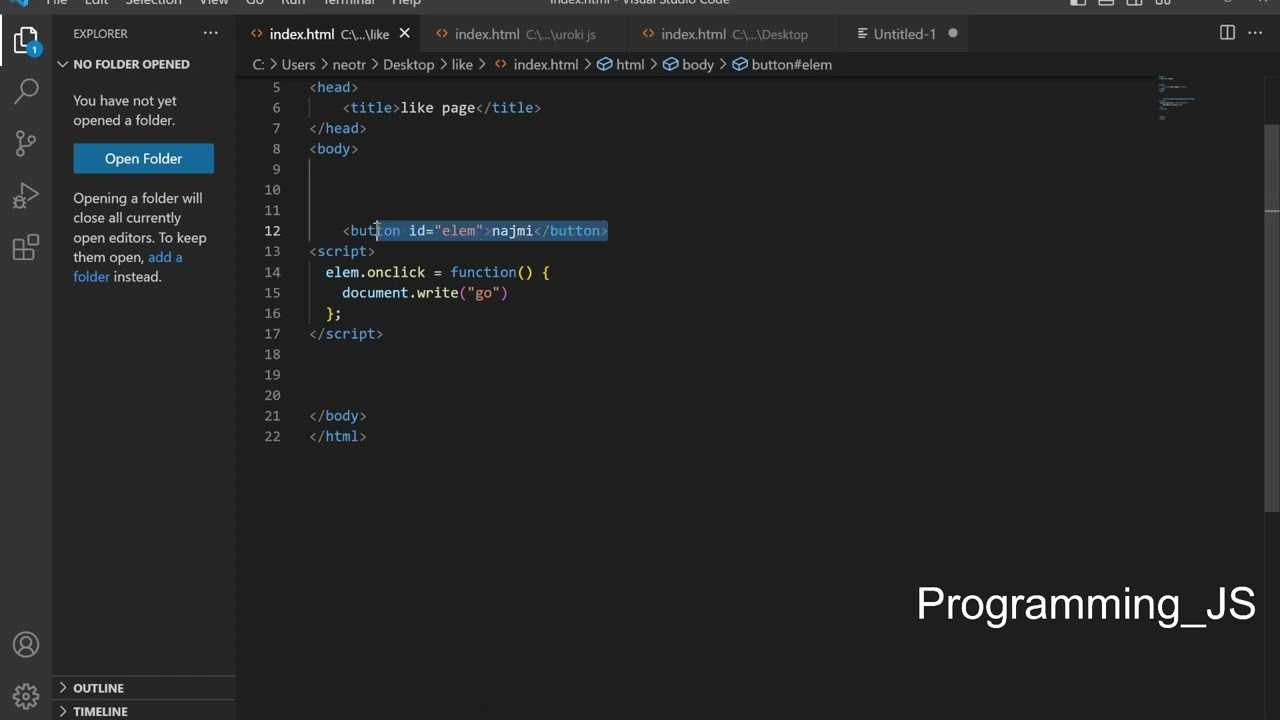
Пример:Onclick В JavaScript, используя метод addEventListener()
И последний элемент теории Onclick — использование метода addEventListener
Нам опять понадобится кнопка
<button id=»onclick_v_addEventListener»>Это второй способ реализации Onclick в JavaScript</button>
Опять применяем querySelector — обращаемся к нашей кнопке, добавляем метод addEventListener, во внутрь помещаем событие click И второй параметр — это функция myFoo.
document.querySelector(«#onclick_v_addEventListener») .addEventListener(«click», myFoo);
Далее нам понадобится функция:
function myFoo() { alert(«Это третий способ реализации Onclick в JavaScript через addEventListener и вывод через alert»); }
Соберем весь код вместе:
<button id=»onclick_v_addEventListener»>Это третий способ реализации Onclick в JavaScript</button>
<script>
document.querySelector(«#onclick_v_addEventListener») .addEventListener(«click», myFoo);
function myFoo()
{
alert(«Это третий способ реализации Onclick в JavaScript через addEventListener и вывод через alert»);
}
</script>
Результат:
Это третий способ реализации Onclick в JavaScript
Удалить Getclick10.biz

Удалить Getclick10.biz из Google Chrome
Откройте браузер Google Chrome, в адресной строке введите: chrome://settings/content/notifications
или следуйте инструкциям ниже.
- Откройте Google Chrome.
- В правом верхнем углу разверните меню Chrome.
- В меню Google Chrome откройте Настройки.
- на Конфиденциальность и безопасность разделом, щелкните Настройки сайта.
- Откройте приложение Уведомления настройки.
- Удалить Getclick10.biz щелкнув три точки справа рядом с URL-адресом Getclick10.biz и нажав Удалить.
Удалить Getclick10.biz с Android
- Откройте Google Chrome
- В правом верхнем углу найдите меню Chrome.
- В меню нажмите Настройкипрокрутите вниз до Фильтр.
- В Настройки сайтов раздел, коснитесь Уведомления настройки, найдите Getclick10.biz домен и нажмите на него.
- Нажмите Очистить и сбросить кнопку и подтвердите.
Удалить Getclick10.biz из Firefox
- Открыть Firefox
- В правом верхнем углу щелкните значок Меню Firefox (три горизонтальные полосы).
- В меню перейдите в Опции, в списке слева перейдите к Конфиденциальность и безопасность.
- Прокрутите вниз до Разрешения… и затем Настройки рядом с Уведомления.
- Выберите Getclick10.biz URL из списка и измените статус на Заблокировать, сохраните изменения Firefox.
Удалить Getclick10.biz из Edge
- Откройте Microsoft Edge.
- В правом верхнем углу нажмите на три точки, чтобы развернуть Меню Edge.
- Прокрутите вниз до Настройки.
- В левом меню нажмите на Разрешения для сайтов.
- Нажмите на Уведомления.
- Нажмите на три точки справа от Getclick10.biz домен и Удалить.
Удалить Getclick10.biz из Safari на Mac
-
Откройте Safari. В верхнем левом углу нажмите на Safari
. - Перейдите на Настройки в меню Safari, теперь откройте Веб-сайты меню.
- В левом меню нажмите на Уведомления
- Найдите Getclick10.biz домен и выберите его, нажмите Отказать .
Переходите к следующему шагу.
 Удалить рекламное ПО Getclick10.biz
Malwarebytes — это комплексный инструмент для удаления вредоносных программ и .
Вредоносные веб-сайты, такие как Getclick10.biz, перенаправляют вас на опасную рекламу, которая рекомендует рекламные приложения. Веб-сайт Getclick10.biz также перенаправляет браузер на другие вредоносные программы, такие как крипто-майнеры и различные эксплойты. Обязательно полностью очистите свой компьютер от вредоносных программ с помощью Malwarebytes.
- Установить Malwarebytes, следуйте инструкциям на экране.
- Нажмите Scan чтобы запустить вредоносное ПОscan.
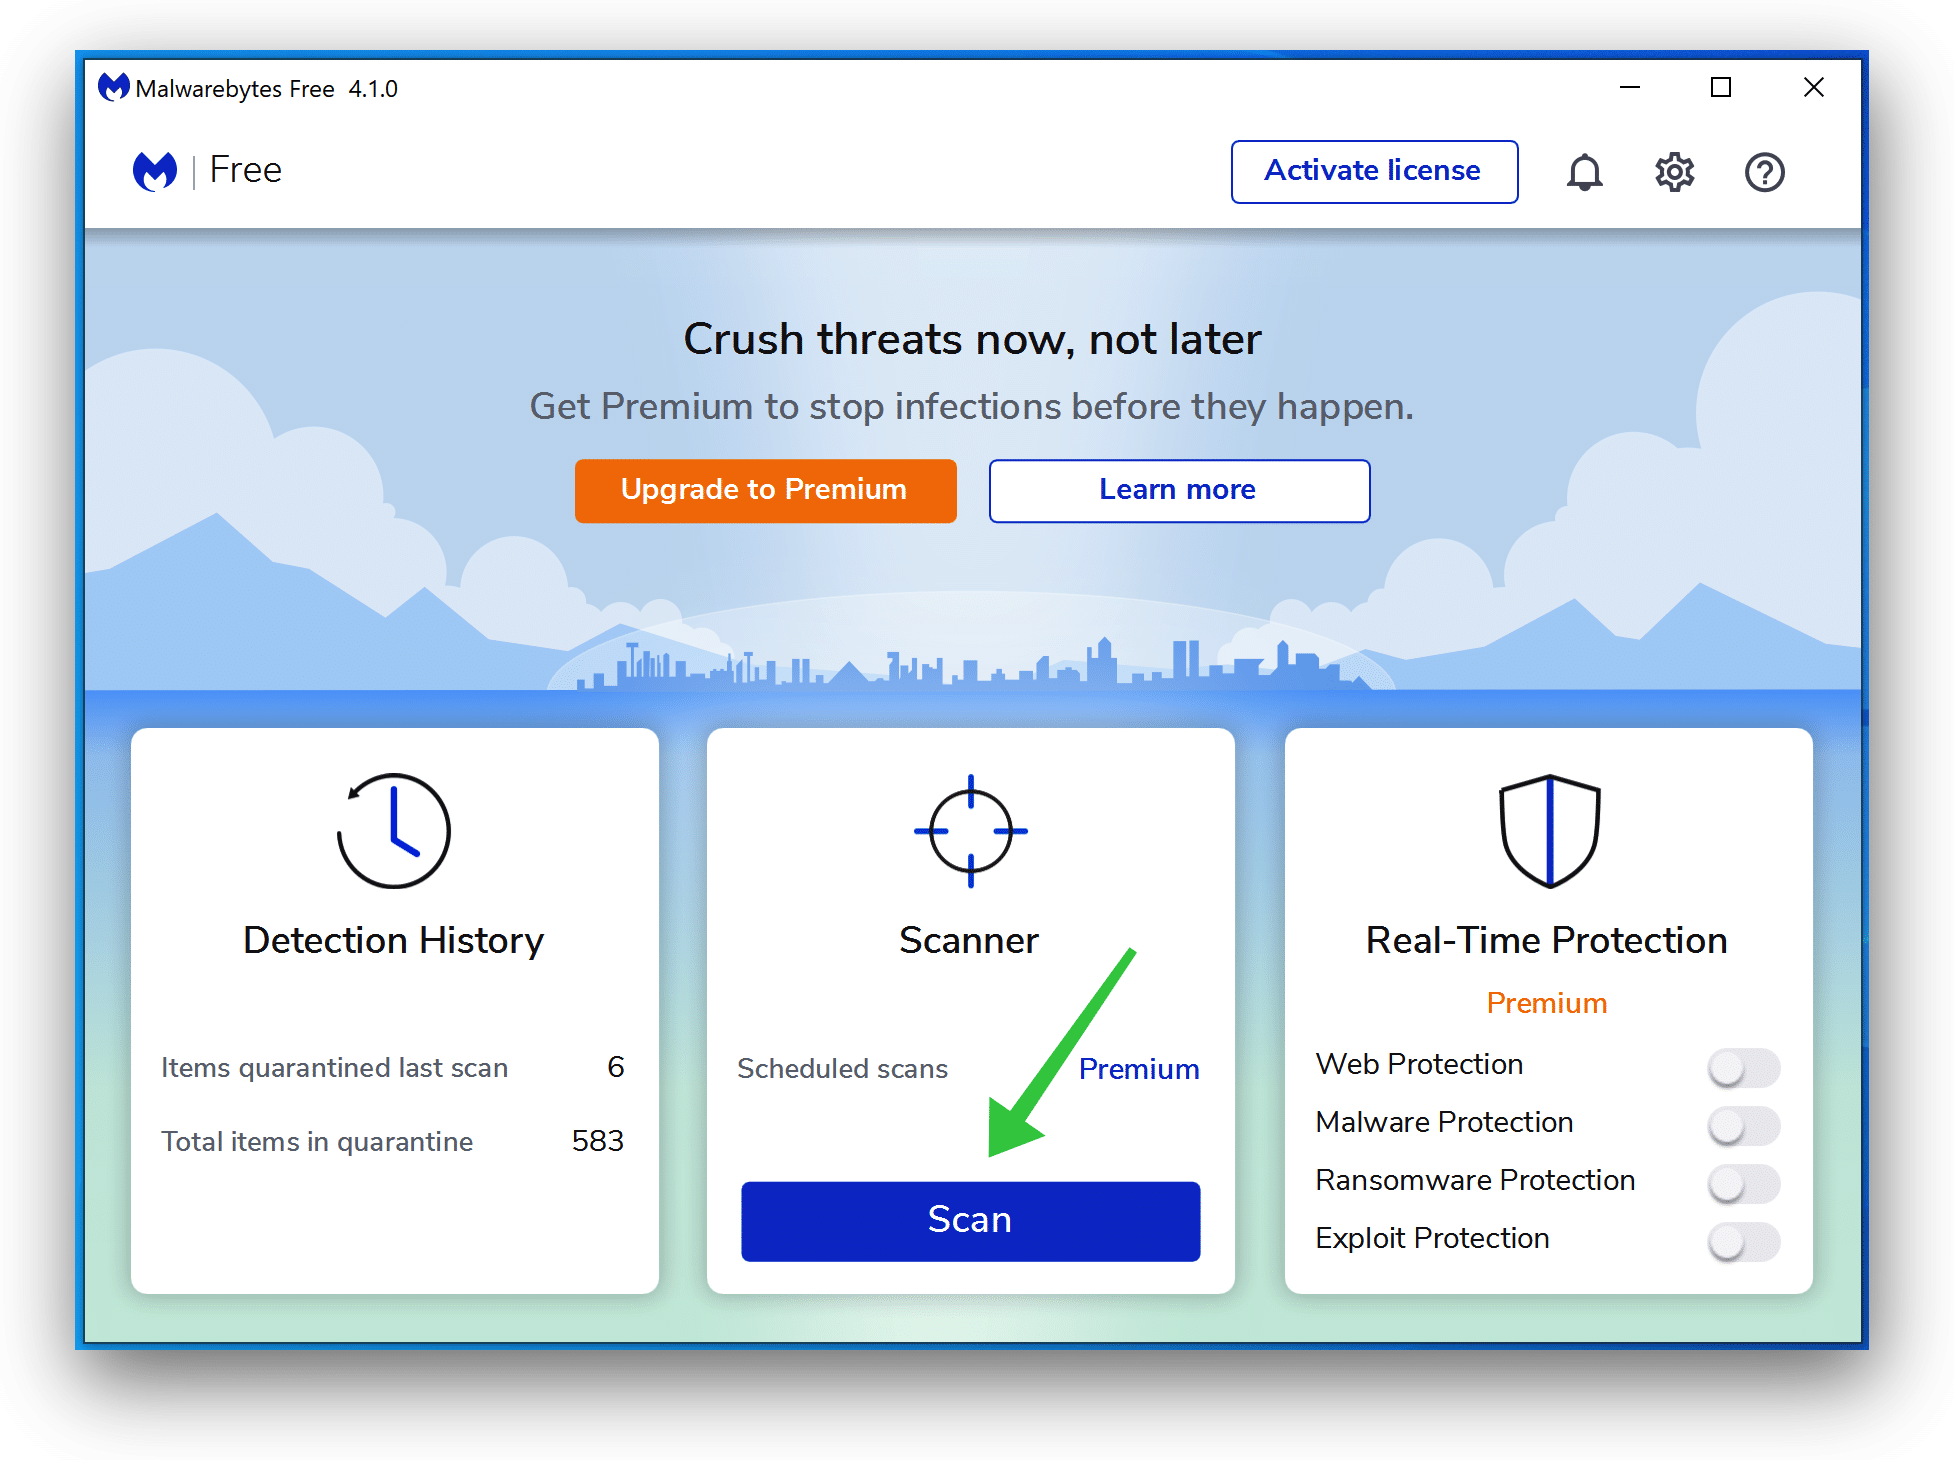
- Подождите, пока Malwarebytes scan в конце.
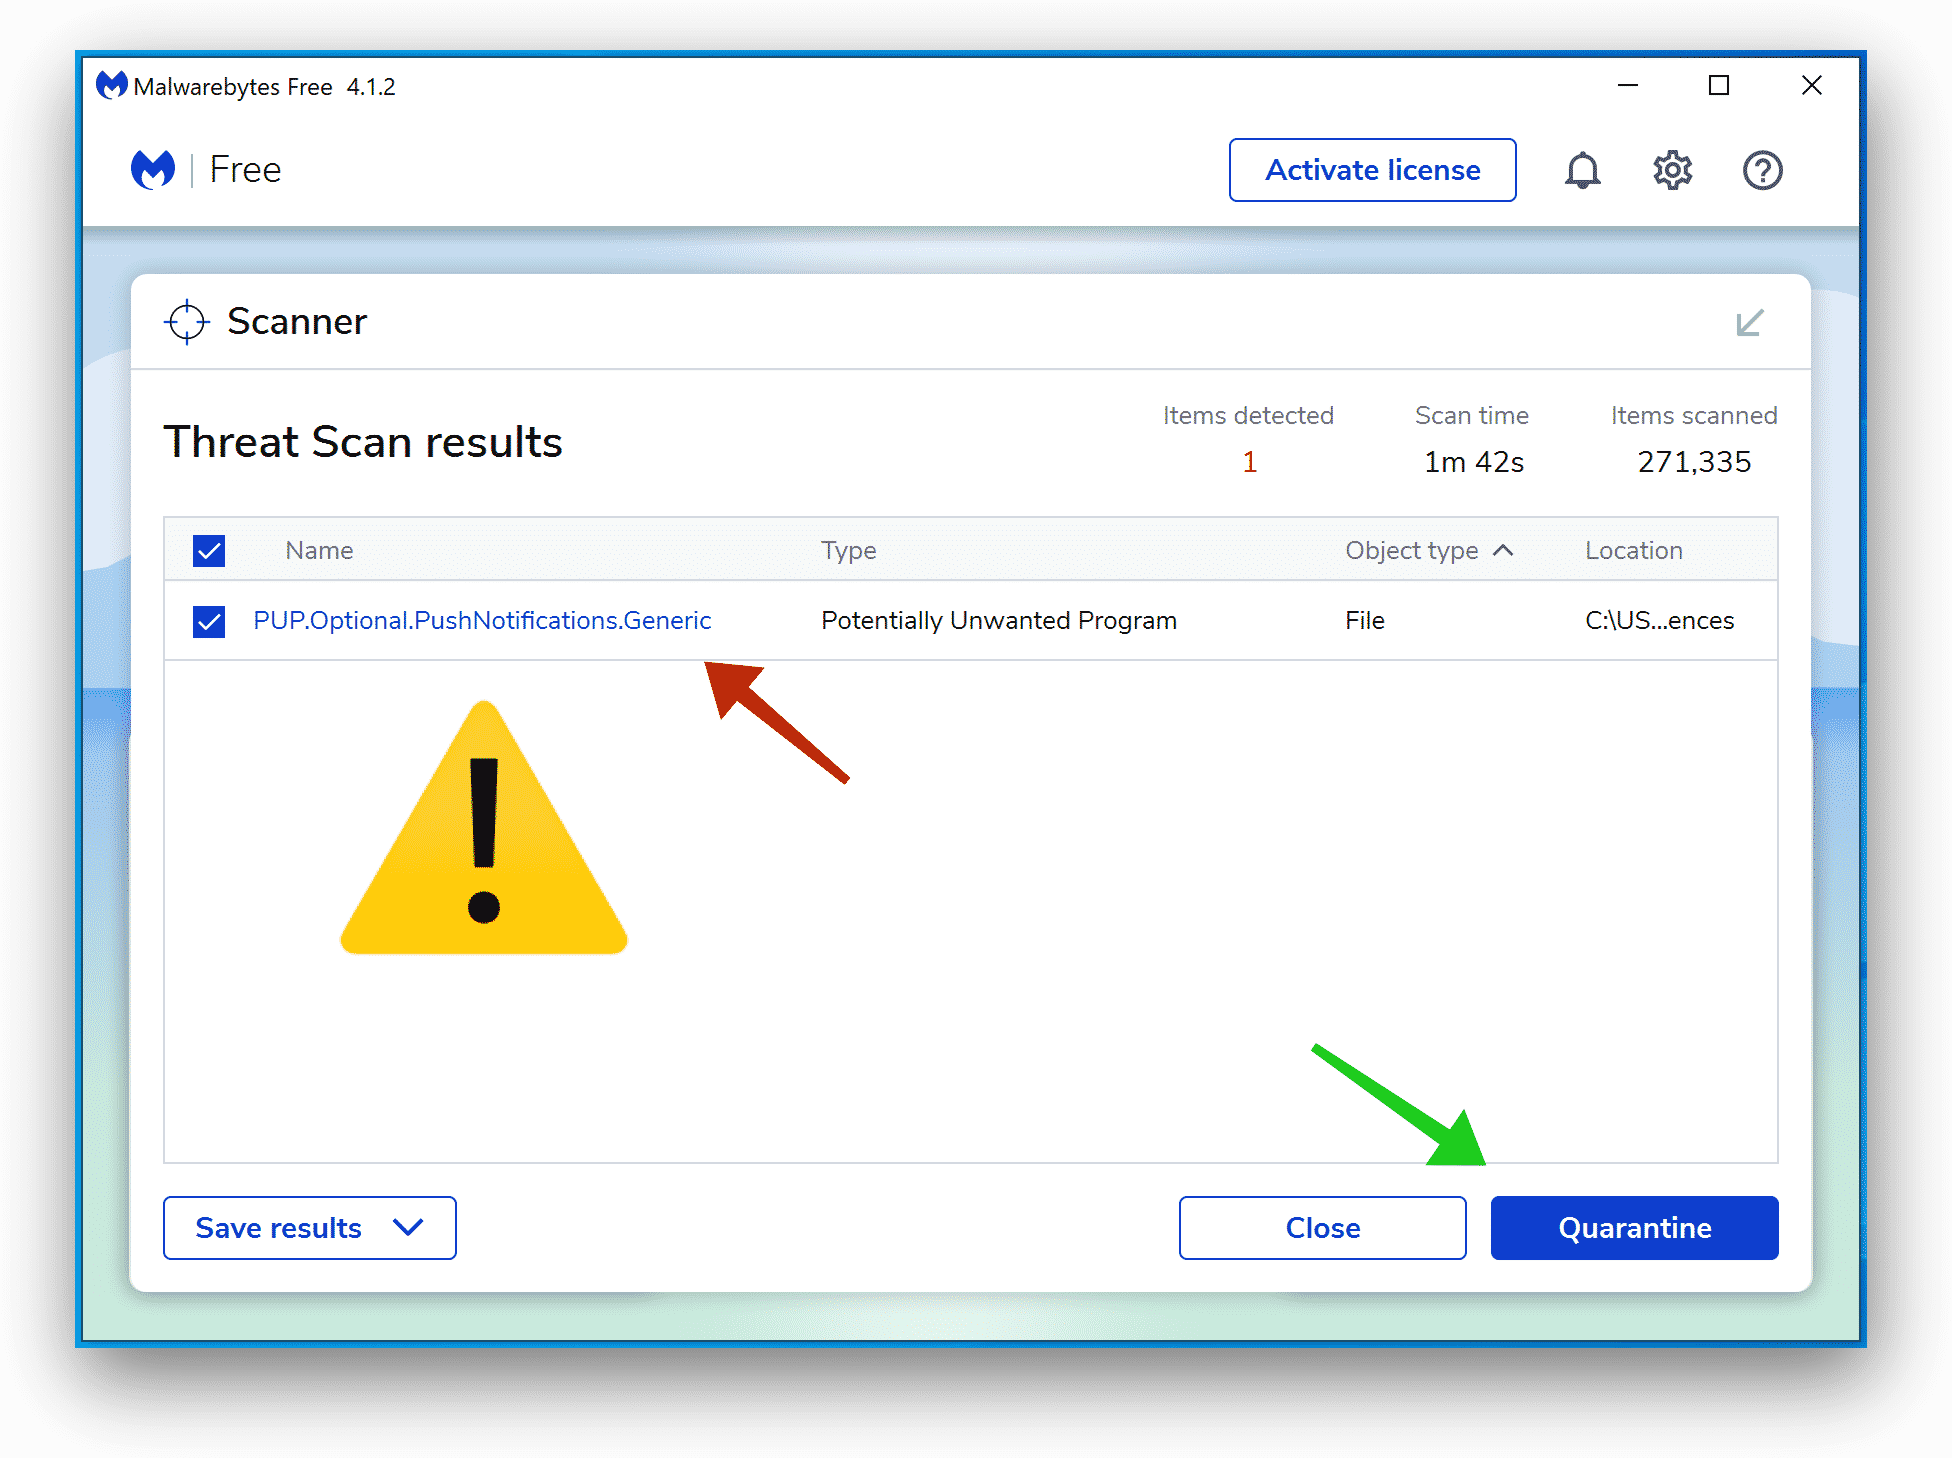
- После завершения просмотрите обнаружения push-уведомлений.
- Нажмите Карантин для продолжения.
Перезагружать Windows после того, как все обнаружения будут перемещены в карантин.
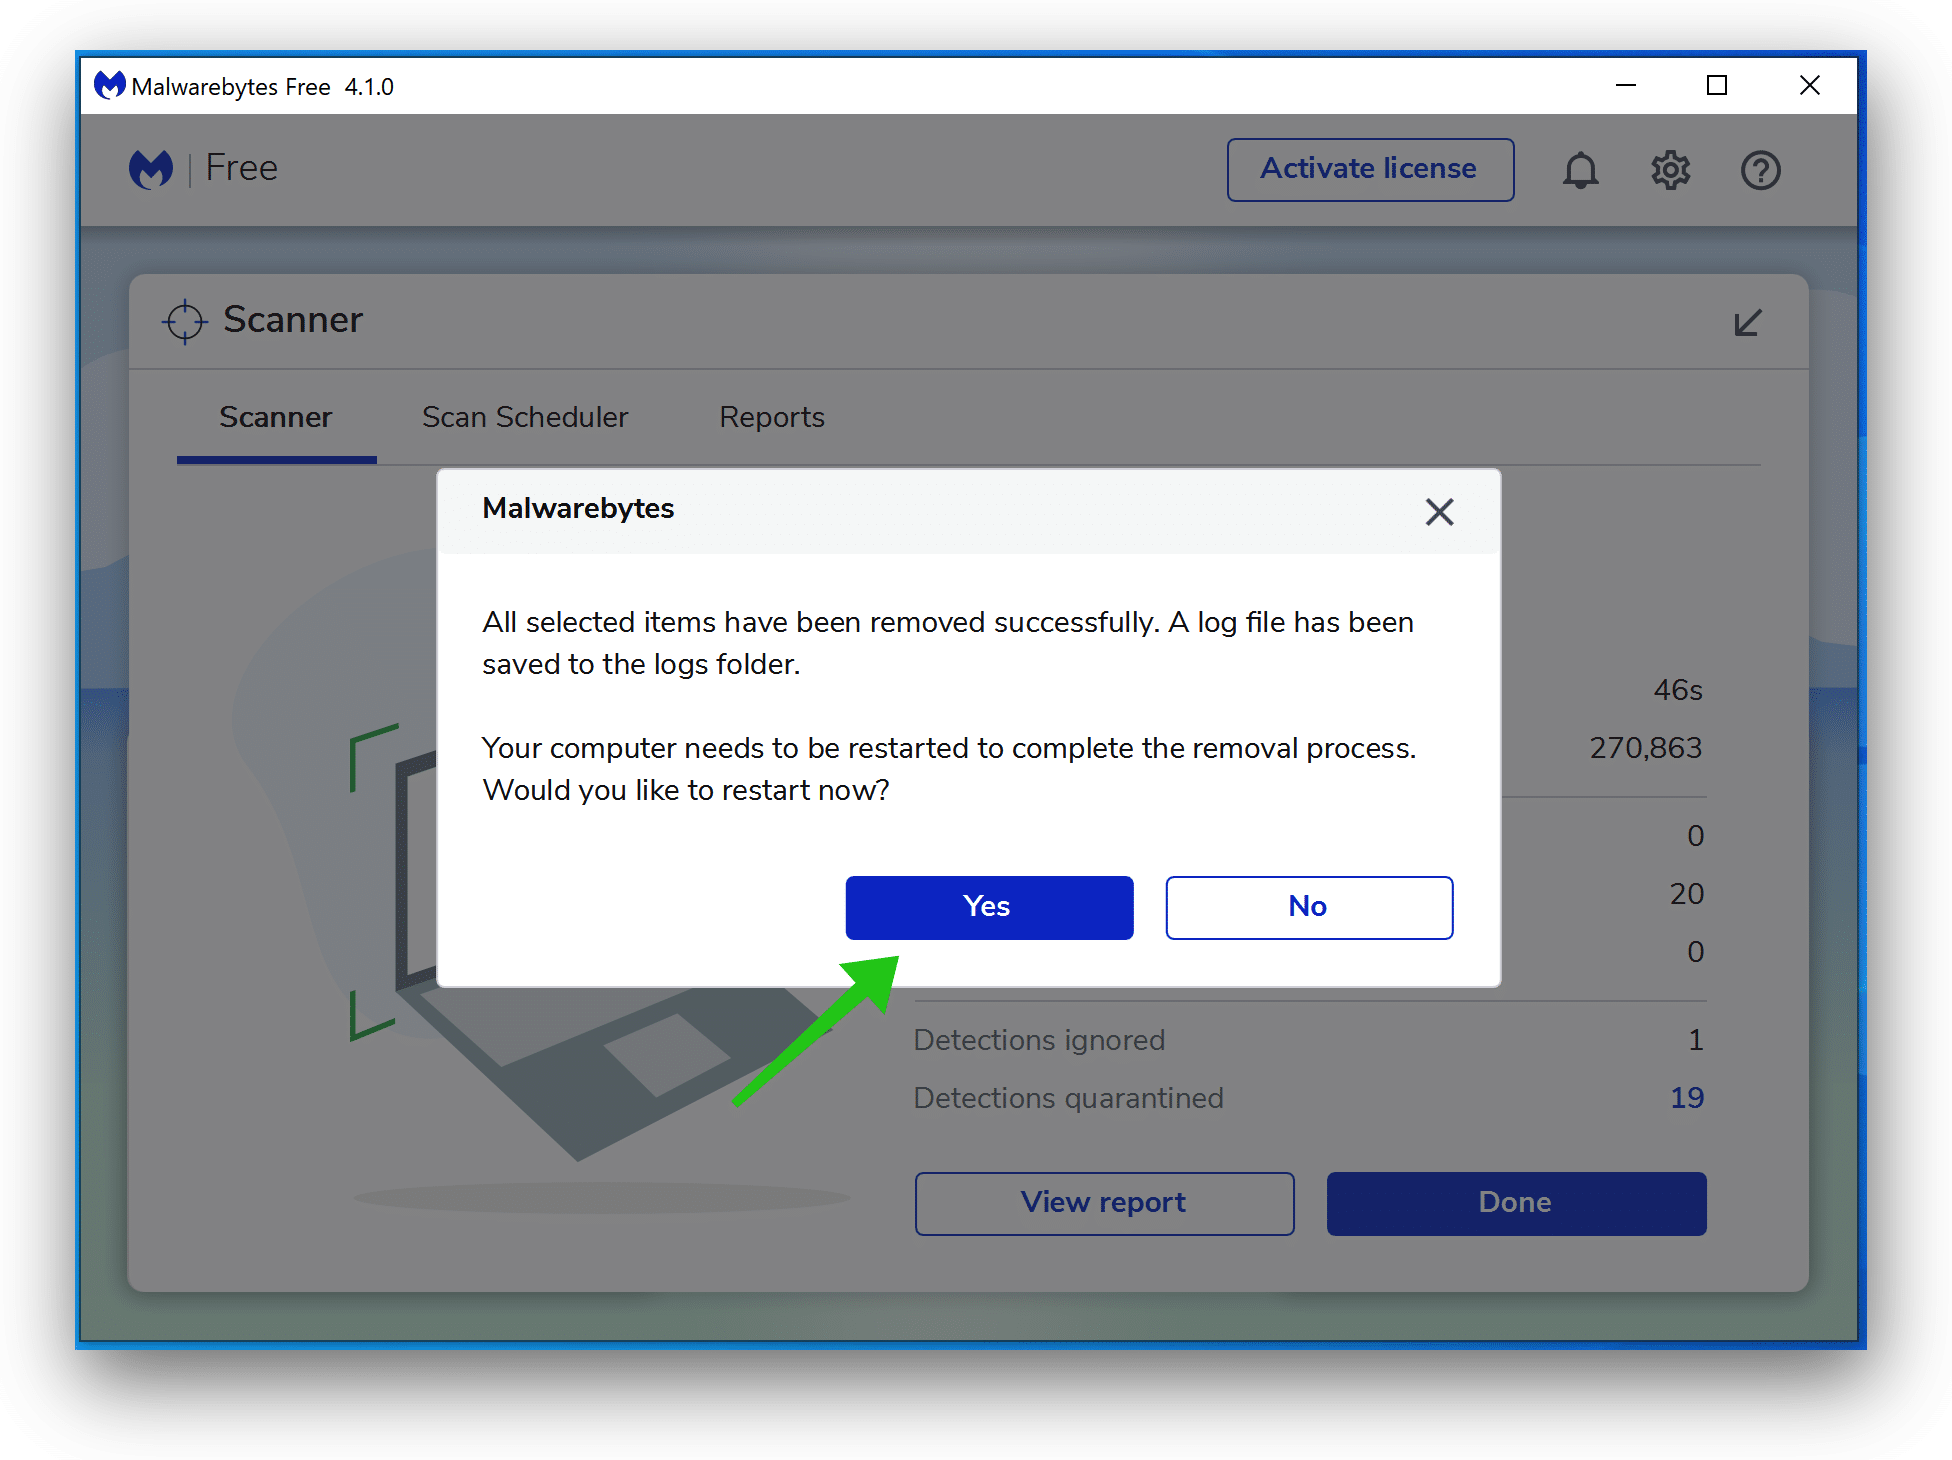
Вы успешно удалили со своего компьютера рекламное и другое вредоносное ПО.
How to Use the click eventListener in JavaScript
In JavaScript, there are multiple ways of doing the same thing. As JavaScript itself evolved over time, we started needing to separate the HTML, CSS, and JavaScript code in order to comply with best practices.
Event listeners make this possible as they let you separate the JavaScript from the HTML. You can also do this with onclick, but lets take another approach here.
Basic syntax
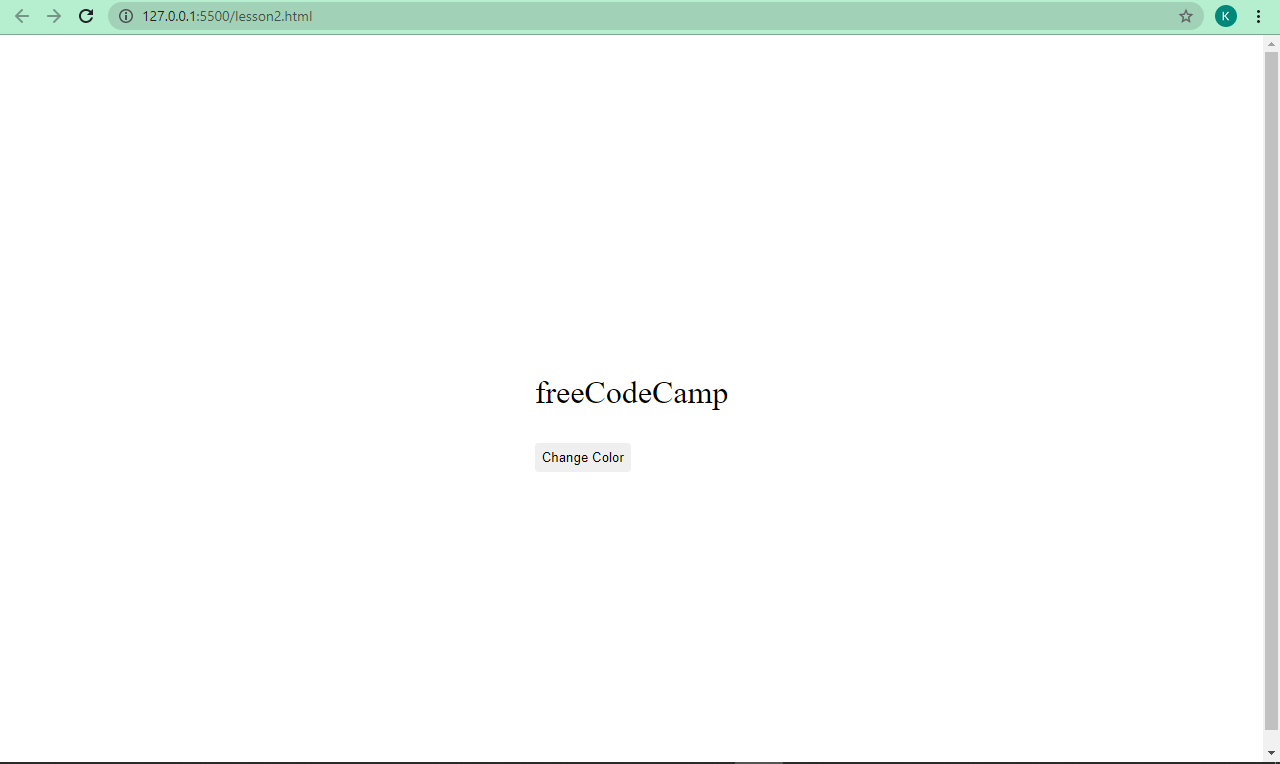
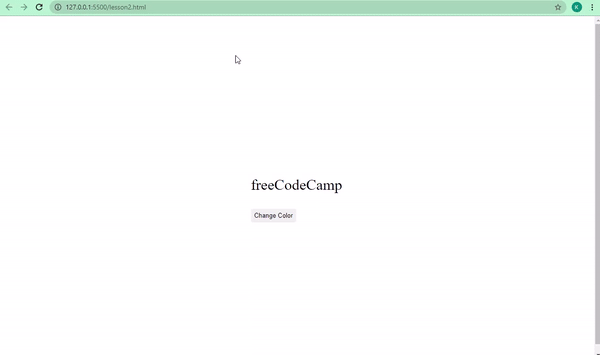
Now, let’s change the freeCodeCampt text to blue by using the click eventListner
This is our new HTML:
And this is what it looks like:
This time around in our script, we need to select the button too (not just the freeCodeCamp text). That’s because there’s nothing JavaScript in the opening tag of our button, which is cool.
So, our script looks like this:
We can also separate our function totally from the and our functionality will still remain the same:
Характеристики сервиса VKStorm
VKStorm — сервис, назначение которого заключается в продвижении аккаунтов, пабликов, материала, размещаемого в ВК. Продвижение лайков при помощи реальных юзеров посредством взаимообмена. Имеется встроенная форма для быстроты заказа и с выбором услуги и всех необходимых действий.
Основная специфика:
- бесплатное продвижение реакций по принципу взаимности с остальными пользователями;
- покупка «сердечек», просмотр историй, ретвитов, добавлений в «друзья» и т. д.;
- платный заказ на продвижение в ВК: на площадке есть местная валюта — поинты — ее покупают и получают за выполнение заданий от иных юзеров; валюту используют для создания задач для раскрутки аккаунтов и пабликов, еще поинты можно выводить.
Достоинства платформы:
- быстрота выполнения;
- взаимообмен позволяет применять опции портала без оплаты;
- отсев ботов;
- соблюдаются дедлайны;
- таргетинг ЦА по следующим критериям: гендер, местонахождение, возраст и прочие;
- пробный период, но для него нужна авторизация;
- функционирует бонусная система (во время регистрации, за приведенного друга и т. д. партнерская программа);
- предоставляется отчетность по сделанным заданиям, статистика).
Что плохого?
свидетельства юзеров говорят о минимальной цене на задачи.
К регистрируемым профилям предъявляются высокие стандарты: настоящие личные данные и аватарка, соответствующая указанному возрасту. Если будет множество нарушений, могут заблокировать. Выплаты еженедельные.
Method 4: Using jQuery .on() method
To get the element clicked on the whole document using jQuery’s .on() method, follow these steps:
- First, select the document using jQuery and call the .on() method on it.
- Pass the ‘click’ event as the first parameter to the .on() method.
- Use the selector parameter to filter the click events to only fire on elements that match the selector.
- In the event handler function, use the ‘this’ keyword to refer to the clicked element.
Here’s an example code snippet:
In this example, the ‘*’ selector is used to capture click events on any element in the document. The event handler function logs the clicked element to the console.
You can also use a specific selector to capture click events on specific elements. For example:
In this example, only elements with the class ‘my-class’ will trigger the click event. The event handler function logs the clicked element to the console.

More Examples
Click a <button> to display the date:
<button onclick=»getElementById(‘demo’).innerHTML = Date()»>What is the time?</button>
Click a <h3> element to change the text color:
<h3 id=»demo» onclick=»myFunction()»>Click me to change my color.</h3><script>function myFunction() { document.getElementById(«demo»).style.color = «red»;}</script>
Another example on how to change the color of an element:
<h3 onclick=»myFunction(this, ‘red’)»>Click me to change my color.</h3><script>
function myFunction(element, color) {
element.style.color = color;}</script>
Click to copy text from one input field to another:
<button onclick=»myFunction()»>Copy Text</button>
function myFunction() {
document.getElementById(«field2»).value =
document.getElementById(«field1»).value;}</script>
How to assign an «onclick» event to the window object:
window.onclick = myFunction;
function myFunction() {
document.getElementsByTagName(«BODY»).style.backgroundColor = «yellow»;
}
Use onclick to create a dropdown:
document.getElementById(«myBtn»).onclick = function() {myFunction()};
function myFunction() { document.getElementById(«myDropdown»).classList.toggle(«show»);}
Propagation
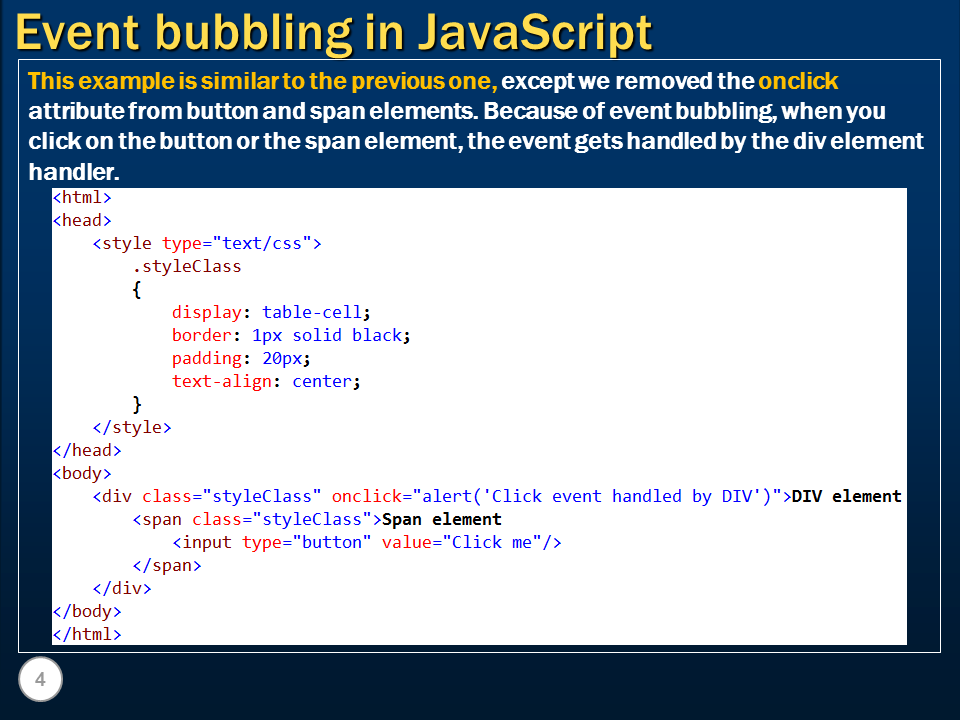
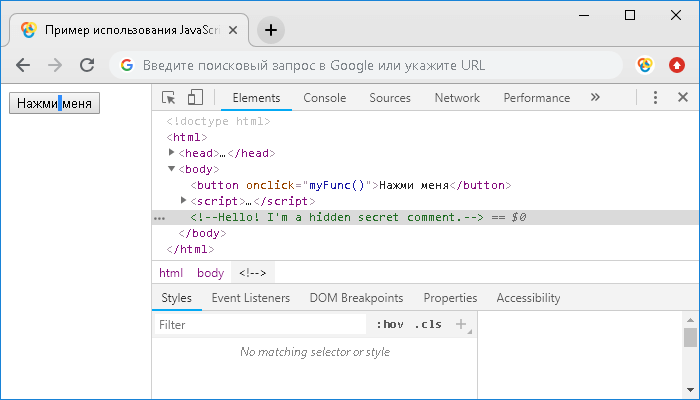
For most event types, handlers registered on nodes with children will also receive events that happen in the children. If a button inside a paragraph is clicked, event handlers on the paragraph will also see the click event.
But if both the paragraph and the button have a handler, the more specific handler—the one on the button—gets to go first. The event is said to propagate outward, from the node where it happened to that node’s parent node and on to the root of the document. Finally, after all handlers registered on a specific node have had their turn, handlers registered on the whole window get a chance to respond to the event.
At any point, an event handler can call the method on the event object to prevent handlers further up from receiving the event. This can be useful when, for example, you have a button inside another clickable element and you don’t want clicks on the button to activate the outer element’s click behavior.
The following example registers handlers on both a button and the paragraph around it. When clicked with the right mouse button, the handler for the button calls , which will prevent the handler on the paragraph from running. When the button is clicked with another mouse button, both handlers will run.
<p>A paragraph with a <button>button</button>.</p>
<script>
  let para = document.querySelector("p");
  let button = document.querySelector("button");
  para.addEventListener("mousedown", () => {
    console.log("Handler for paragraph.");
  });
  button.addEventListener("mousedown", event => {
    console.log("Handler for button.");
    if (event.button == 2) event.stopPropagation();
  });
</script>
Most event objects have a property that refers to the node where they originated. You can use this property to ensure that you’re not accidentally handling something that propagated up from a node you do not want to handle.
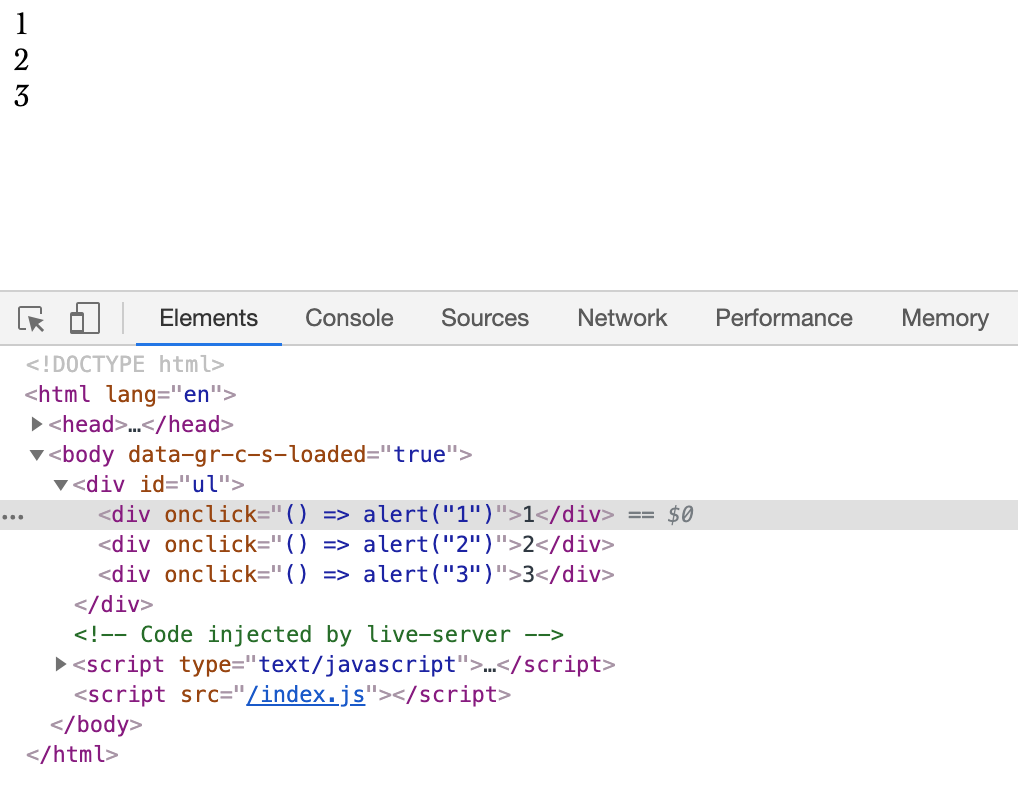
It is also possible to use the property to cast a wide net for a specific type of event. For example, if you have a node containing a long list of buttons, it may be more convenient to register a single click handler on the outer node and have it use the property to figure out whether a button was clicked, rather than register individual handlers on all of the buttons.
<button>A</button>
<button>B</button>
<button>C</button>
<script>
  document.body.addEventListener("click", event => {
    if (event.target.nodeName == "BUTTON") {
      console.log("Clicked", event.target.textContent);
    }
  });
</script>
Deploying our Context Menu — the JavaScript
Let’s start here by actually looking at how to register the event. In our JavaScript, we’ll open up a self-executing function, and catch the event on the entire document. We’ll also log the event to the console so we can take a peek at some of the information that gets output:
If you open up the console and right-click anywhere on the document, you’ll see that the event does indeed get logged. There’s a lot of interesting information there that will come in handy for us, particularly positional coordinates. Before we prevent default behaviour though, let’s take into consideration that on most parts of the document, we don’t actually need custom behaviour. We only want to deploy the custom context menu on our task items. With that in mind, let’s build up a little bit according to the following steps:
- We need to loop over each of our task items, and add the event listener to them.
- For each event listener on each task item, we will prevent default behaviour.
- For now, let’s just log the event and the element in question to the console.
Here’s what we have so far:
If you check out your console, you’ll notice that a unique event gets triggered each time we click on a task item element. Let’s take it a little further now, and implement the following two steps:
- We’ll prevent the default behaviour when we right-click on a task item.
- We’ll display the custom context menu by adding our helper class to it.
Before we do that though, let’s add an ID of to our menu to make it easier to fetch, and let’s also create a new variable called in our JavaScript. We’ll default this to , and assume that means off, and means on. Finally, let’s cache a variable for our active class and call it . Here’s my three additional variables:
Now, let’s revise our function, and also add a to launch the menu:
At this point, right clicking on a task item should deploy the menu! But a few things are still not working correctly. First, the menu isn’t in the position we’d expect when we right-click on an item. This needs to be revised with some math. Second, there’s no way to switch the menu off after it appears. If we observe default behaviour, we’ll notice a couple things off the bat:
- Clicking outside the menu causes the menu to go back to its inactive state.
- Pressing the escape key (or 27) also causes the menu to revert to an inactive state.
Let’s take this a little further though. Because we have the default menu available on other parts of the app, users would also expect to be able to launch that menu as normal, even if the custom menu is open. So right-clicking outside of our context should close the custom menu, and open up the default one. This doesn’t happen just yet. Let’s tackle all of these open/close problems first, and then get to position.
HTML Events
HTML Events
abort
afterprint
animationend
animationiteration
animationstart
beforeprint
beforeunload
blur
canplay
canplaythrough
change
click
contextmenu
copy
cut
dblclick
drag
dragend
dragenter
dragleave
dragover
dragstart
drop
durationchange
ended
error
focus
focusin
focusout
fullscreenchange
fullscreenerror
hashchange
input
invalid
keydown
keypress
keyup
load
loadeddata
loadedmetadata
loadstart
message
mousedown
mouseenter
mouseleave
mousemove
mouseover
mouseout
mouseup
offline
online
open
pagehide
pageshow
paste
pause
play
playing
progress
ratechange
resize
reset
scroll
search
seeked
seeking
select
show
stalled
submit
suspend
timeupdate
toggle
touchcancel
touchend
touchmove
touchstart
transitionend
unload
volumechange
waiting
wheel
HTML Event Objects
Animation Events
Clipboard Events
Drag Events
Events
Focus Events
HashChange Events
Input Events
Keyboard Events
Mouse Events
PageTransition Events
PopState Events
Progress Events
Storage Events
Touch Events
Transition Events
Ui Events
Wheel Events
HTML Event Properties
altKey (Mouse)
altKey (Key)
animationName
bubbles
button
buttons
cancelable
charCode
clientX
clientY
code
ctrlKey (Mouse)
ctrlKey (Key)
currentTarget
data
defaultPrevented
deltaX
deltaY
deltaZ
deltaMode
detail
elapsedTime
elapsedTime
eventPhase
inputType
isTrusted
key
keyCode
location
metaKey (Mouse)
metaKey (Key)
newURL
oldURL
offsetX
offsetY
pageX
pageY
persisted
propertyName
relatedTarget
relatedTarget
screenX
screenY
shiftKey (Mouse)
shiftKey (Key)
target
targetTouches
timeStamp
touches
type
which (Mouse)
which (Key)
view
HTML Event Methods
getModifierState()
preventDefault()
stopImmidiatePropagation()
stopPropagation()
Характеристики сервиса VKSerfing

VKSerfing — автоматический инструмент, который дает возможность получить доход и продвигать социальные сети. На основной странице сервиса размещена форма быстрого заказа. Для ее применения нужно будет войти в свой аккаунт и указать требуемое число «сердечек» и вписать ссылку на профиль. Аккаунты исполнителей должны соответствовать утвержденным нормам, в частности они должны быть заполнены примерно на 70%. Самая маленькая сумма для выведения — 50 руб. Выплаты осуществляются раз в неделю. Можно выбрать одну из пяти вариаций.
Главная специфика:
- скорое и эффективное продвижение пабликов;
- взаимодействие только с реальными профилями (отсев ботов посредством верификации пользователя);
- настройка таргетинга по конкретным параметрам: местоположение, гендер, возраст и т. д.;
- отслеживание и отсеивание фирм по рекламе, формирование статистики по ним.
Достоинства платформы:
- сервис оптимален для следующих сетей: ТикТок, ВК, Телеграм, Инста*, а также Лики — сеть из Сингапура, аналог ТикТок благодаря возможности публиковать короткие ролики, в скором времени дойдет очередь до ФБ, ОК и Ютуб;
- имеется опция автоматических задач, то есть заказов, что составляет непосредственно обсуждаемый сервис, такие задачи требуются для зарабатывания очков и повышения репутации;
- каждый день посредством биржи идет несколько сотен заказов, задачи может выполнить практически любой юзер, для этого не нужно каких-либо специальных знаний и умений;
- количество пользователей больше 2-ух млн;
- безопасность от ботов;
- актуальна реферальная программа.
Что плохого?
- небольшое количество задач;
- маленькая цена.