

Method 2: Via Screen Mirroring
If you don’t want to use a dongle, you can enable Android Auto on your car by simply mirroring your smartphone screen on your car’s display. Here’s how you can do it:
- First, make sure your phone has screen mirroring feature enabled.
- Pair your phone with the car stereo using Bluetooth or other wireless connectivity options.
- Next, turn on screen mirroring on your phone and select your car stereo from the list of available devices.
- Your phone’s screen should now be mirrored on the car’s display. Simply launch the Android Auto app on your phone and you’re good to go.
Pros:
- You don’t need an additional dongle.
- Doesn’t require hardware upgrades in your car.
- If successful, it enables you to control more Android apps, not just Android Auto.
Cons:
- Not all phones support screen mirroring. You’ll need a smartphone with this feature to use this method.
- You’ll need to connect your phone and car stereo every time you want to use Android Auto.
- The quality of the display can be diminished when you mirror with wireless connections not strong enough for integration.
Checking Compatibility with Your Android Device
Android Auto is a car mode for your Android phone. It was designed with safety in mind, allowing you to use your phone while keeping your hands on the wheel and your eyes on the road. Android Auto is available on over 400 car models from over 40 brands.
To use Android Auto, you’ll need an Android phone running 5.0 (Lollipop) or higher, and the Android Auto app. You can download the Android Auto app from the Google Play Store.
Once you have the Android Auto app installed, open it and follow the on-screen instructions to connect your phone to your car. You’ll need to have a car that supports Android Auto, and you’ll need to be connected to the car’s audio system.
Once your phone is connected to your car, you’ll be able to use Android Auto. The Android Auto app will launch automatically when you connect your phone to your car, and you can use it to control your music, navigation, and other features.
You can also use Android Auto even if you’re not driving. You can use it to listen to music, make calls, and send messages while you’re on the go.
Thoroughly modifies the look and feel of Android Auto
New Android Auto interface unlocked thanks to AA AIO TWEAKER
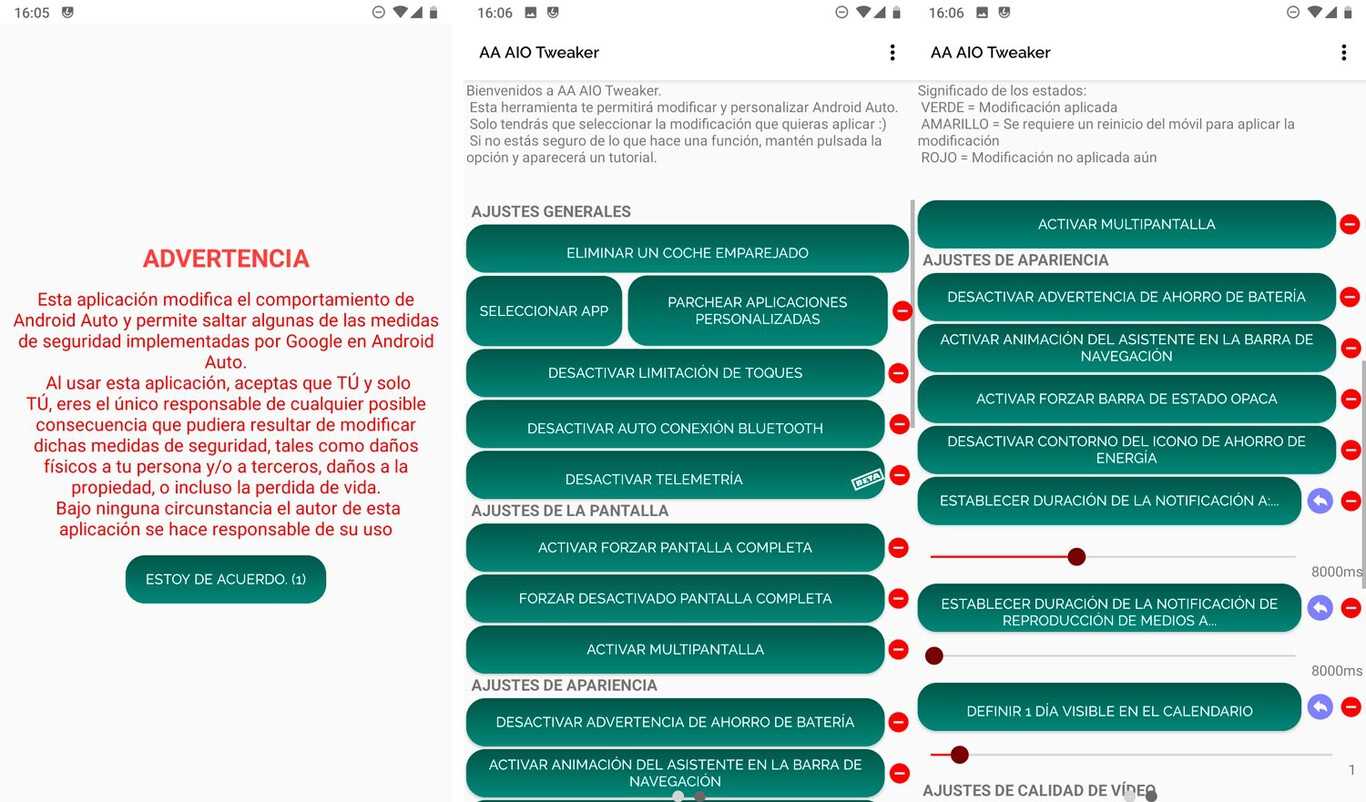
Google does not offer too many adjustments at the user level, a little more space for developers and allows a wide range of changes if the internal code of the application is modified. Of course, Android Auto doesn’t allow those notifications; so you can only access them if you are an administrator on the phone. Or what is the same: ROOT access is required.
Modifying any aspect of the internal code of Android Auto can cause the system to not behave as it should, you have to take this into account. This is even more delicate in an environment where the car is added to the equation: any glitch in Android Auto performance could lead to fatal distractions. Act with the utmost caution.
To modify Android Auto you have to access the system databases to alter those called “flags”, experimental functions that are in testing. The AA AIO TWEAKER app makes it easy as it execute those changes without having to fight with databases: its graphical interface allows you to activate and deactivate what you want just by clicking on the buttons.
Activation of the new Android Auto interface after unlocking it with AA AIO TWEAKER
AA AIO TWEAKER is an open source project that is available on the GitHub from Gabriele Rizzo, its developer. To use it on your mobile you must do the following:
- Remember: it is essential that your phone is rooted.
- Access the AA AIO TWEAKER page and download the latest APK on the Android mobile that you are going to use with your car.
- Install and open AA AIO TWEAKER. You will have to authorize access to the system root from the app with which you manage that permission.
Tweaks available with AA AIO TWEAKER on a rooted Samsung Galaxy S5
The list of modifications offered by AA AIO TWEAKER is very high and is constantly being updated. You can try the ones you need by activating the specific buttons; then, to execute the change in Android Auto, you must restart the phone. Once you connect it to the car, the modifications will appear on the vehicle screen.
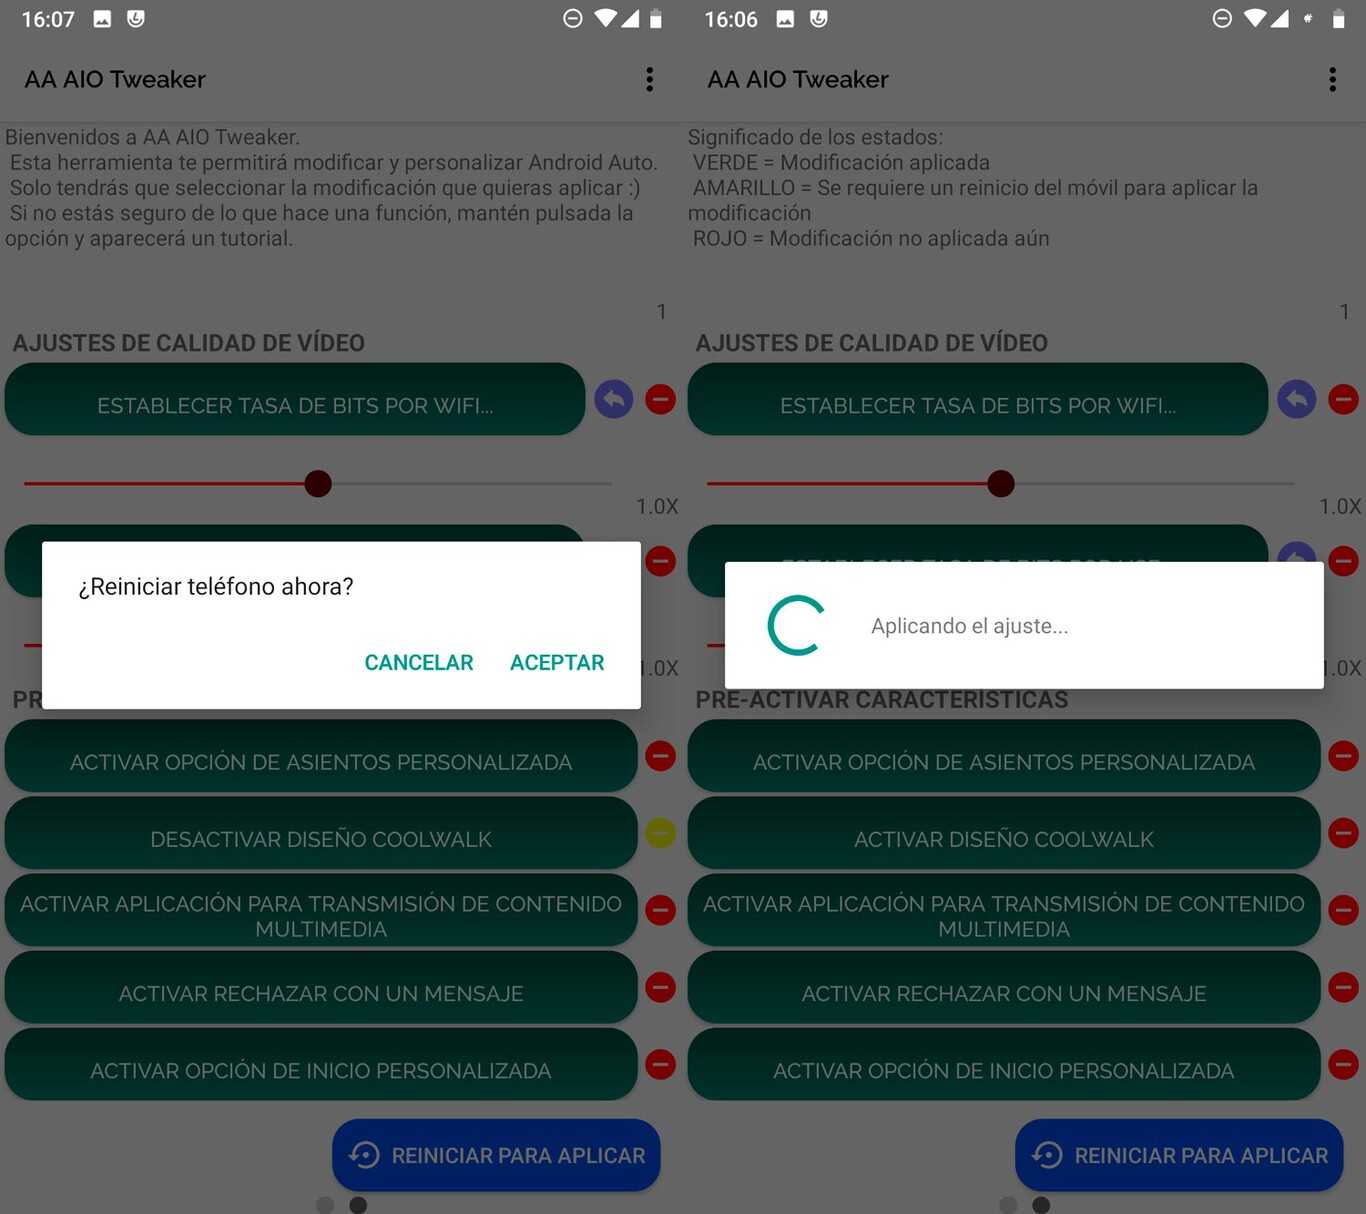
Restart the rooted mobile so that the modifications made in Android Auto can take effect
Rooting the usual mobile is not the most recommended: our recommendation is that, in case you want to try the modifications, make ROOT to some other Android that you have at home and that you use that one to test with AA AIO TWEAKER. You can even keep that phone in the glove compartment of the car so you have it handy on trips, for example.
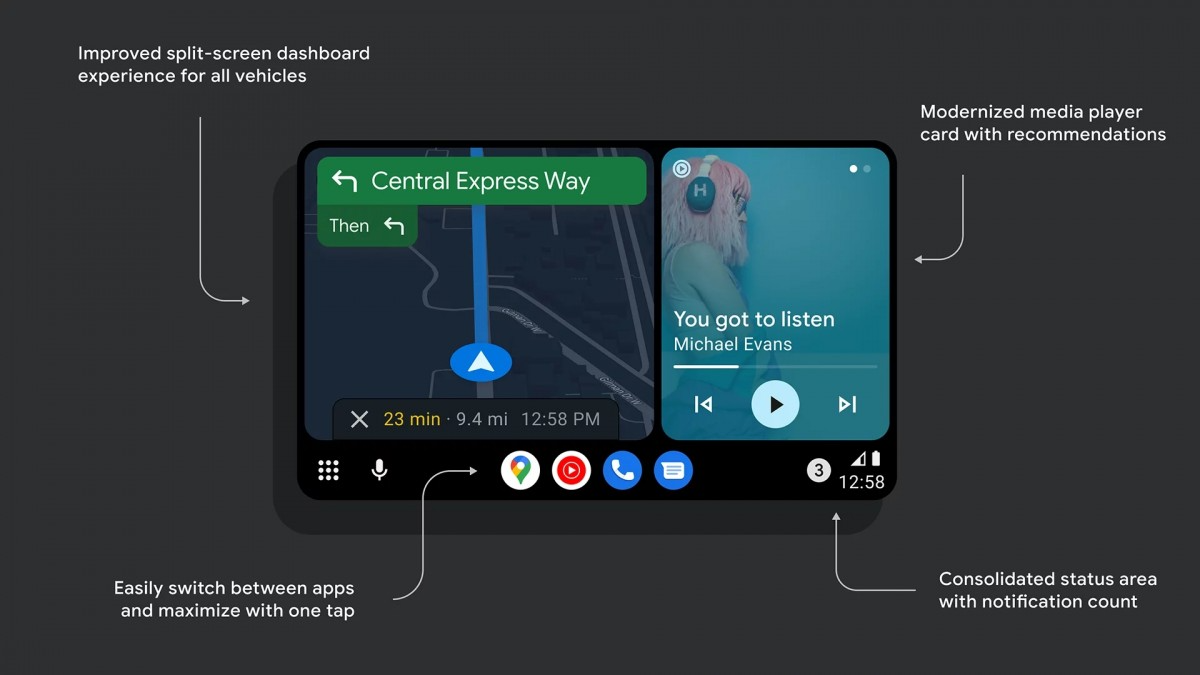
Integrating Coolwalk Android Auto with Apps and Services
Android Auto is a car mode interface for controlling an Android phone with a car’s built-in display and controls. It was announced on June 25, 2014, and released in November 2014. Android Auto is available for Android phones running 5.0 “Lollipop” or later.
The interface is designed to minimize distractions while driving, allowing the driver to control the car’s audio system, navigation, and climate control, as well as make and receive phone calls, without having to look at or touch the phone.
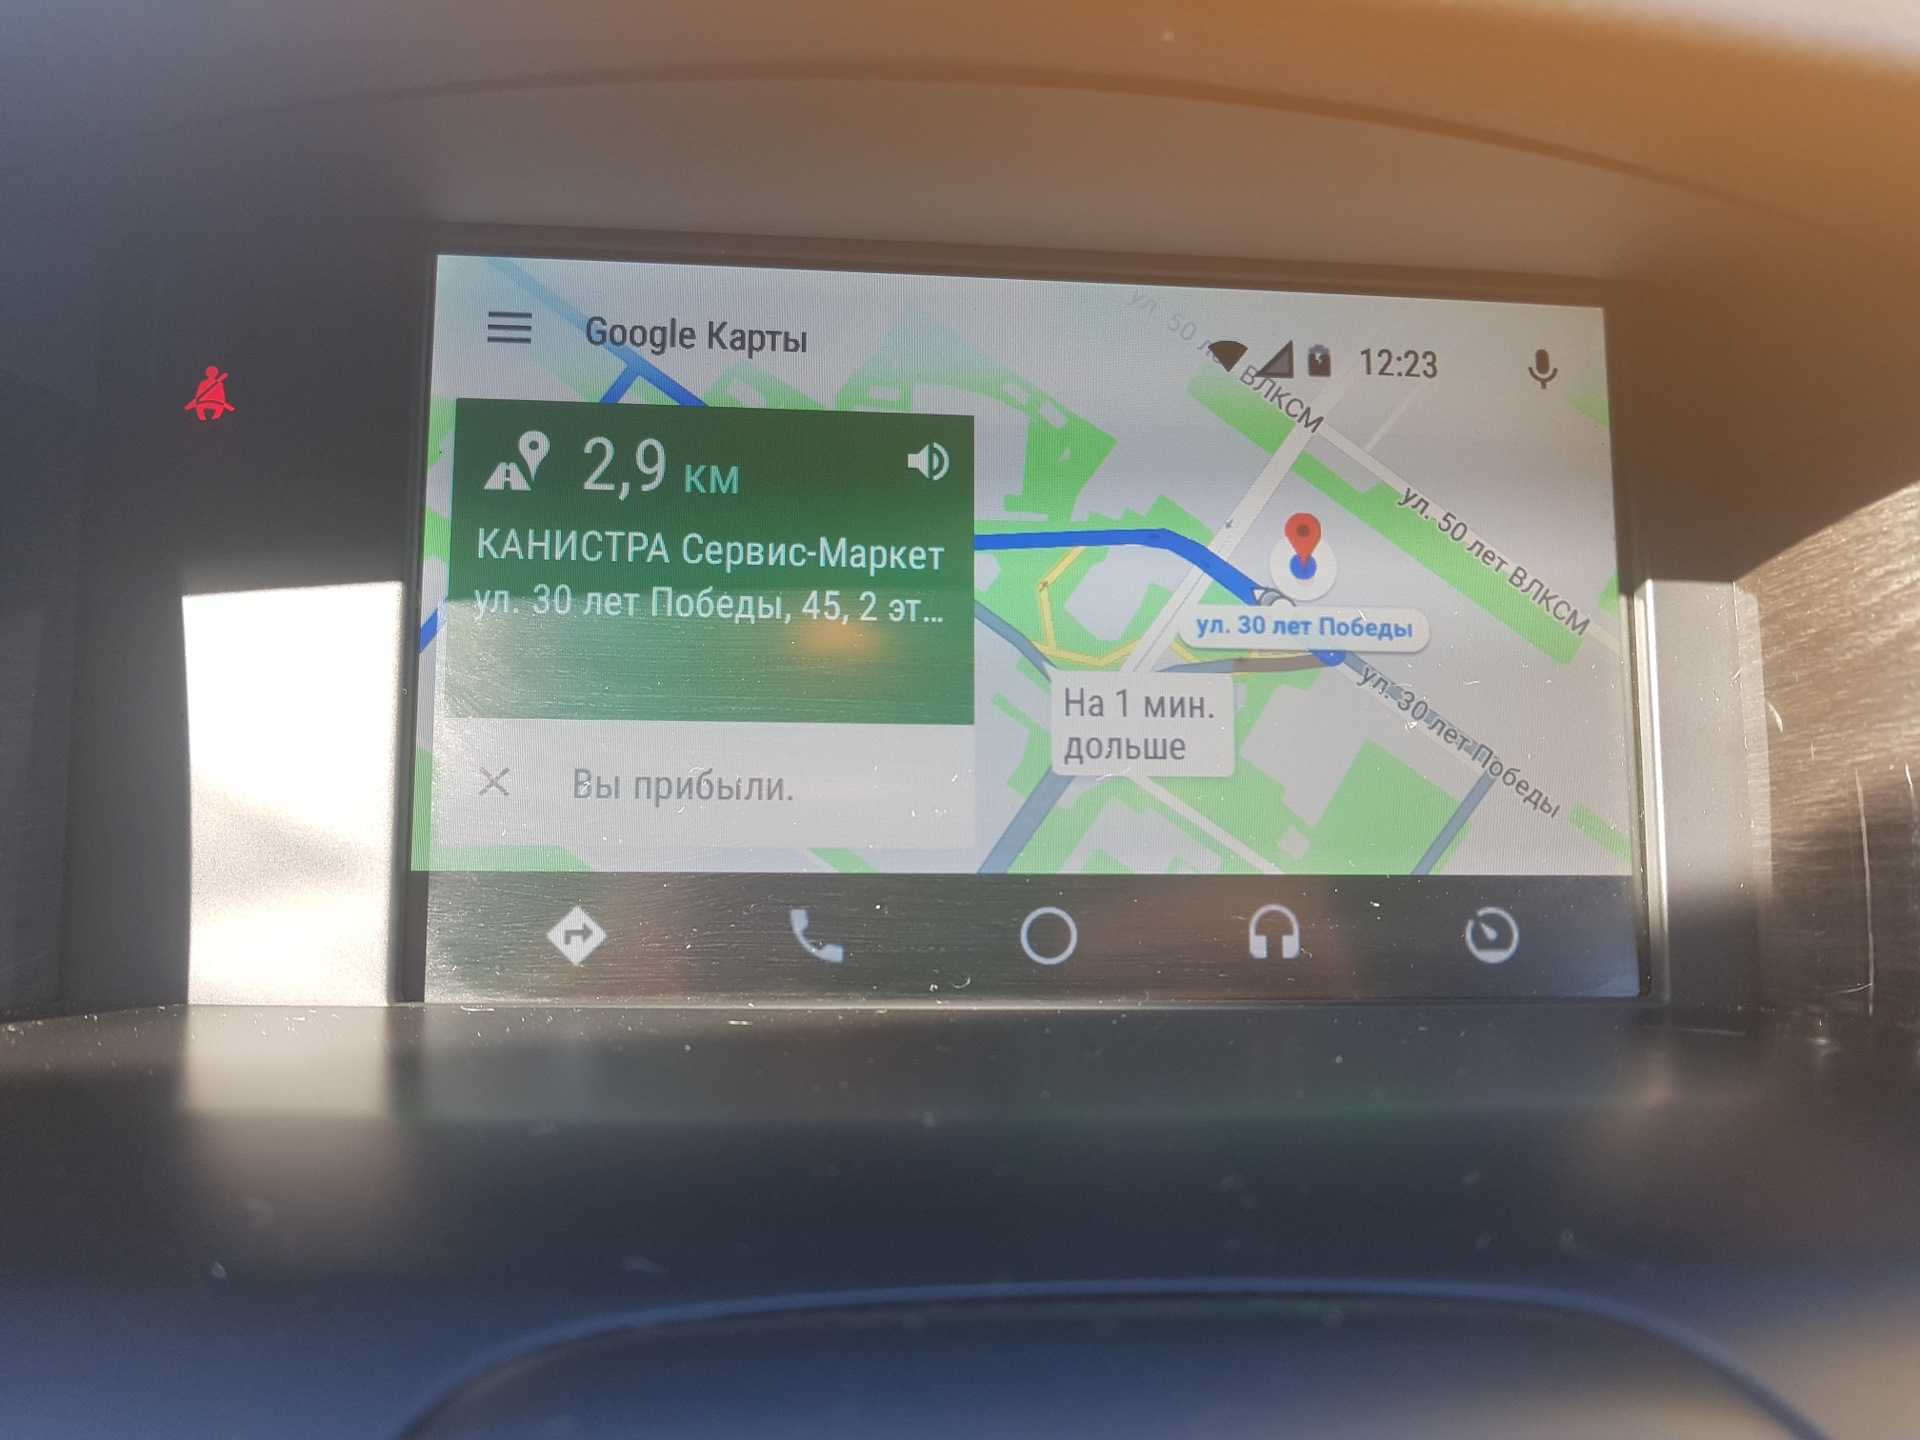
Android Auto is integrated with a number of car-manufacturer systems, as well as with Google Maps, Google Play Music, and Hangouts. It can also be used with third-party apps such as Spotify and WhatsApp.
To use Android Auto, the phone must be connected to the car’s infotainment system either via a USB cable or wirelessly using Bluetooth. Android Auto can also be used with an aftermarket head unit.
The Android Auto app is available from the Google Play Store. After downloading and installing the app, the user must open it and follow the on-screen instructions to connect the phone to the car.
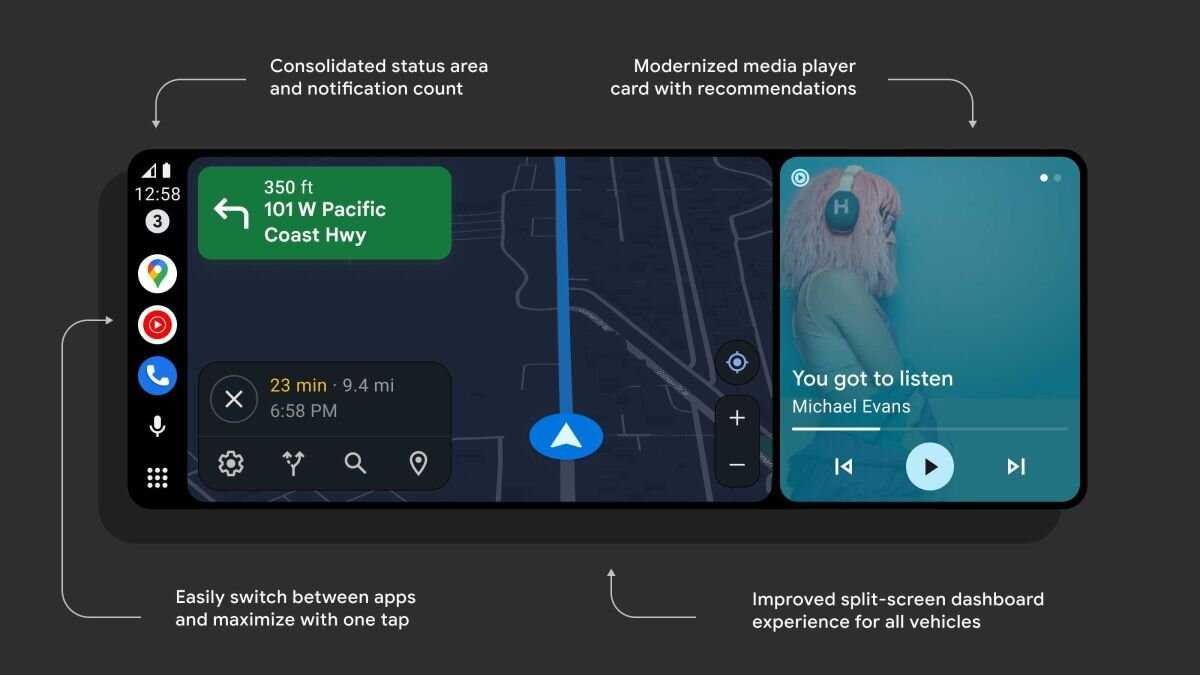
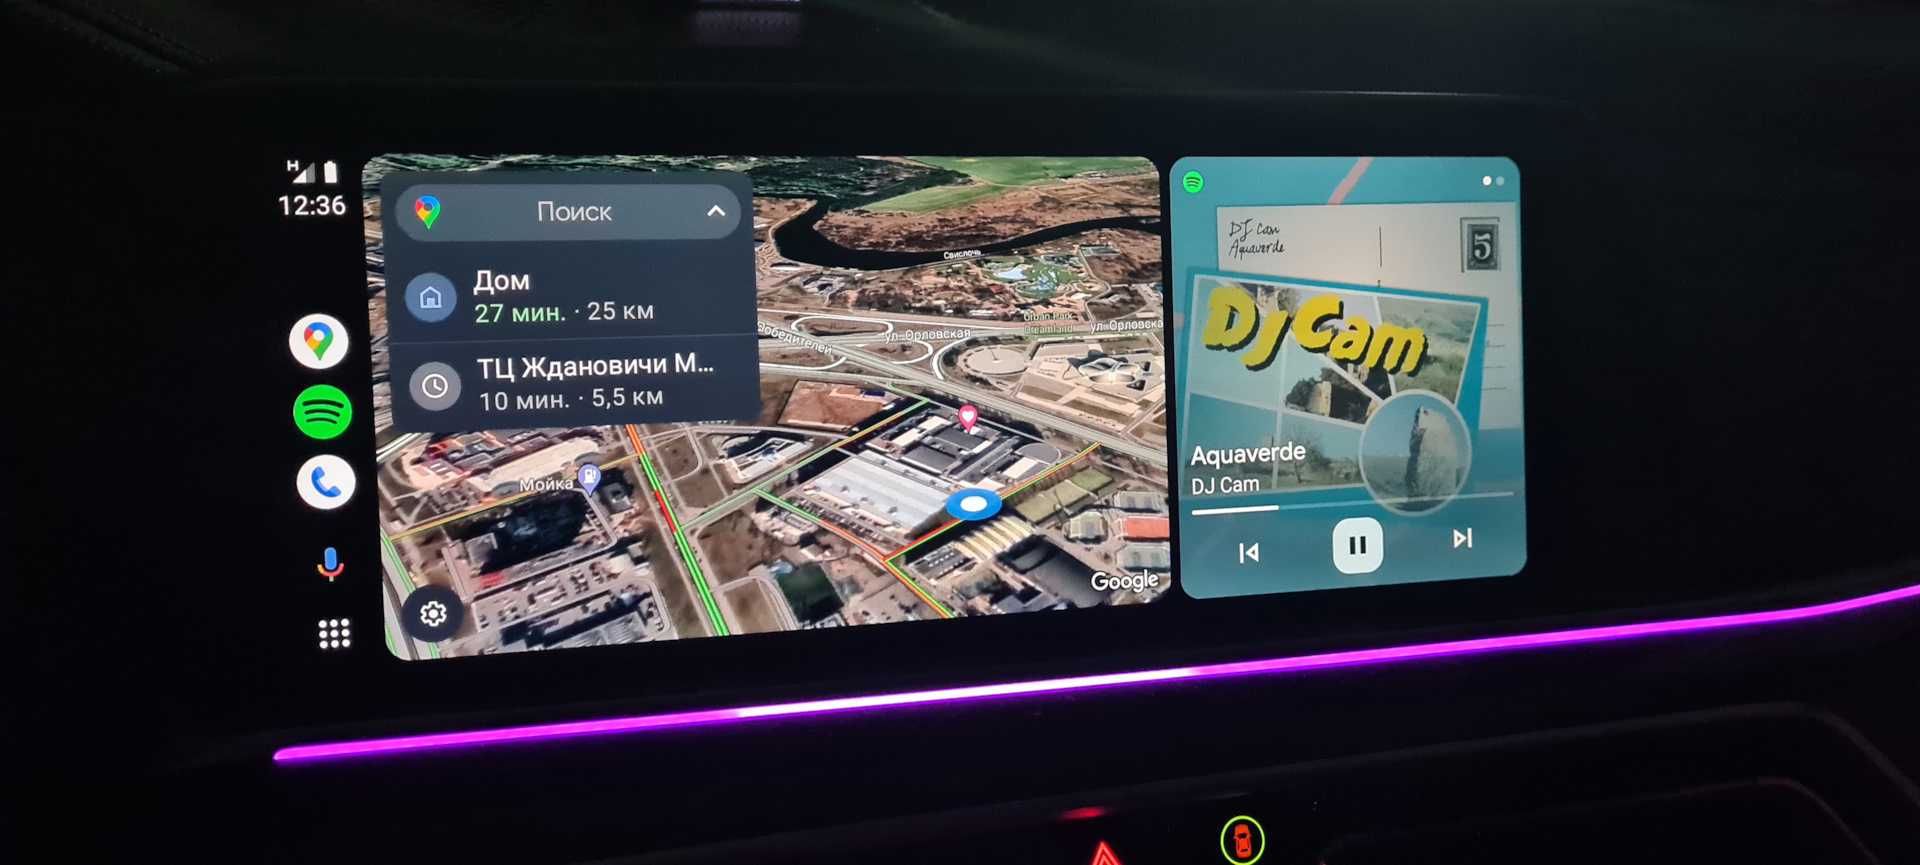
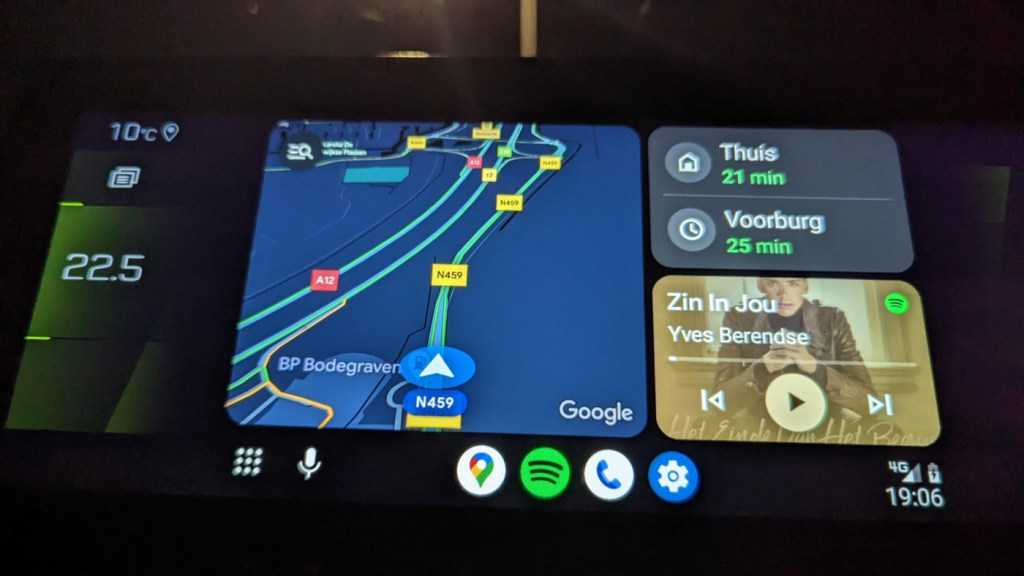
The main Android Auto screen is divided into three sections:
The top section contains the phone’s status bar, with icons for the time, battery level, and signal strength.
The middle section contains the main Android Auto screen, which shows the current navigation or music activity, as well as any notifications that have been received.
The bottom section contains buttons for returning to the home screen, opening the main Android Auto menu, and activating voice commands.
The Android Auto app can be used to control a number of functions in the car, including:
Audio system: The Android Auto app can be used to control the car’s audio system, including play/pause, next/previous track, and volume.
Navigation: The Android Auto app can be used to navigate to a destination, with voice commands or by entering the address manually. The app can also show the current location, the route to the destination, and estimated arrival time.
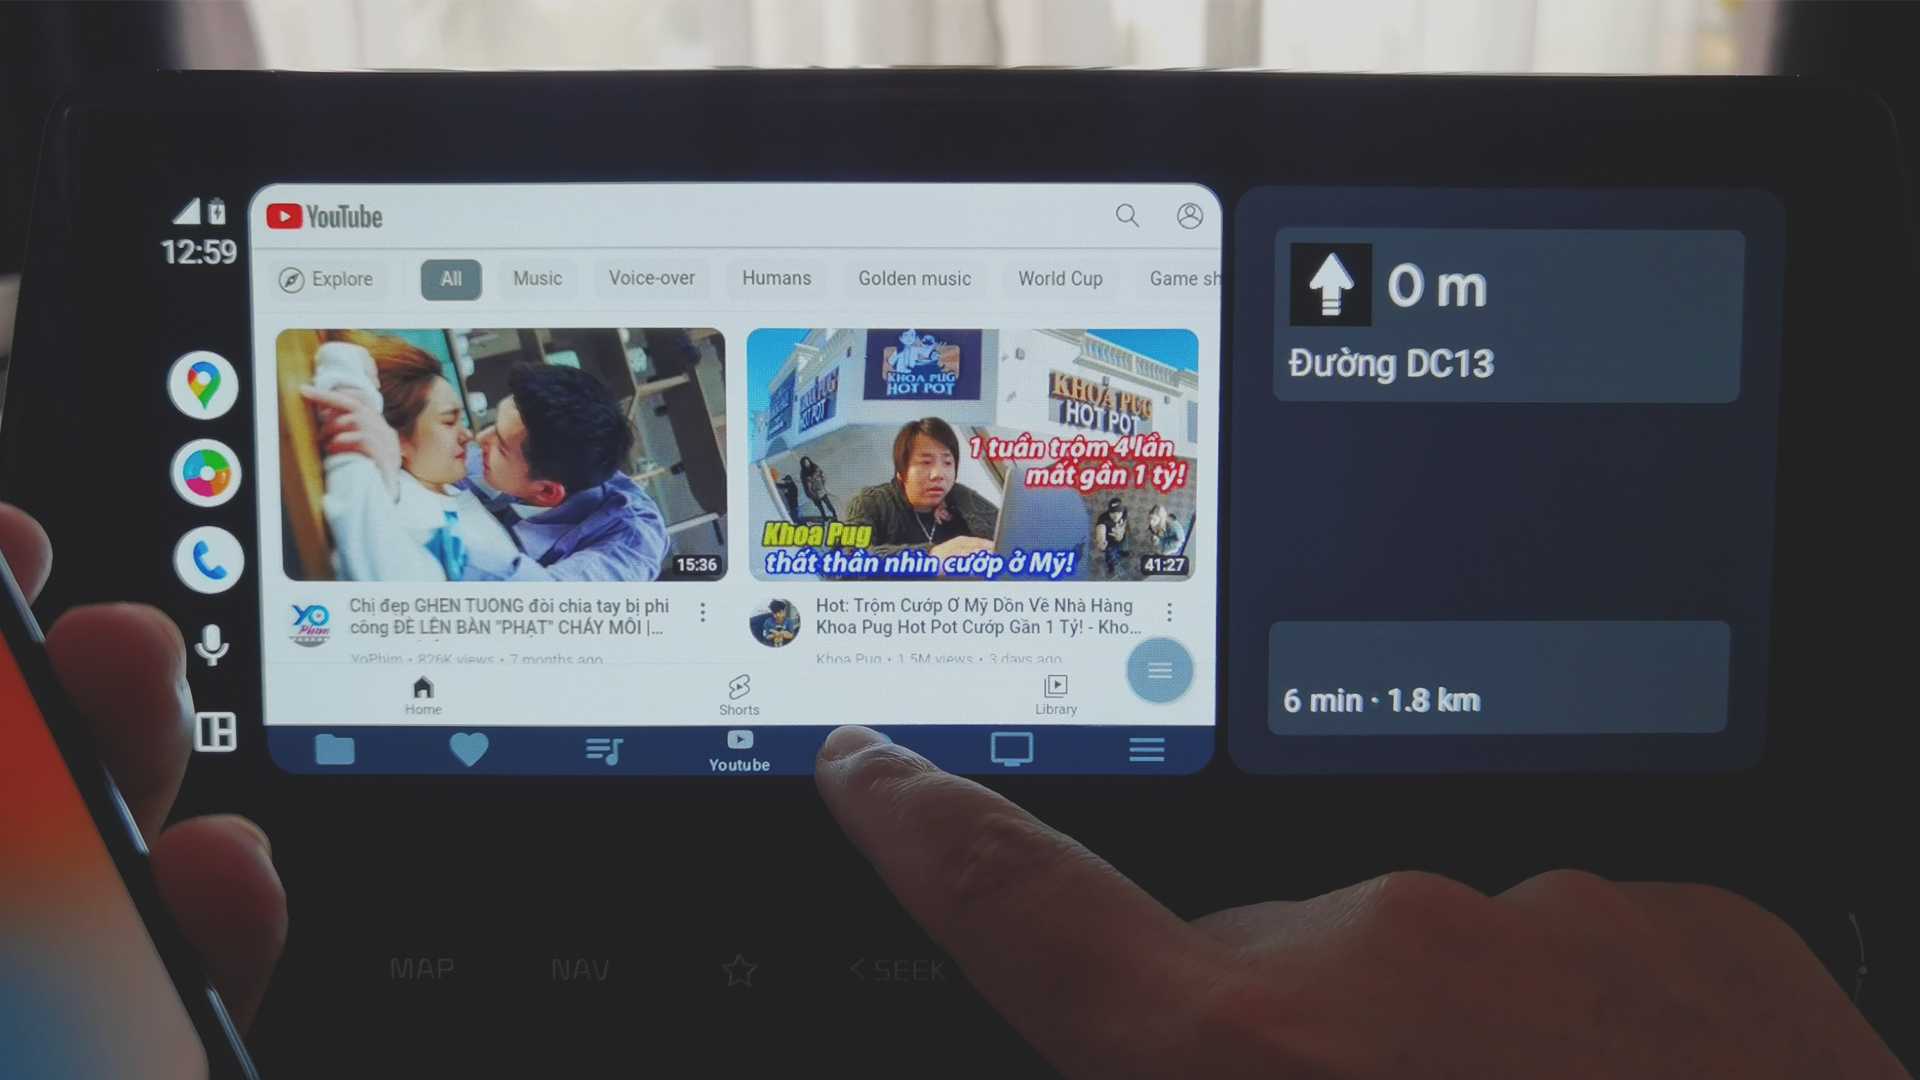
![How to watch youtube on android auto? [ android auto hack]](https://triathlon21.ru/wp-content/uploads/3/5/1/3511c7c816ec734f8700f5f5f4d38452.jpeg)

Climate control: The Android Auto app can be used to control the car’s climate control, including setting the temperature and fan speed.
Phone calls: The Android Auto app can be used to make and receive phone calls, with voice commands or by entering the phone number manually.
Text messages: The Android Auto app can be used to read and respond to text messages, with voice commands or by entering the text manually.
Third-party apps: The Android Auto app can be used to control third-party apps, such as Spotify and WhatsApp, with voice commands or by entering the app name manually.
Обхода аккаунта Google через «Отправить /Поделиться»
- Проходим по меню первоначальной настройки устройства и подключаемся к Wi-Fi сети
- Вводим e-mail и пробуем его выделить, появиться сообщение «Отправить /Поделиться», выбираем данный пункт
- Открываем через приложение SMS
- В поле кому вводим номер 112 и в теле письма пишем вновь какой-то текст и отправляем
- Появиться уведомление, что SMS не было доставлено, выбираем данное сообщение
- В вверху будет кнопка «Вызов«, нажимаем на нее
- В номернобиратели стираем номер 112 и вводим *#*#4636#*#*
- Откроется меню для тестирования устройства, нажимаем на каждый пункт, один них переадресует вас в Настройки Android
- В настройках переходим в раздел «Сброс и Восстановление» и делаем полный сброс
Установка полноценного NetHunter
Алгоритм действий
Для установки NetHunter необходимо выполнить следующие действия:
- Загрузите предварительно созданный образ или создайте свой собственный
- Переведите ваше устройство в режим разработчика
- Разблокируйте своё устройство
- Установить TWRP
- Flash Magisk
- Android 9 и выше: отформатируйте данные и прошейте Universal DM-Verity и ForceEncrypt Disabler.
- Установить NetHunter
- Android 10 и выше: обновите приложение NetHunter из магазина NetHunter.
- Запустите приложение NetHunter, чтобы завершить установку
1. Поддержка NetHunter и готовые образы
Вы можете подтвердить, что ваше устройство и версия Android поддерживаются посмотрев следующие ссылки: https://www.offensive-security.com/kali-linux-nethunter-download/
Команда NetHunter создаёт и публикует образы для отобранных устройств на официальной странице загрузки NetHunter.
2. Перевод вашего устройства в «Режим разработчика»
Перед началом установки вы должны включить режим разработчика на своём устройстве. Для этого перейдите в «Настройки» → «О программе» и 7 раз коснитесь поля «Номер сборки», пока не получите уведомление о том, что режим разработчика включён. Вернитесь на главную страницу настроек, и у вас появится новый раздел под названием Параметры разработчика. Нажмите на новый раздел параметров разработчика и включите параметры расширенной перезагрузки и отладки Android.
NetHunter поддерживает более 60 различных устройств под управлением версий Android от Kitkat до Android Q.
Хотя мы стандартизировали процедуру установки NetHunter, шаги по разблокировке, рутингу и установке пользовательского рекавери различаются от устройства к устройству и даже различаются между версиями Android.
Предпочтительным кастомным рекавери для NetHunter является TWRP.
Предпочтительным программным обеспечением для рутирования устройства для NetHunter является Magisk.
Пожалуйста, обратитесь к соответствующему руководству по разблокировке, рутингу и установке пользовательского рекавери на вашем устройстве с предпочитаемого вами интернет-ресурса, такого как форум разработчиков XDA.
6. Прошивка универсального модуля DM-Verity и ForceEncrypt Disabler.
ВАЖНОЕ ПРИМЕЧАНИЕ для пользователей Android 9, 10 и 11: перед установкой NetHunter убедитесь, что вы прошили Universal DM-Verity, ForceEncrypt Disabler и отформатировали раздел данных.
Magisk не поддерживает изменение контекста пользователя на зашифрованных разделах данных, что приводит к ошибкам при подключении к Kali rootfs через ssh (т.е. «Требуемый ключ недоступен», «Required key not available»), если раздел данных зашифрован.
7. — 9. Установка образа NetHunter
Теперь, когда ваш телефон Android готов, перенесите на него образ NetHunter, перезагрузитесь в режиме восстановления и прошейте zip на свой телефон. После этого перезагрузитесь и запустите приложение NetHunter, чтобы завершить настройку!
ВАЖНОЕ ПРИМЕЧАНИЕ для пользователей Android 10 и 11: обновите приложение NetHunter из магазина NetHunter после прошивки NetHunter. В Android 10 введены ограничения на «ограниченное хранилище», которые не позволяют NetHunter использовать место хранения, которое мы традиционно использовали для сохранения файлов конфигурации
Мы находимся в процессе перемещения местоположения и реализации функции импорта/экспорта, но обновление приложения после прошивки NetHunter предоставляет обходной путь, который позволяет нам продолжать доступ к текущему местоположению хранилища, пока не будут реализованы новые функции.
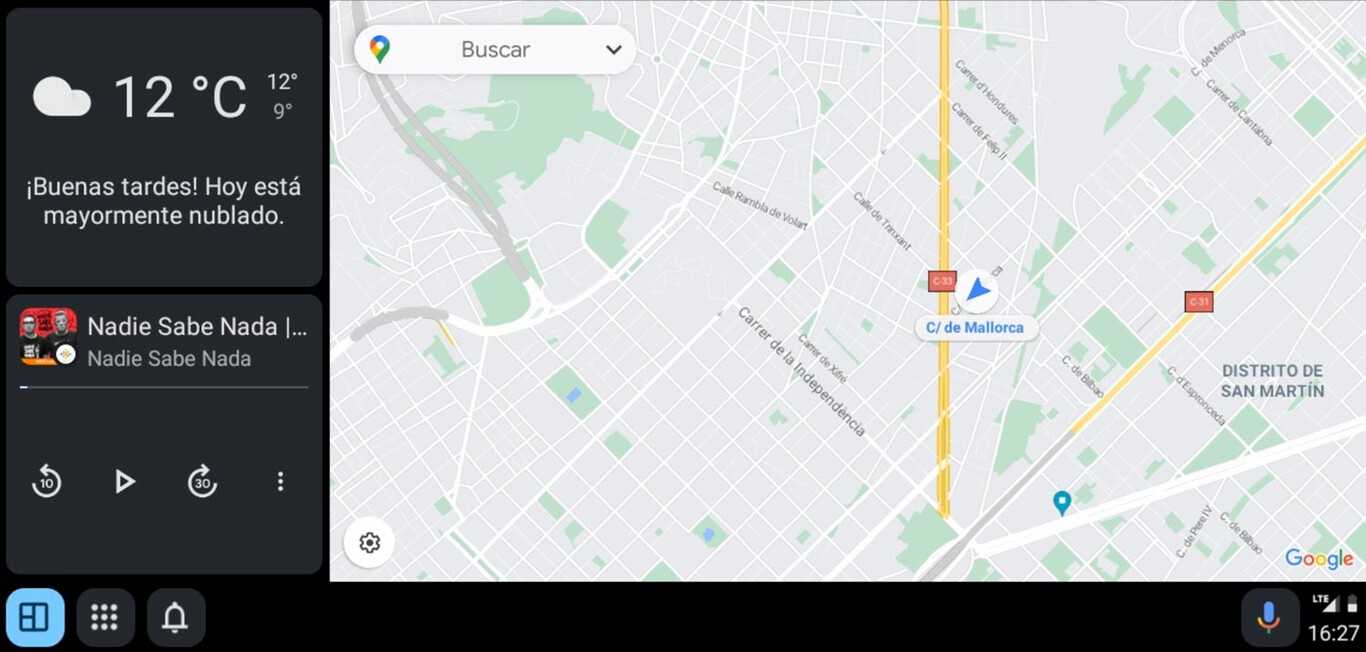
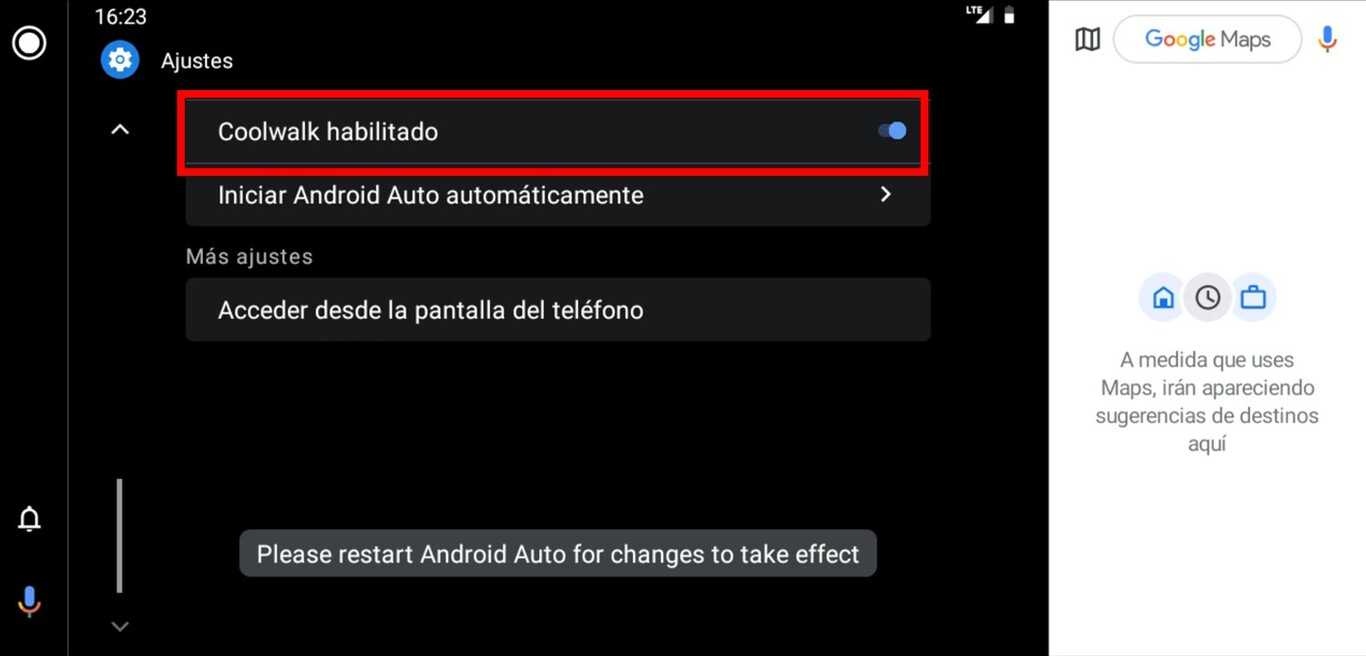
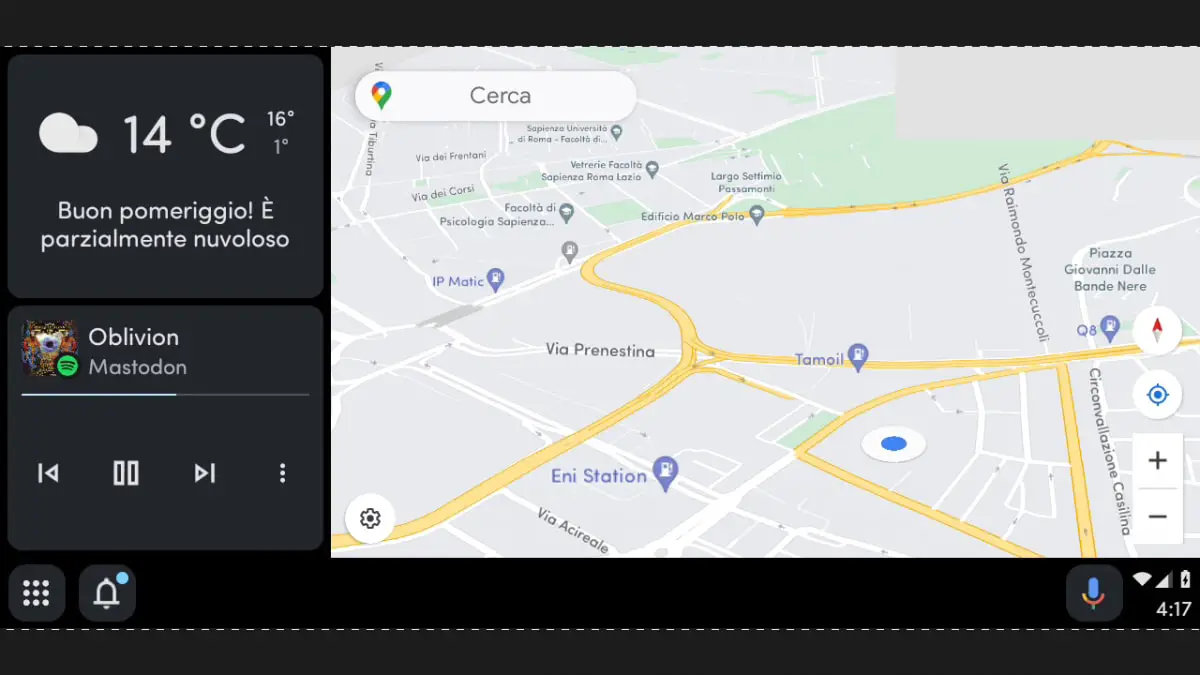
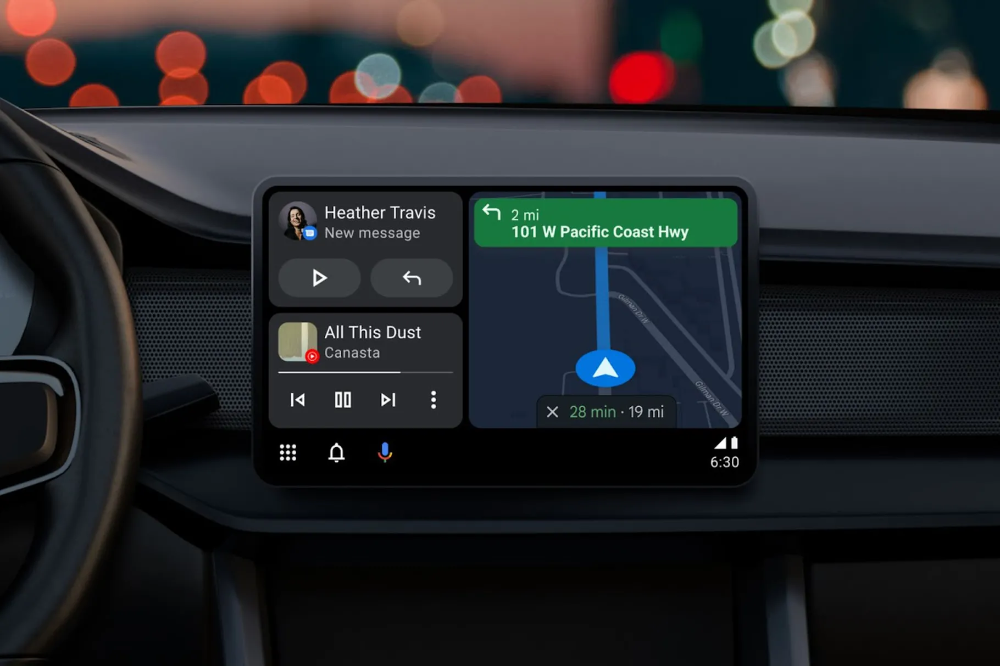
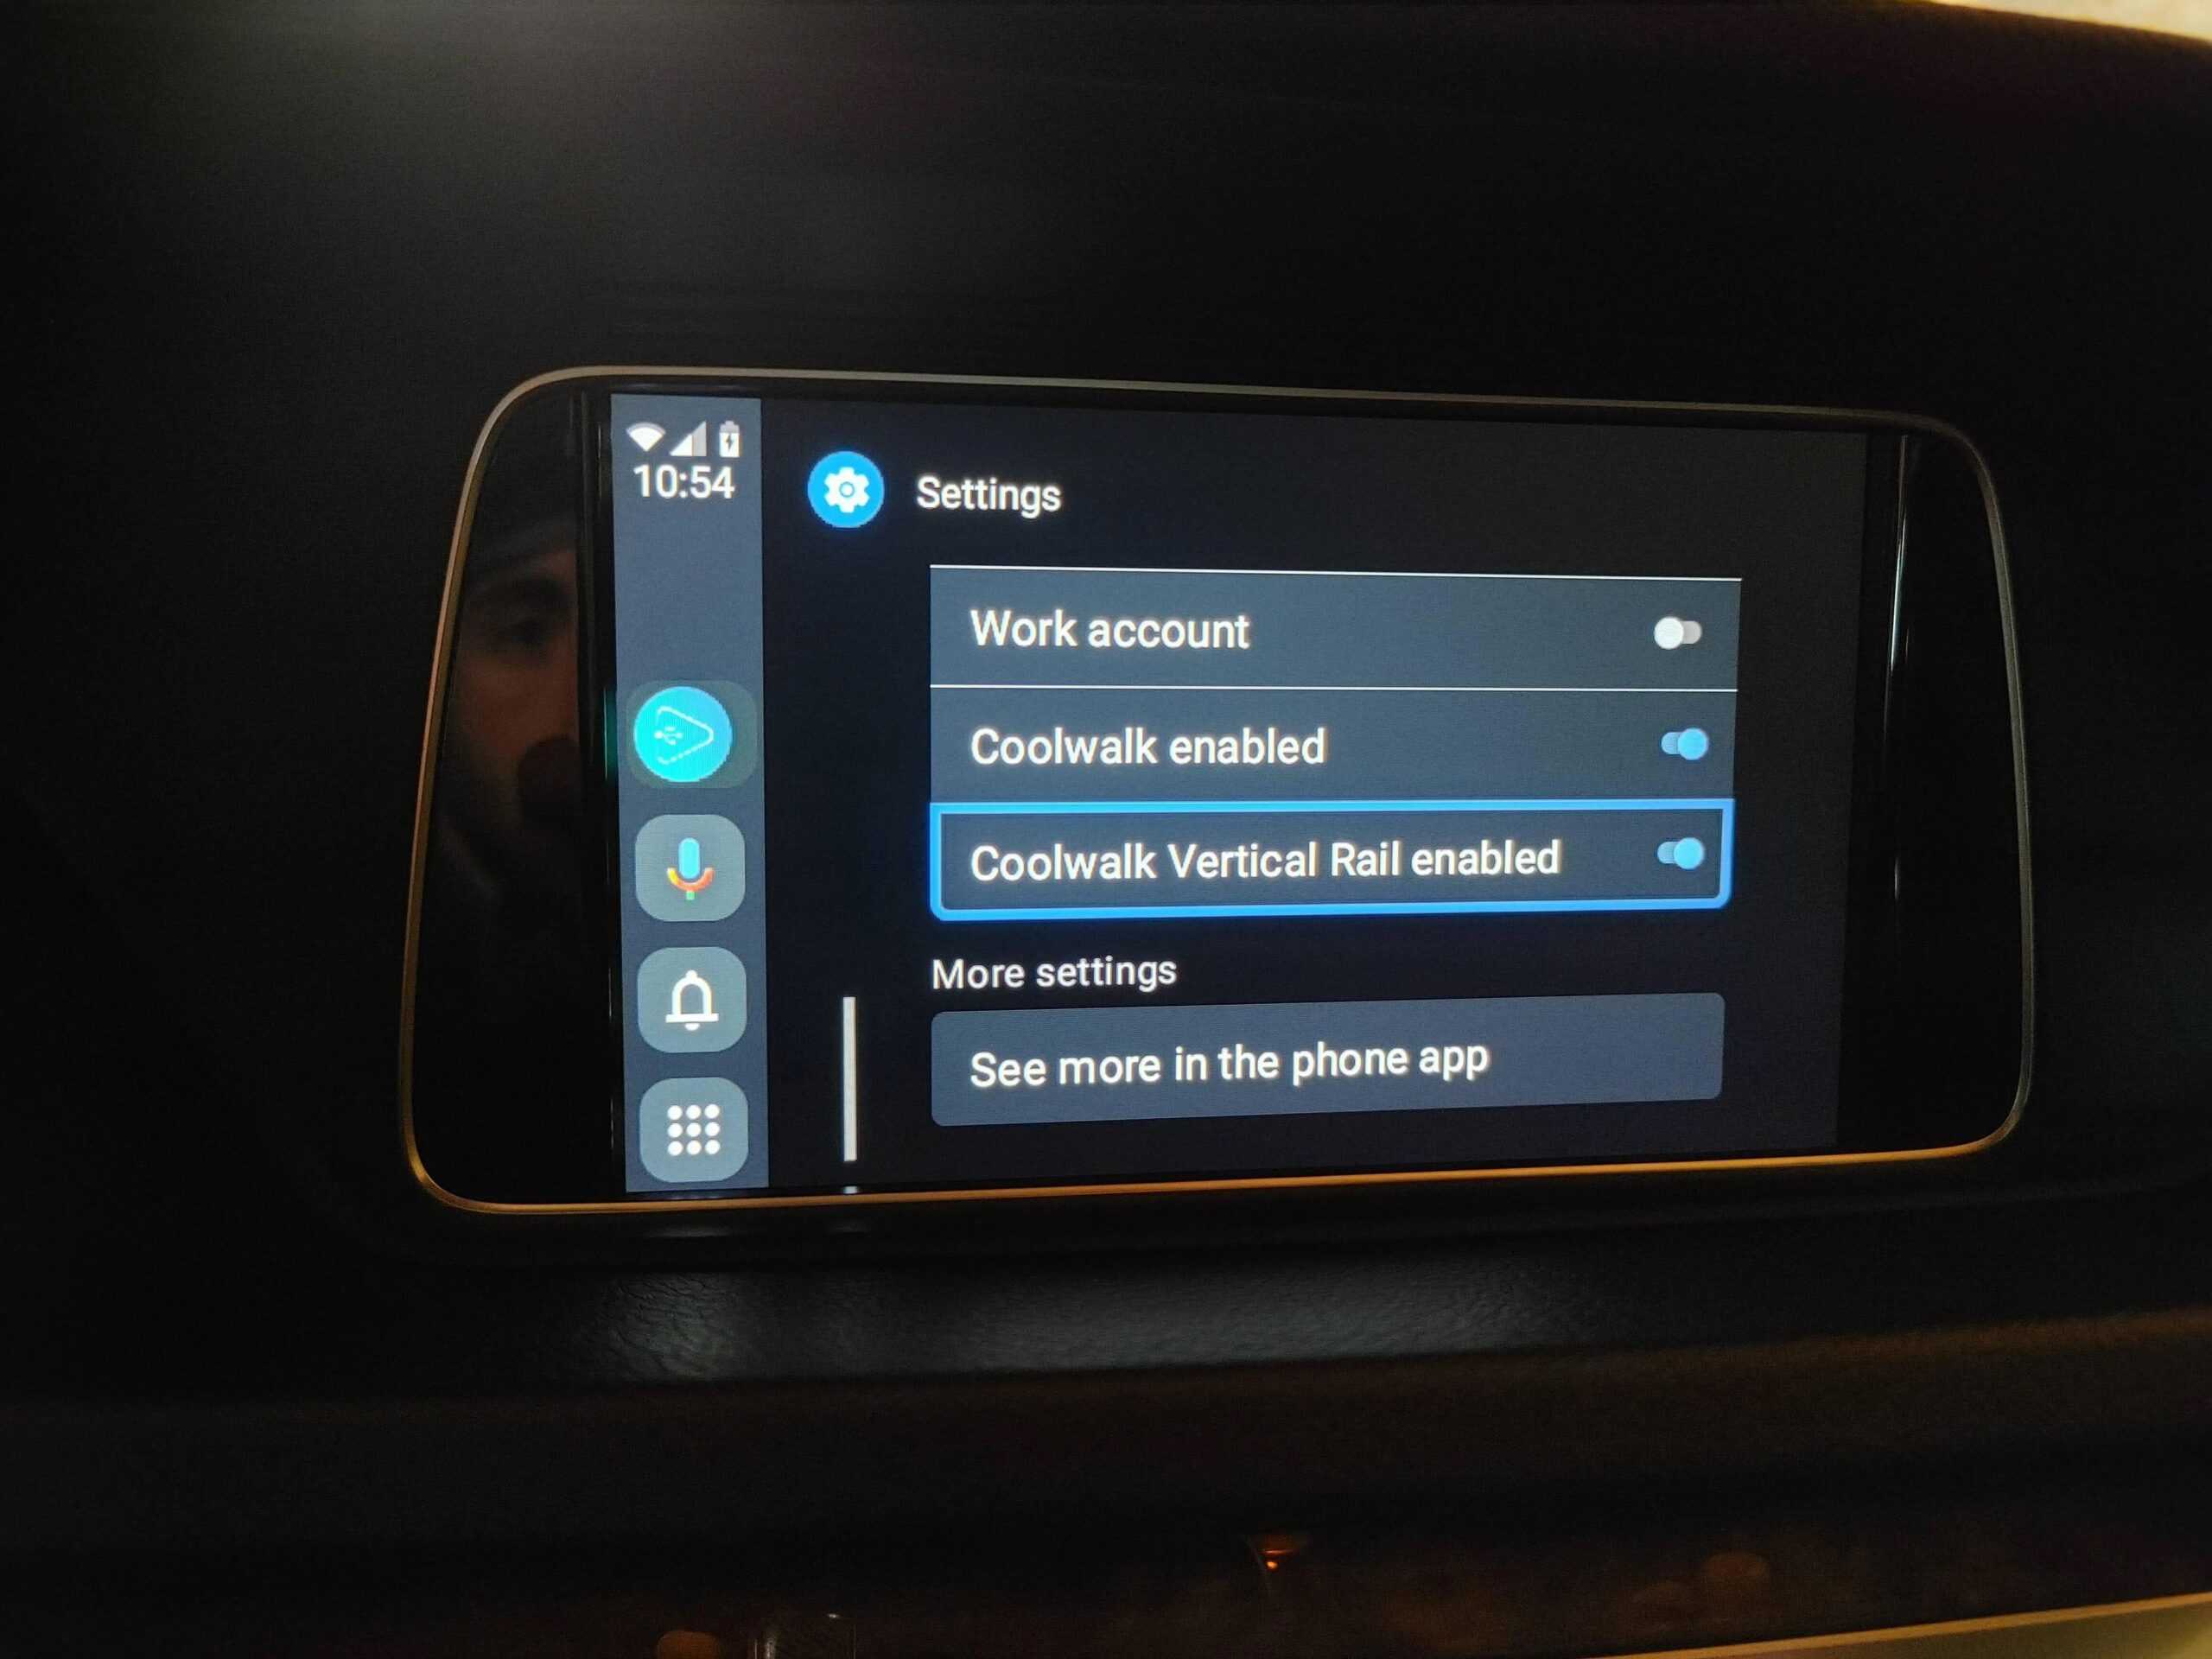
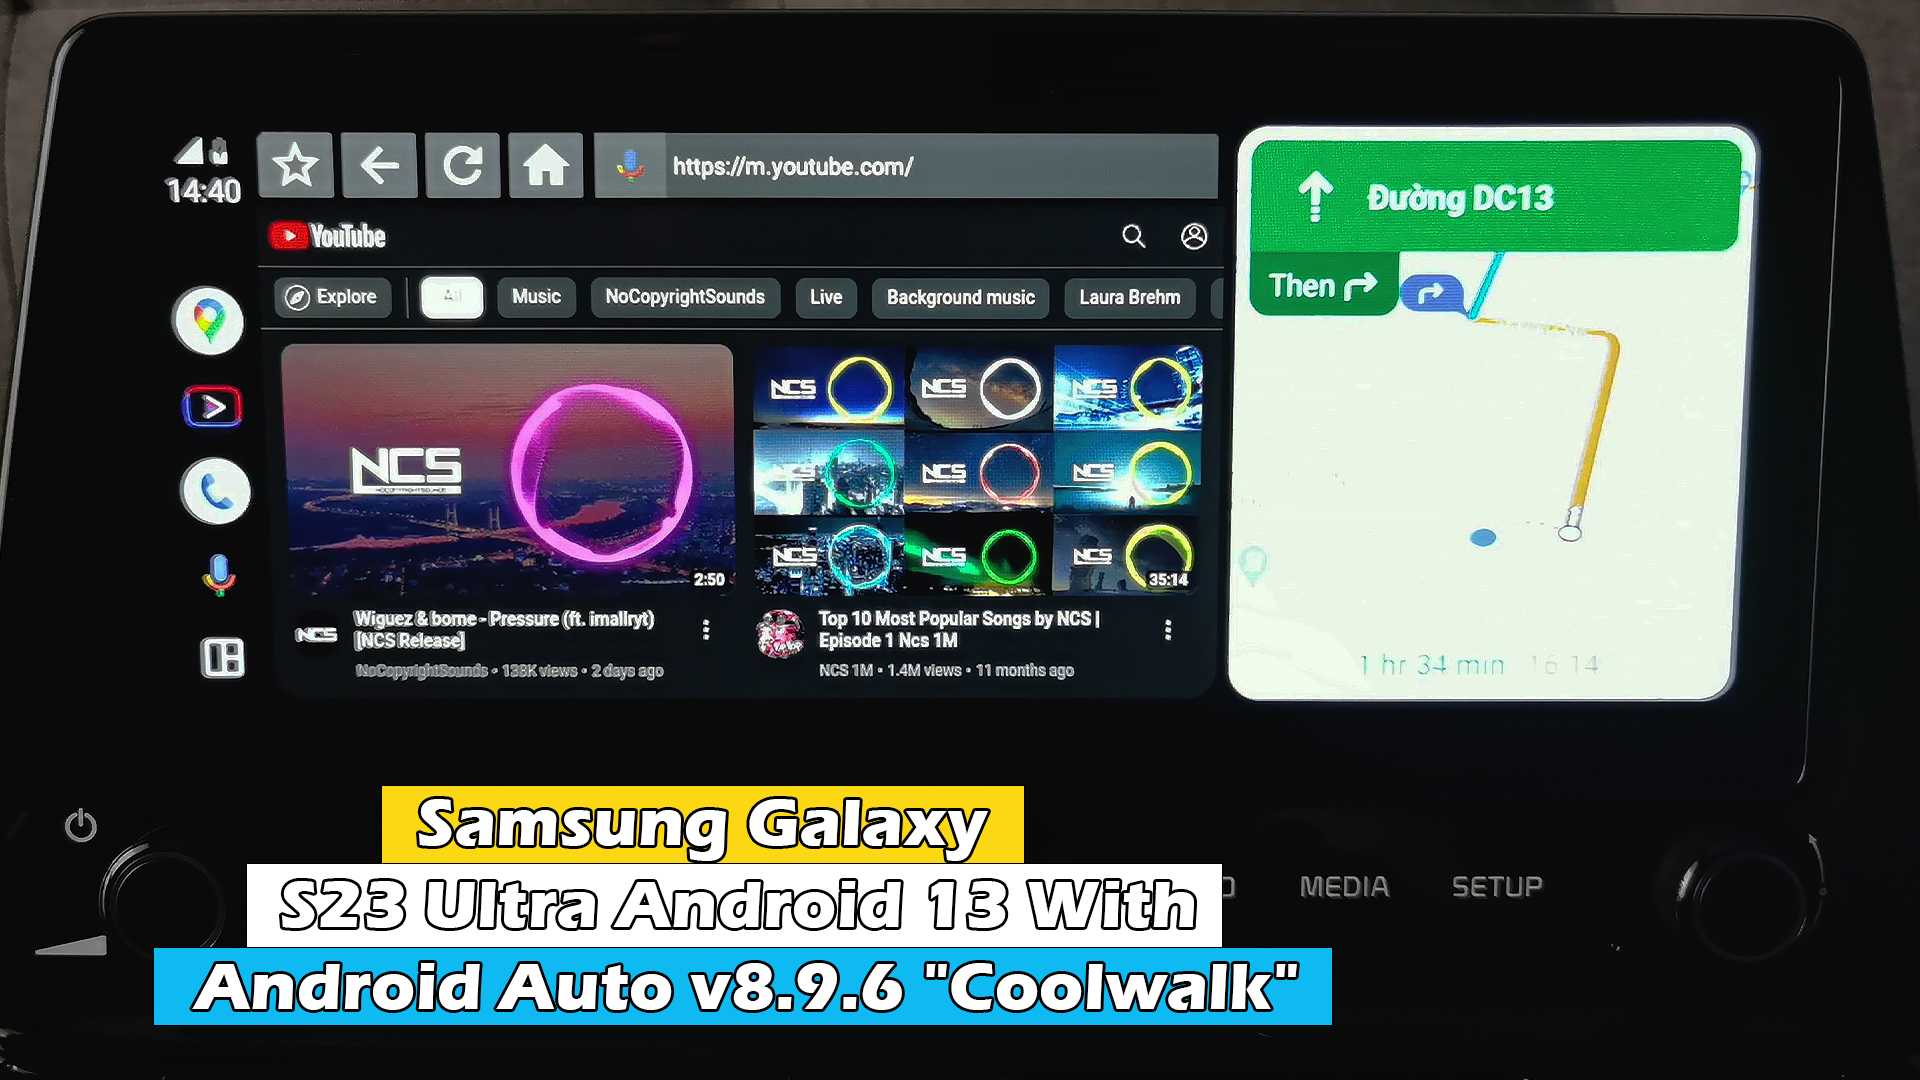
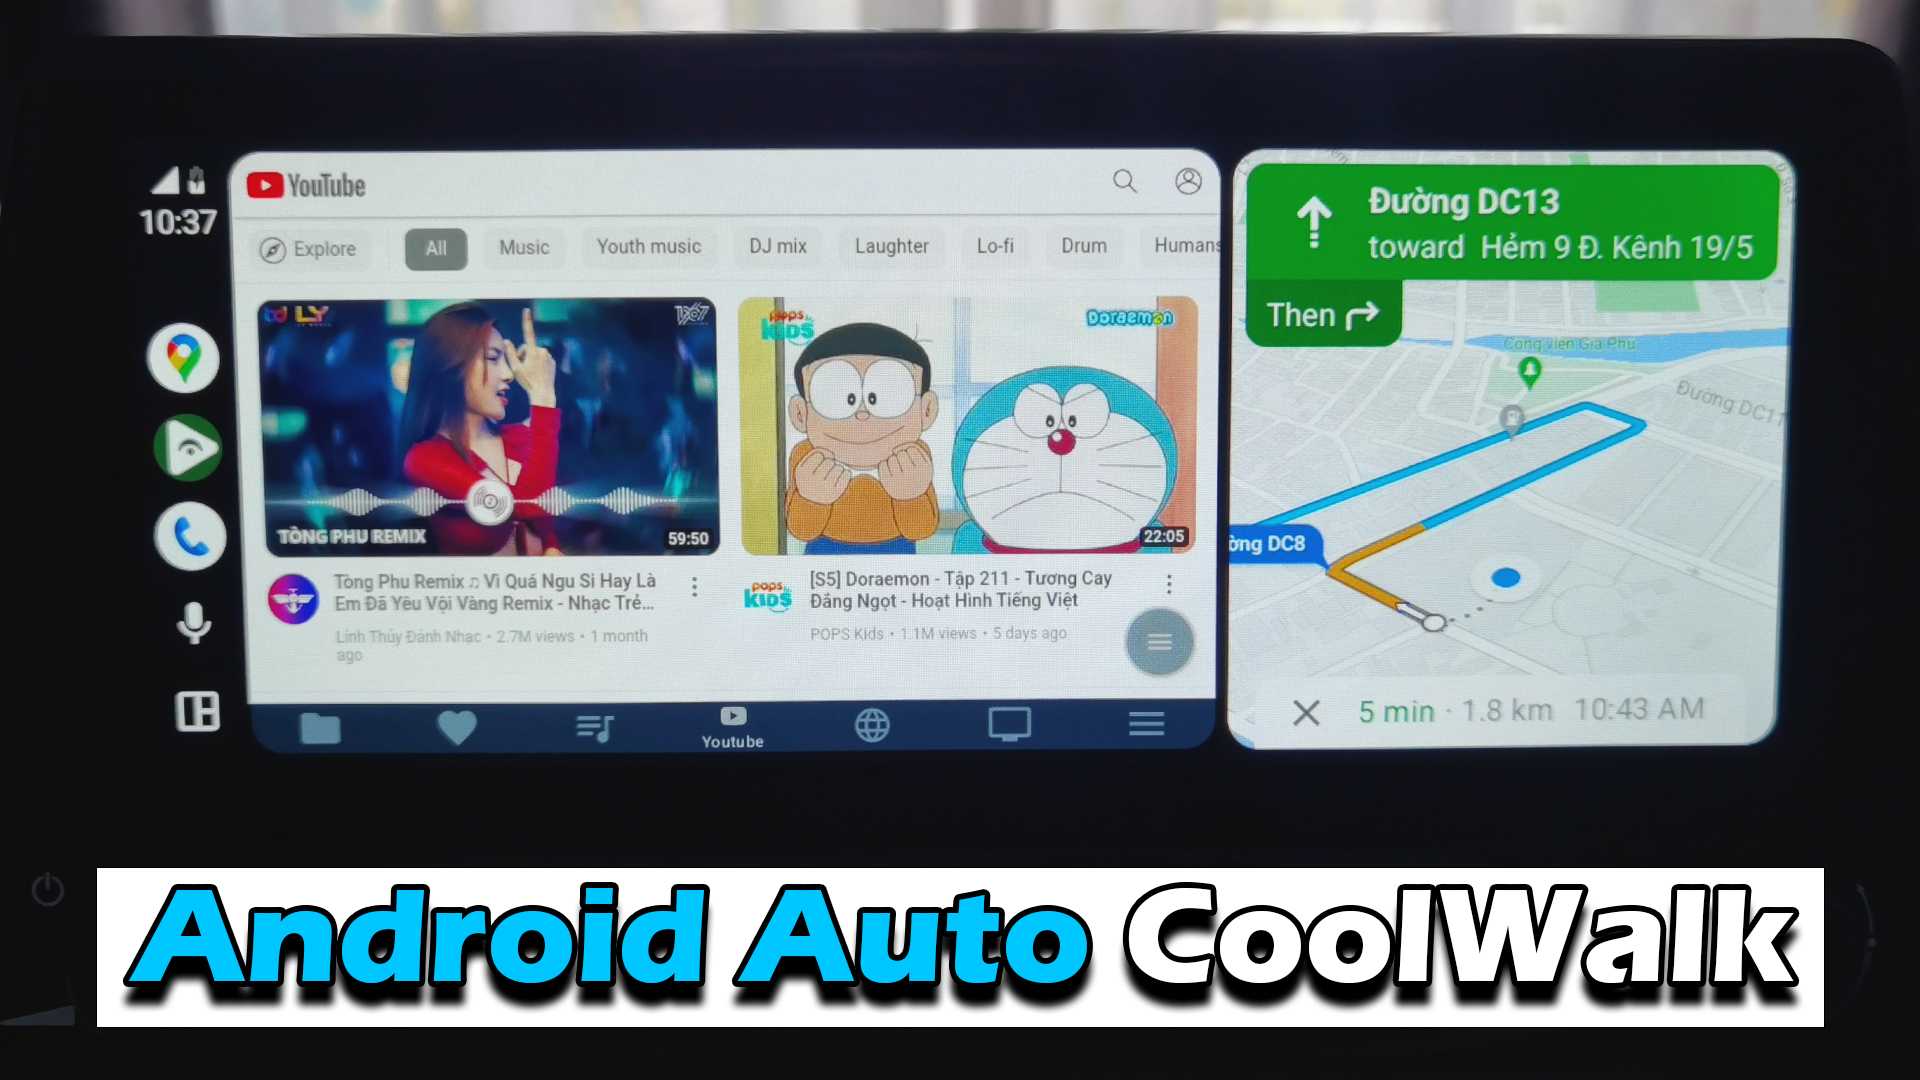
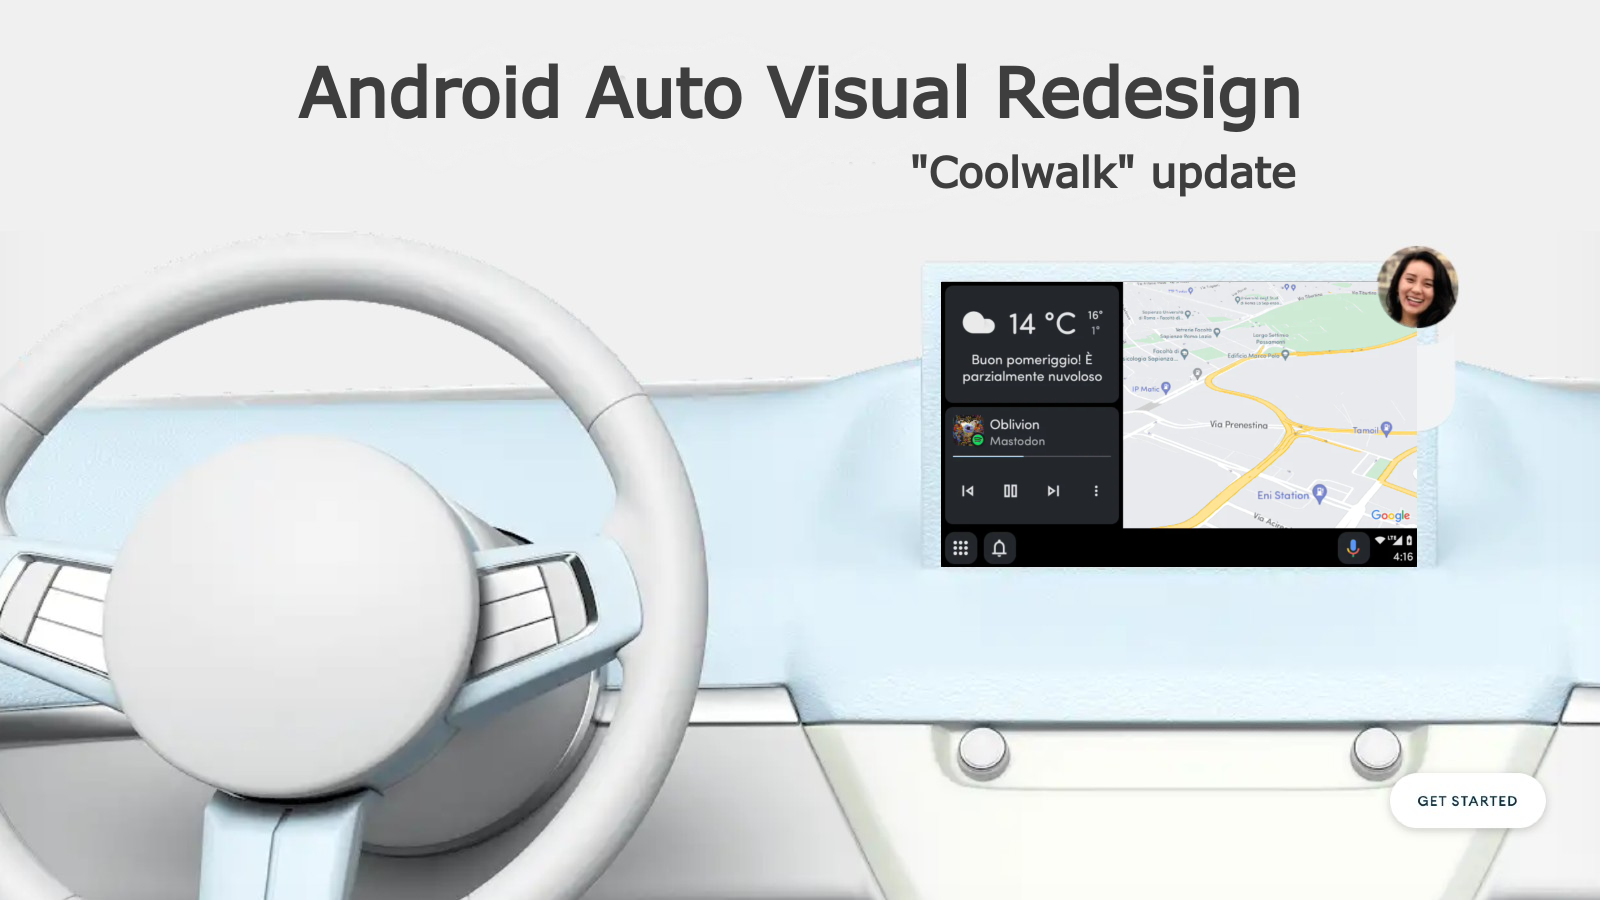
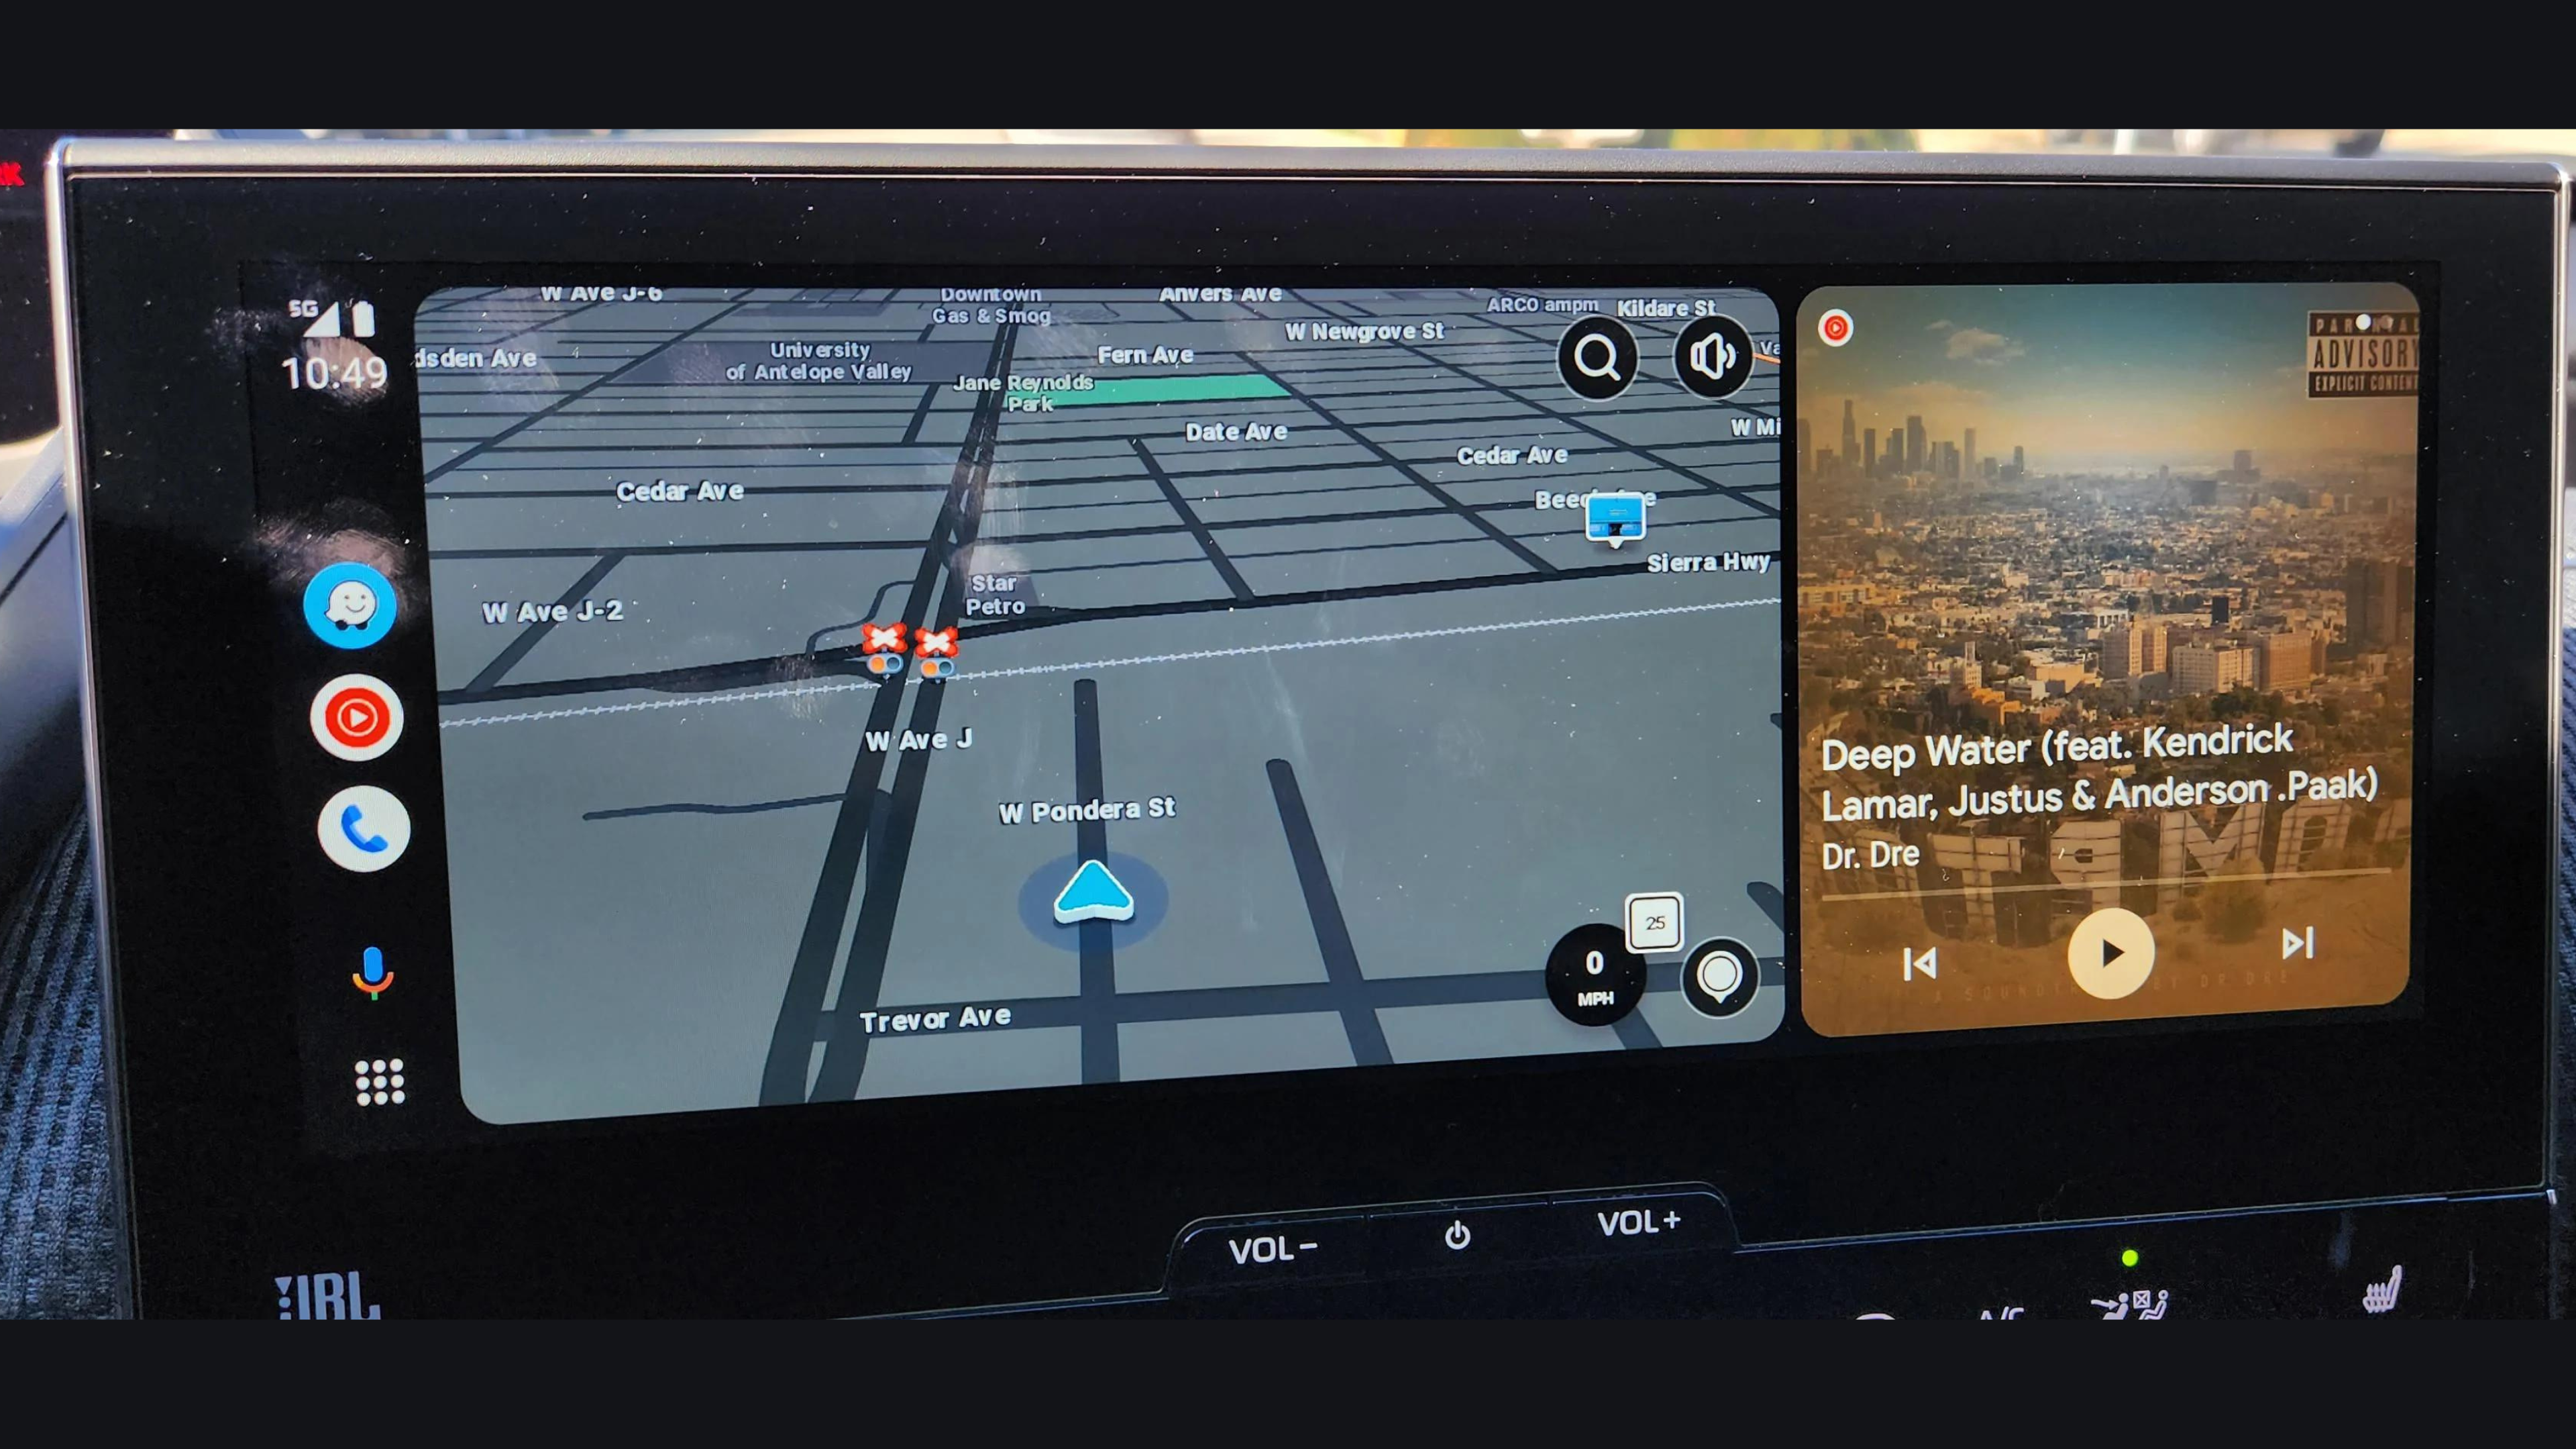
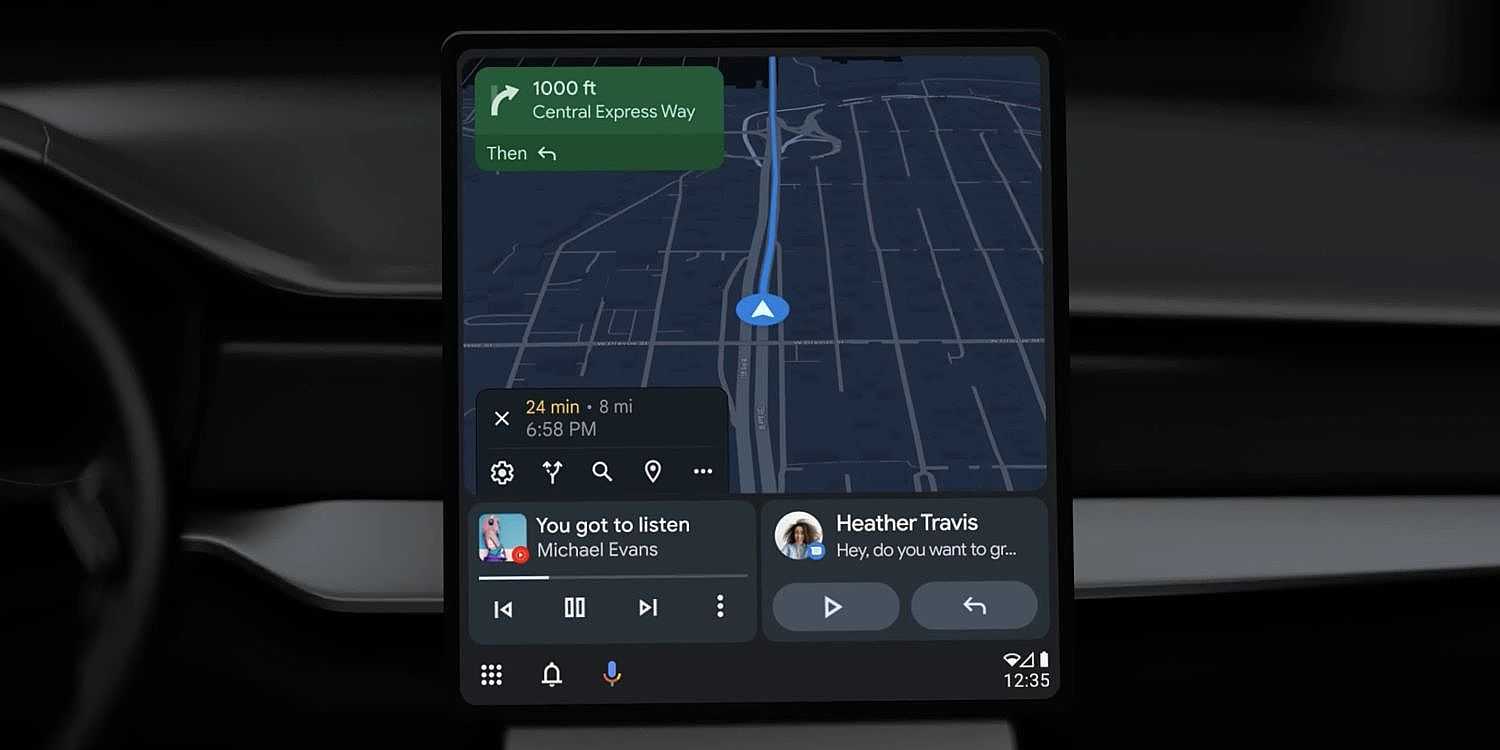
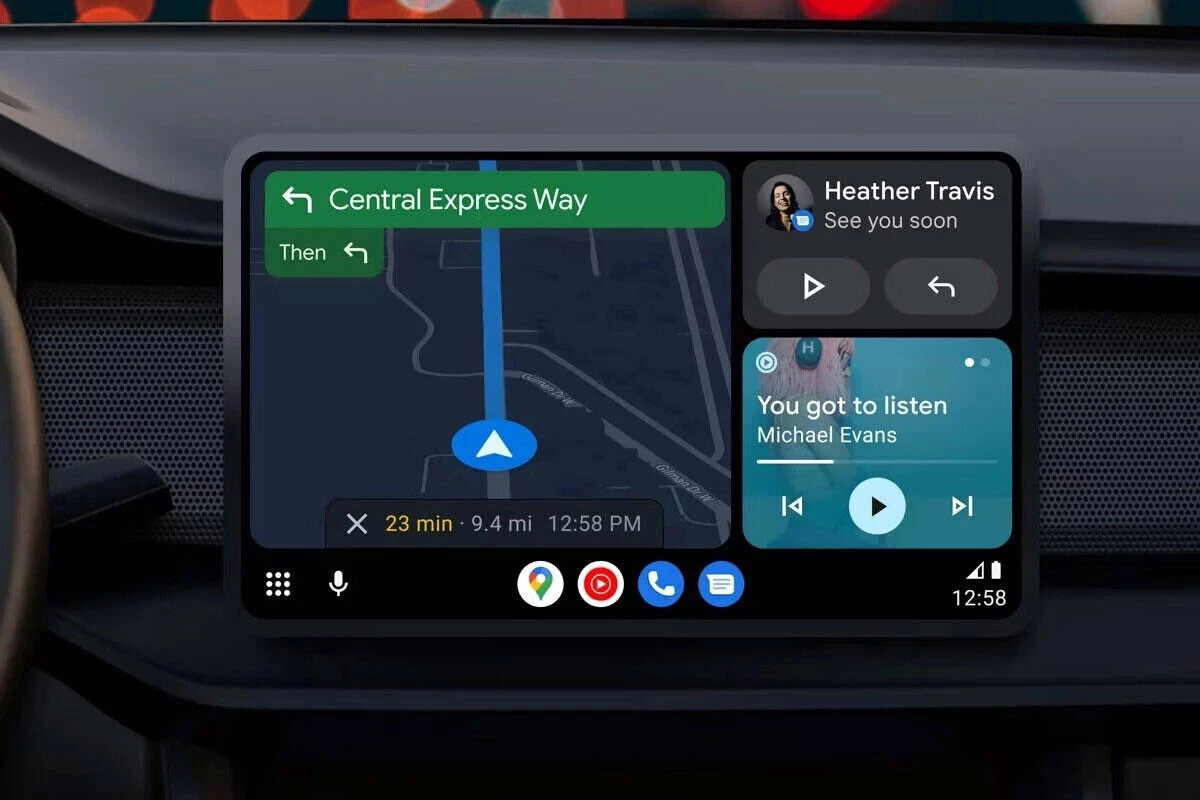
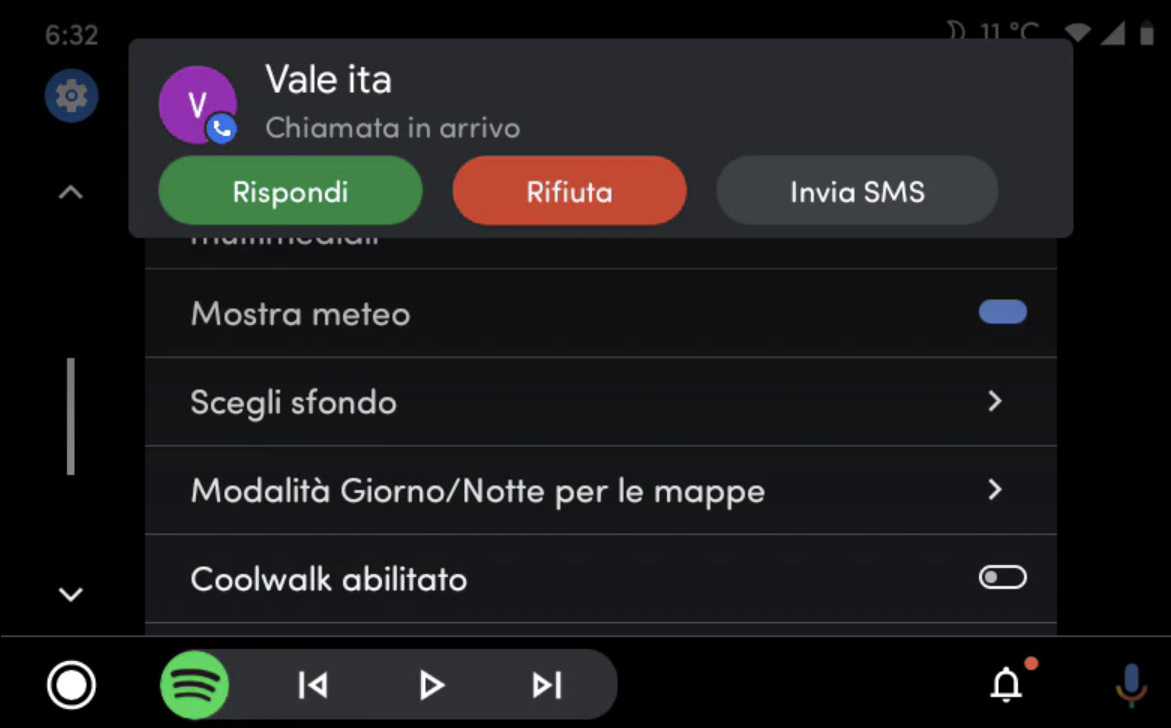
How to and activate Coolwalk in Android Auto
Coolwalk is gradually being implemented. In other words, while some s may already have the latest interface, you may have to wait a little more. Undoubtedly, the most important thing is to make sure you have updated Android Auto to its latest version. Otherwise, even if Coolwalk had been made available to all s, you will not have access to the revamped design.
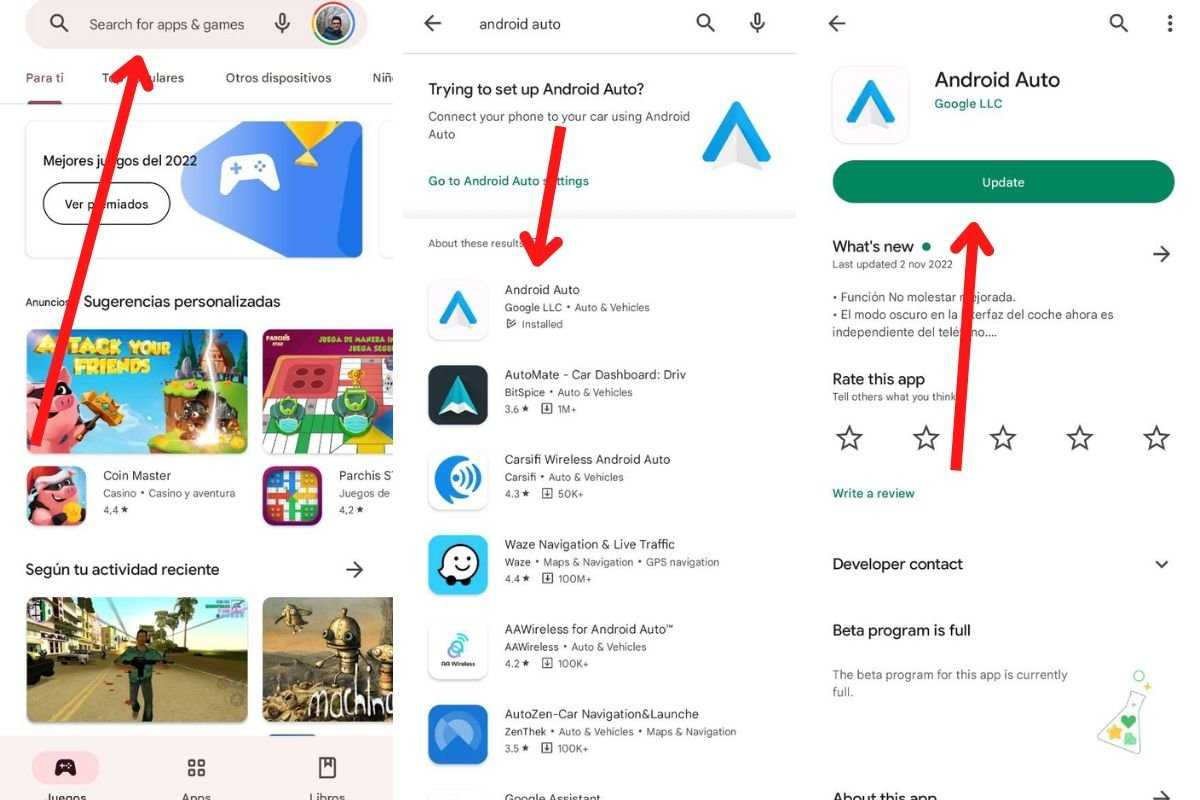
Update Android Auto from the Google Play Store
Updating Android Auto is simple:
- Open the Google Play Store app.
- Type Android Auto in the search engine at the top of the interface.
- Tap on Android Auto. Usually, the app will show a label saying Installed, especially if you have already been using this tool.
- Tap Update to get the latest version.
- You can also visit Android Auto on Malavida to check if there is a new version available to .
You are now ready to receive Coolwalk when Google makes it available for all s. However, is it possible that you already have the new interface and do not know it? There is a very simple way to determine if you have already received the latest design pattern.
Check if Coolwalk has been implemented on your device
This is how you can find out if you have Coolwalk in Android Auto:
- Open the Google Play Store app.
- Enter the term Android Auto in the search engine.
- Tap on Go to Android Auto setting.
- Check if you have the Weather option. If you do, it means that Coolwalk is not available to you. For now, the new interface does not display information related to the weather, so if you already have it, this parameter should not appear.
If you are impatient to receive the renewed design in your car and nothing seems to work, you have one last chance: try installing the beta version of Android Auto. Do so by visiting the official Play Store link and opting in to receive preliminary updates. that this step is necessary to receive the latest features.
Enable notifications for free spaces on Android Auto’s beta program
Given the anticipation around it, Android Auto’s beta program is usually unavailable. With Beta Maniac, you can be alerted when there is an opening available to be one of the first s to access this update. You can do this by following these steps:
- Beta Maniac.
- Open the application and sign in with your Google .
- Wait for the tool to analyze all the applications installed on your smartphone.
- Select Android Auto and become a beta tester if the option is available.
- Otherwise, go to Beta Maniac settings and check Auto Scan. Specify how often it should check for openings and if you want it to scan only over wifi.
- Go back to the Android Auto tab and enable notifications.
- Wait for available openings in the beta program and it as soon as possible.
Что такое Bootloader и зачем его разблокировать
Чтобы долго не расписывать и не отнимать время у других, рекомендую почитать (если вы новичок) о том, что такое загрузчик на смартфонах Xiaomi в нашем глоссарии. Ниже мы поговорим минимум о 3 причинах разблокировки бутлоадера. Советуем внимательно изучить каждый пункт, чтобы после не возникло дополнительных вопросов.
Китайская версия телефона
При покупке телефонов на таких сайтах как AliExpress или Gearbest можно найти очень выгодные цены, которые могут отличаться от местных на 50-100 долларов. Именно поэтому многие пользователи покупают телефоны с низкой ценой. Продавцы в свою очередь могут продать китайскую версию под видом глобальной. Китайская версия смартфона Xiaomi всегда дешевле и на ней может быть установлена MIUI China, или MIUI Global.
- MIUI China: на телефоне только английский и китайский языки (+ могут быть еще несколько других), нет русского, украинского и прочих. Такое устройство обычно приходит с заблокированным загрузчиком, в запечатанной коробке.
- MIUI Global: смартфон прошит на глобальную прошивку, однако сам он китайской версии. При попытке обновления можно получить «кирпич». Также в подобных случаях продавцу могут прошивать китайские аппараты в обход разблокировки загрузчика, чтобы продать их под видом «глобальных» намного дороже.
Сторонняя прошивка
Первый и основной плюс – это возможность установки кастомных (неофициальных) и локализованных (официальных, но с доработками специально под ваш регион) MIUI прошивок. Что дает кастомная прошивка:
- Более богатый функционал и расширенные опции, позволяющие контролировать всю работу смартфона;
- Простой интерфейс с урезанным или улучшенным функционалом.
- Продвинутый и чувствительный GPS-навигатор. Местоположение определяется в несколько раз быстрее, чем на стандартной версии.
- Отлично оптимизированное ядро операционной системы, которое или повышает производительность телефона, или увеличивает время автономной работы.
- Порты различных сборок от «ромоделов», начиная от Pixel Experience и заканчивая прошивками от других оболочек (OneUI, EMUI, Flyme и тд).
Стороннее Recovery
Разблокировав загрузчик, можно без труда устанавливать TWRP или CWM-рекавери, необходимое не только для получения рут-прав, но и для других важных операций на вашем смартфоне. Рассмотрим подробнее:
- Доступ к установке новой прошивки;
- Возможность установки Magisk.
- Быстрое и простое создание резервных копий.
- Получение рут-прав.
- Установка Google Camera.
- И многое другое.
Root-права
Имея разблокированный загрузчик, вы можете получить статус Суперпользователя. Почти во всех актуальных сборках используется Magisk, так как SuperSu уже давно не поддерживается и новые версии не выходят. Польза рут-прав огромна, начиная от удаления встроенной рекламы и заканчивая разгоном процессора.
Оглавление
2. Установка (установка Kali Linux на настольные компьютеры и ноутбуки с использованием файлов «.ISO»)
3. Виртуализация (виртуальные машины — Vmware, VirtualBox, Hyper-V и Vagrant)
4. USB (портативная Kali на USB-накопителе)
5. Кали на ARM (всё об устройствах ARM)
6. Контейнеры (Docker и LXC/LXD)
8. Облако (AWS, Azure и Linode)
11. Инструменты (инструменты внутри Kali)
12. Решение проблем (когда что-то идёт не так)
В поверхностных описаниях можно прочитать, что Kali NetHunter — это Kali Linux для телефонов на Android. На самом деле, NetHunter — это платформа для тестирования на проникновение с открытым исходным кодом для устройств Android, основанная на Kali Linux. Цель NetHunter: получить полноценную Kali Linux в мобильном корпусе с возможностью выполнять большинство атак, доступных на настольной системе.
Кроме инструментов Kali Linux, NetHunter включает в себя модифицированное ядро, позволяющее использовать встроенное в телефон или подключённое железо, например, Wi-Fi адаптеры, SDR — RTL-SDR (на основе RTL2832U), USB для специфических атак.
Для всего этого требуется:
- TWRP рекавери
- root права на телефоне
- модификация ядра оригинальной прошивки телефона
Каждый из этих пунктов может вызвать затруднения.
TWRP рекавери не может быть установлено на некоторые последние модели телефона из-за их внутренних изменений и усиления защиты, убирающей доступ к необходимым разделам.
Если отсутствует TWRP рекавери, то часто это означает невозможность получить root права.
Чтобы пропатчить оригинальное ядро прошивки, необходимо, чтобы исходные коды прошивки и ядра были открыты.
Как вы можете увидеть, нужно чтобы довольно много звёзд сложилось вместе, чтобы получить полноценный образ NetHunter для современной модели телефона. И это сказывается на списке полноценно поддерживаемых мобильных устройств: https://www.offensive-security.com/kali-linux-nethunter-download/
Список очень небольшой и там мало современных моделей и практически полностью отсутствуют телефоны, вышедшие за последние год-два. Пожалуй, самое свежее это OnePlus 7 / OnePlus 7 Pro Ten — этот телефон ещё можно найти на первичном рынке, но это ненадолго.
Авторы NetHunter понимают это лучше нас с вами и сделали версию NetHunter, не требующую root прав. По сути, этот облегчённый образ просто устанавливает приложения Kali Linux без возможности работать с железом телефона напрямую.
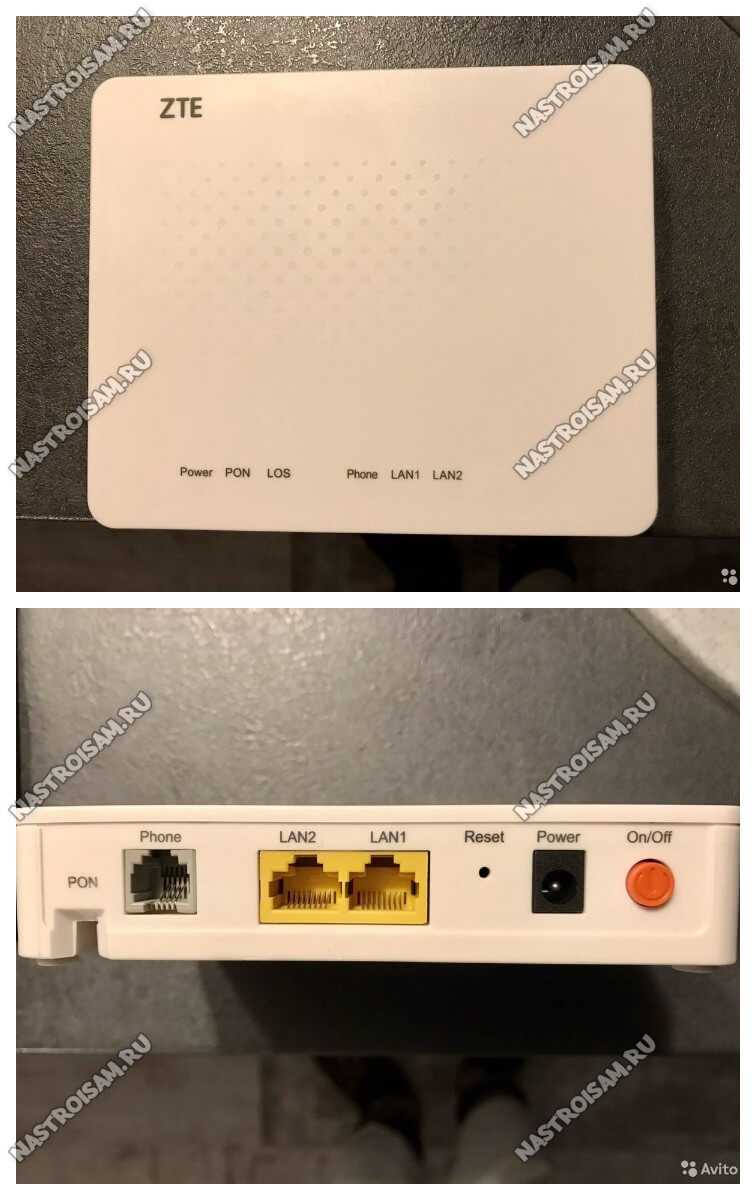
Оптические Интернет терминалы Low-уровня
В этот сегмент входят устройства доступа, которые ещё называют PON-розетка. Фактически это более «умный» медиаконвертер для пассивной оптики, имеющий WAN-порт с разъёмом SC, несколько LAN-портов и опционально телефонный разъём для подключения стационарного телефона.
![]()
Есть два варианта использования PON-розетки.Первый вариант — это простейший дешевый вариант подключения к Интернету. Тут всё понятно.Второй вариант — подойдёт для более продвинутых пользователей и подразумевает установку дополнительно Wi-Fi роутера или даже целой Mesh-системы. И вот я советую использовать именно такой вариант. Почему? Дело в том, что на момент написания статьи ни у одного производителя я не встречал ни одного оптического PON-терминала с WiFI, который имел бы хорошую зону покрытия. Как правило, она или плохая или так себе. И это не только у Ростелекома, но и у всех других операторов. Возможно у самого топового оптического роутера RT-X дела обстоят получше, но пока протестировать возможности не было. Так вот использование PON-розетки позволяет поставить хороший мощный роутер или МЕШ-систему и забыть о проблемах с беспроводной сетью.
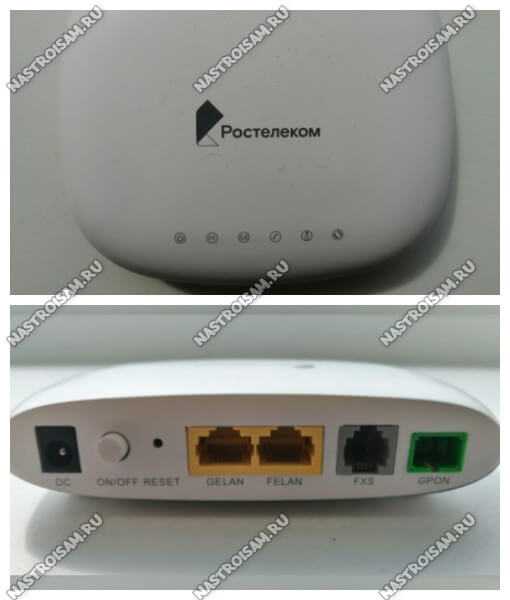
1. Huawei HG8120H (HW 867.A)
![]()
Самая распространённая и надёжная PON-розетка Ростелеком. Модель HG8120H широко используется у разных провайдеров и потому обычно не имеет проблем с совместимостью со станционными OLT-терминалами. На Авито можно купить достаточно дёшево.Порты:
1 х GPON тип SC/APC
1 x LAN GigabitEthernet 100/1000Base-T
1 x LAN FastEthernet 100Base-TХ
1 x POTS FXS
Прошивка Huawei HG8210H: скачать
Стандартный IP-адрес: 192.168.100.1
Авторизация:
PLOAM пароль — 1234567890 или 000000000
ПО Ростелеком: логин — admin, пароль admin, изменяется при первой настройки.
ПО Huawei:логин — telecomadmin, пароль – admintelecom
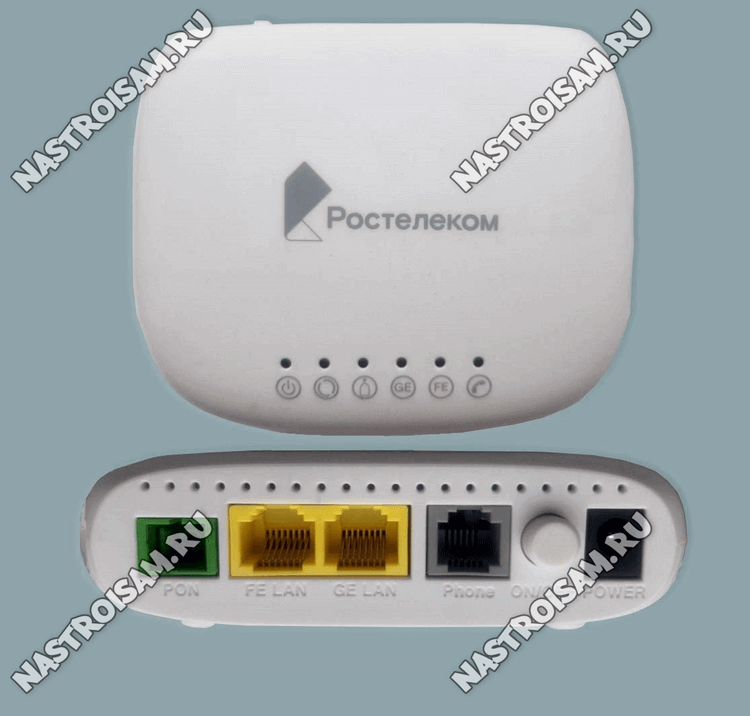
2. ZTE F612 (HW V6.0)
Ещё один достаточно распространённый упрощённый абонентский Интернет-терминал (PON-розетка) — ZTE F612. В представленной аппаратной версии HW Ver.6 является практически двойником Huawei HG8210H.
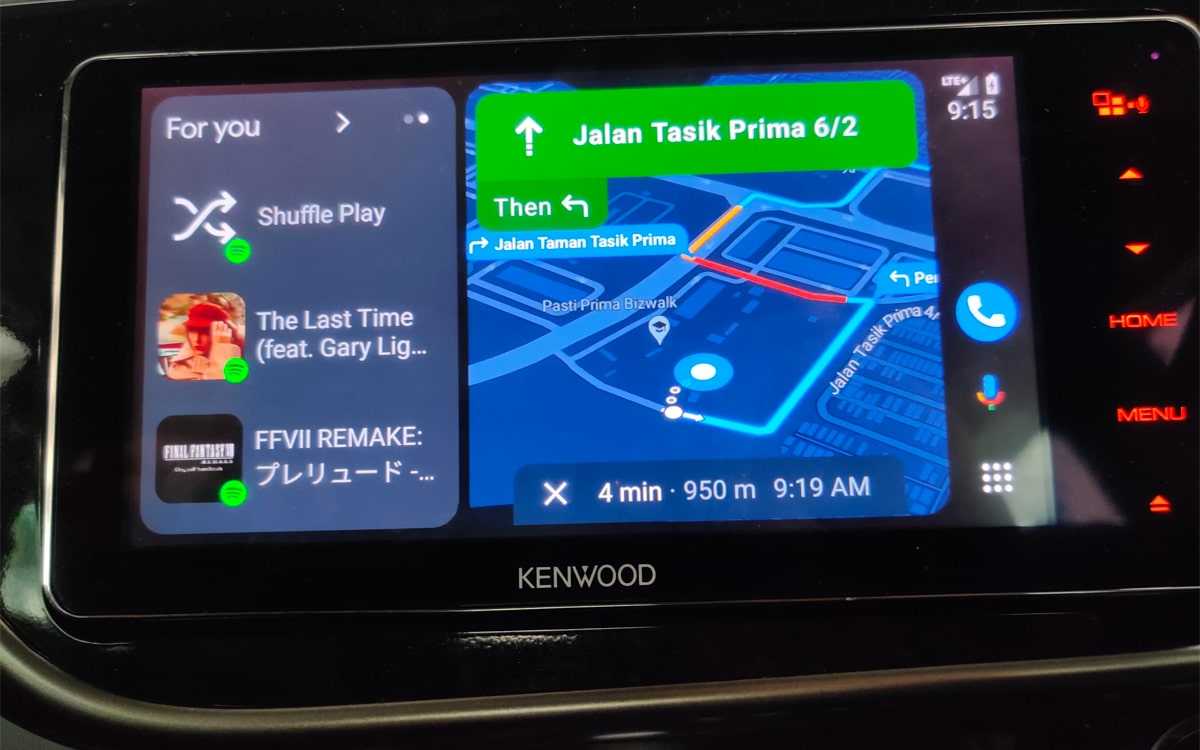
![Android auto coolwalk: download links, features, and release date [updated]](https://triathlon21.ru/wp-content/uploads/9/1/3/91373603efa21f76bf0a09e2fa394143.jpeg)

Порты:
1 х GPON тип SC/APC
1 x LAN GigabitEthernet 100/1000Base-T
1 x LAN FastEthernet 100Base-TХ
1 x POTS FXS
Прошивка ZTE F612: Скачать
Стандартный IP-адрес: 192.168.0.1
Авторизация: PLOAM пароль — 1234567890 или 000000000
логин — admin, пароль – при установке
Суперпользователь — superadmin, пароль Zte521zTE@ponXXXXX
где XXXXX — последние 5 символов GPON SN из наклейки.
3. Qtech QONT-RT-1G1F1V (HW V1.0)
Ну и третья разновидность гигабитная GPON-розетка Ростелеком в обычной компоновке. На сегодня это самая редко встречающаяся модель.
Порты:
1 х GPON тип SC/APC
1 x LAN GigabitEthernet 100/1000Base-T
1 x LAN FastEthernet 100Base-TХ
1 x POTS FXS
Прошивка Qtech QONT-RT-1G1F1V: Скачать
Стандартный IP-адрес: 192.168.0.1
логин — admin, пароль – уникальный, на наклейке
4. Rotek RTK6251 (HW: RTK6251)
Характеристики:
Чип — Realtek RTL9603
ПЗУ — 128 МБ
ОЗУ — 128 МБ
Порты:
1 х GPON тип SC/APC
1 x Gigabit Ethernet 100/1000Base-T
1 x Fast Ethernet 100Base-T
1 x POTS FXS RJ-11
Оптический терминал идёт в белом корпусе.
Прошивка Rotek RTK6251 — скачать
Стандартный IP-адрес: 192.168.0.1
логин — admin, пароль – уникальный, на наклейке
Troubleshooting and Tips for Coolwalk Android Auto
Coolwalk Android Auto is a car-interface app that allows users to connect their Android phones to their car stereos for a hands-free driving experience. It has a wide variety of features, including music playback, navigation, and voice-activated control. However, because it is such a complex app, it can be prone to errors. In this article, we will provide some tips for troubleshooting and fixing common errors with Coolwalk Android Auto.
One of the most common problems with Coolwalk Android Auto is that it can be slow to connect to the car stereo. If this is happening to you, make sure that your phone is fully charged and that you are using the latest version of the app. You may also want to try restarting your car and your phone, and disabling Bluetooth on your phone.
If you are having trouble connecting to the internet while using Coolwalk Android Auto, make sure that your car’s Wi-Fi is turned on and that your phone is connected to the correct network. You may also want to try disabling your phone’s data roaming.
If you are having trouble getting voice commands to work properly with Coolwalk Android Auto, make sure that your car’s microphone is turned on and that you are speaking clearly and slowly. You may also want to try disabling other apps that use the microphone, such as Skype or Google Voice.
Finally, if you are experiencing any other problems with Coolwalk Android Auto, you can try resetting the app to its default settings. To do this, go to the Settings menu on your phone and select Applications > Manage Applications > Coolwalk Android Auto > Clear Data.